
Specifications


20
The default settings of the “Adjust Size” menu is the next one: Horizontal 5 & Vertical 7
Once you have adjusted image, you have to calibrate the touch screen again, push on “Settings”, then push on
“Touch Screen”, and repeat the steps for calibration process mentioned before.
NOTE: Remember to do again a calibration of the touch screen after adjusting the image on the screen.
Even if you do this changes and you can’t adjust the image as much as you want, you can use the multimedia
interface image setting menu.
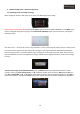
Now push the
◀ button of the multimedia interface remote control for 2 seconds to enter to the advanced
settings menu, this image will be shown:
Use ▲ or ▼ buttons of the remote control to select IMAGE in the menu, and push OK to enter. Now use ▲ or ▼
buttons of the remote control to select between the H-POSITION (Horizontal position) and V-POSITION (Vertical
position), once you have entered to one of the options, adjust it by using the ▲ or ▼ buttons of the remote control,
push OK to confirm.