
Specifications


19
Now, push the ◀ button for 5 seconds to enter to the interface advanced settings menu or push the following
button combination: ▲→ ▼→ ▲→ MENU.
Move the selector to UTIL, using ▲ or ▼ buttons of the remote control and push OK, push OK again on TOUCH
CALIBRATION, select YES option by the ▲ or ▼remote control buttons and push OK.
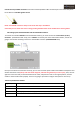
Once the OK button is pushed, it will appear the message “CALIBRATION” in the center of the screen, then, screen
will show a white wallpaper with a cross shape cursor in the center.
Push this cursor for aproximattely 2 sec. in the touch screen, once the cursor "+" is pushed it will change its position,
push it in all the screen zones where it appears until you receive the message “SUCCES”, this way you will have
calibrated successfully the touch screen, if while you are doing the calibration process appears the message “FAIL”,
you must repeat the process again.
At this way, you have configured the interface multimedia to be able to change the mode by touching, in NAVI
mode, hold on pushing the touch screen until appears the touch mode menu:
Push on the OEM touch screen button to enter to the original vehicle OEM's video mode, to go back to NAVI mode
from the OEM mode push briefly the touch screen.
Now you will have to adjust the screen’s image position, push on the “Settings” button, then push on the “Screen”
button, and finally on the “Ajust position” button, this way we will enter to the screen’s setting menu, adjust it using
the menu buttons. You can also use the “Adjust Size” button to adjust even more the screen's image.