
Diamond Storage Array Installation, Operations, Maintenance Manual
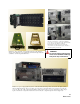
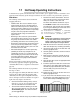
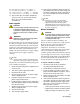


Table Of Contents
- Preface
- 1.0 Diamond Storage Array Product Overview
- 2.0 Diamond Storage Array Technical Overview
- 3.0 Installation Instructions
- 3.2 Physical Set Up
- 4.0 Determining Drive and Sled Designations
- 5.0 Accessing the Array
- Command Line Interface
- ATTO ExpressNAV
- In-band SCSI over Fibre Channel
- RS-232 port
- Ethernet port
- SNMP
- I/O details
- Browser compatibility
- Opening an ExpressNAV session
- Navigating ExpressNAV
- Exhibit 5.4-1 Atypical page in the ATTO ExpressNAV configuration tool.
- Status
- Ethernet
- SNMP
- Serial Port
- Fibre Channel
- Storage Management
- RAID
- Clear Data
- Logical Units
- Rebuild
- Configuration
- Advanced
- Restart
- Help
- FirmwareRestart
- Help
- RestoreConfiguration
- SaveConfiguration
- SystemSN
- VerboseMode
- EthernetSpeed
- FTPPassword
- IPAddress
- IPDHCP
- IPGateway
- IPSubnetMask
- SNMPTrapAddress
- SNMPTraps
- SNMPUpdates
- TelnetPassword
- TelnetTimeout
- TelnetUsername
- FcConnMode
- FcDataRate
- FcFairArb
- FcFrameLength
- FcFullDuplex
- FcHard
- FcHardAddress
- FcNodeName
- FcPortInfo
- FcPortList
- FcPortName
- FcWWName
- SerialPortBaudRate
- SerialPortEcho
- SerialPortHandshake
- SerialPortStopBits
- AudibleAlarm
- DiamondModel
- DiamondName
- DriveCopyStatus
- DriveInfo
- FcNodeName
- FcPortList
- FcPortName
- Help
- IdentifyDiamond
- Info
- LUNInfo
- SerialNumber
- SledFaultLED
- SMARTData
- Temperature
- VirtualDriveInfo
- FcScsiBusyStatus
- FirmwareRestart
- MaxEnclTempAlrm
- MinEnclTempAlrm
- Temperature
- Zmodem
- ATADiskState
- AutoRebuild
- ClearDiskReservedAreaData
- DriveCopy
- DriveCopyHalt
- DriveCopyResume
- DriveCopyStatus
- DriveInfo
- DriveSledPower
- DriveWipe
- IdeTransferRate
- LUNInfo
- LUNState
- QuickRAID0
- QuickRAID1
- QuickRAID5
- QuickRAID10
- RAID5ClearData
- RAID5ClearDataStatus
- RAIDInterleave
- RAIDHaltRebuild
- RAIDManualRebuild
- RAIDRebuildState
- RAIDRebuildStatus
- RAIDResumeRebuild
- RebuildPriority
- ResolveLUNConflicts
- RestoreModePages
- SledFaultLED
- VirtualDriveInfo
- 6.0 Configuring Drives
- JBOD (Just a Bunch of Disks)
- RAID Level 0
- RAID Level 1
- RAID Level 10
- RAID Level 5
- Interleave
- Hot Spare sleds
- Enhancing performance
- Sled-based versus disk-based
- Exhibit 6.2-1 Sled-based QuickRAID0 stripe groups with LUN designations in a fully populated Array set up as QuickRAID0 6 sled. If sled 6 were to be withdrawn from the array, LUN 3 (grayed boxes) would be unavailable.
- Exhibit 6.2-2 Drive-based QuickRAID0 stripe groups with LUN designations in a fully populated Array set up as QuickRAID0 6 Drive. If sled 6 were to be withdrawn from the array, LUNs 2 and 5 would be unavailable.
- Exhibit 6.2-3 Configurations of a fully populated Diamond Storage Array in RAID Level 0.
- Exhibit 6.3-1 Drive sleds, LUNs and mirror partners in a RAID Level 1 configuration.
- Hot Spare sleds
- Configuring a fully-populated array
- Configuring a partially-populated array
- Removing RAID groups
- Hot Spare sleds
- 7.0 Hardware Maintenance
- 8.0 Copying Drives
- 9.0 Updating Firmware
- 10.0 System Monitoring and Reporting
- RS-232 monitoring port and CLI
- Ethernet monitoring port and CLI
- Power On Self Test (POST)
- Ready LED
- Audible alarm
- Thermal monitoring
- Power supply monitoring
- System fault LED and error codes
- Disk drive activity and disk fault LEDs
- Windows 2000 special instructions
- Error messages
- Specific situations and suggestions
- Default
- Factory Default
- Appendix A ATA Disk Technology
- Appendix B Information Commands Results
- Appendix C Product Safety
- Appendix D Specifications
- Appendix E Warranty

77
ATTO Technology Inc. Diamond Storage Array Installation and Operation Manual
9.0 Updating Firmware
Engineers, technicians and/or system administrators/integrators may update the firmware of the
Diamond Storage Array using the Command Line Interface (CLI) or the Advanced CLI Configuration
page of the ExpressNAV interface (Refer to
ATTO ExpressNAV: Browser-based Interface
on page 25) via the
RS-232 serial port or the optional Ethernet management services card.
Updating firmware using the RS-232 serial
port
To update the firmware via a connection to the
RS-232 serial port, you will need
• a host computer with a terminal emulation
program such as HyperTerminal in Windows
• binary information file (“...”.ima) available from
technical support or on our website (refer to
Contact ATTO Technology, Inc.
on page viii)
• a null modem serial cable with a DB-9 connector
To update firmware
1 Connect to Diamond Storage Array services via
the RS-232 port (refer to
Accessing the Array
on
page 17). You should now be in the Command
Line Interface mode.
2 Copy the latest Diamond Storage Array image
file (“...”.ima) onto the host computer.
3Type
ZModem Receive at the Ready
prompt.
The terminal program on the host should be in
Zmodem only mode, with no other parameters.
4 On the terminal program, choose
Transfer Send File.
5 In the Send File box, enter the current Diamond
flash (“...”.ima) filename or click the browse
button to find it.
6Click Send File
7 The Diamond should acknowledge receiving
the file and display a message not to interrupt
power for 90 seconds.
8 When the flash procedure is complete, cycle
power on the array.
Updating firmware using the optional Ethernet card
To update the firmware via the optional Ethernet
management services card, you will need
• the optional Ethernet management services
card installed in your array
• a host computer with a network card or a
network-connected device such as a hub
• binary information file (“...”.ima) available from
technical support or on our website (refer to
Contact ATTO Technology, Inc.
on page viii)
• a crossover network cable for a direct connect or
standard network cable if attached to a network
device
• a valid IP address
Procedure
1 Connect a cross-over cable (for a direct
connection to a PC) or regular network cable
from a network device to the optional RJ45
Ethernet port on the Ethernet management
card on the front of the Diamond Storage Array.
Or, attach a DB-9 null modem serial cable from
the RS-232 port of the Diamond Array to a host
computer and open a terminal emulator
program on the host to set the Ethernet
parameters.
2 Power on and boot up the host computer.
3 Turn on the Diamond Storage Array.
CAUTIONCAUTION
Do not interrupt the flash process. If the
process is interrupted, the Diamond
Storage Array will become inoperable and
will have to be returned to the factory for
repair.
Do not turn off the Diamond Storage
Array until the display returns the Ready
prompt.