
Diamond Storage Array Installation, Operations, Maintenance Manual
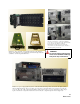


Table Of Contents
- Preface
- 1.0 Diamond Storage Array Product Overview
- 2.0 Diamond Storage Array Technical Overview
- 3.0 Installation Instructions
- 3.2 Physical Set Up
- 4.0 Determining Drive and Sled Designations
- 5.0 Accessing the Array
- Command Line Interface
- ATTO ExpressNAV
- In-band SCSI over Fibre Channel
- RS-232 port
- Ethernet port
- SNMP
- I/O details
- Browser compatibility
- Opening an ExpressNAV session
- Navigating ExpressNAV
- Exhibit 5.4-1 Atypical page in the ATTO ExpressNAV configuration tool.
- Status
- Ethernet
- SNMP
- Serial Port
- Fibre Channel
- Storage Management
- RAID
- Clear Data
- Logical Units
- Rebuild
- Configuration
- Advanced
- Restart
- Help
- FirmwareRestart
- Help
- RestoreConfiguration
- SaveConfiguration
- SystemSN
- VerboseMode
- EthernetSpeed
- FTPPassword
- IPAddress
- IPDHCP
- IPGateway
- IPSubnetMask
- SNMPTrapAddress
- SNMPTraps
- SNMPUpdates
- TelnetPassword
- TelnetTimeout
- TelnetUsername
- FcConnMode
- FcDataRate
- FcFairArb
- FcFrameLength
- FcFullDuplex
- FcHard
- FcHardAddress
- FcNodeName
- FcPortInfo
- FcPortList
- FcPortName
- FcWWName
- SerialPortBaudRate
- SerialPortEcho
- SerialPortHandshake
- SerialPortStopBits
- AudibleAlarm
- DiamondModel
- DiamondName
- DriveCopyStatus
- DriveInfo
- FcNodeName
- FcPortList
- FcPortName
- Help
- IdentifyDiamond
- Info
- LUNInfo
- SerialNumber
- SledFaultLED
- SMARTData
- Temperature
- VirtualDriveInfo
- FcScsiBusyStatus
- FirmwareRestart
- MaxEnclTempAlrm
- MinEnclTempAlrm
- Temperature
- Zmodem
- ATADiskState
- AutoRebuild
- ClearDiskReservedAreaData
- DriveCopy
- DriveCopyHalt
- DriveCopyResume
- DriveCopyStatus
- DriveInfo
- DriveSledPower
- DriveWipe
- IdeTransferRate
- LUNInfo
- LUNState
- QuickRAID0
- QuickRAID1
- QuickRAID5
- QuickRAID10
- RAID5ClearData
- RAID5ClearDataStatus
- RAIDInterleave
- RAIDHaltRebuild
- RAIDManualRebuild
- RAIDRebuildState
- RAIDRebuildStatus
- RAIDResumeRebuild
- RebuildPriority
- ResolveLUNConflicts
- RestoreModePages
- SledFaultLED
- VirtualDriveInfo
- 6.0 Configuring Drives
- JBOD (Just a Bunch of Disks)
- RAID Level 0
- RAID Level 1
- RAID Level 10
- RAID Level 5
- Interleave
- Hot Spare sleds
- Enhancing performance
- Sled-based versus disk-based
- Exhibit 6.2-1 Sled-based QuickRAID0 stripe groups with LUN designations in a fully populated Array set up as QuickRAID0 6 sled. If sled 6 were to be withdrawn from the array, LUN 3 (grayed boxes) would be unavailable.
- Exhibit 6.2-2 Drive-based QuickRAID0 stripe groups with LUN designations in a fully populated Array set up as QuickRAID0 6 Drive. If sled 6 were to be withdrawn from the array, LUNs 2 and 5 would be unavailable.
- Exhibit 6.2-3 Configurations of a fully populated Diamond Storage Array in RAID Level 0.
- Exhibit 6.3-1 Drive sleds, LUNs and mirror partners in a RAID Level 1 configuration.
- Hot Spare sleds
- Configuring a fully-populated array
- Configuring a partially-populated array
- Removing RAID groups
- Hot Spare sleds
- 7.0 Hardware Maintenance
- 8.0 Copying Drives
- 9.0 Updating Firmware
- 10.0 System Monitoring and Reporting
- RS-232 monitoring port and CLI
- Ethernet monitoring port and CLI
- Power On Self Test (POST)
- Ready LED
- Audible alarm
- Thermal monitoring
- Power supply monitoring
- System fault LED and error codes
- Disk drive activity and disk fault LEDs
- Windows 2000 special instructions
- Error messages
- Specific situations and suggestions
- Default
- Factory Default
- Appendix A ATA Disk Technology
- Appendix B Information Commands Results
- Appendix C Product Safety
- Appendix D Specifications
- Appendix E Warranty

71
ATTO Technology Inc. Diamond Storage Array Installation and Operation Manual
7.1 Hot Swap Operating Instructions
To maintain array up time, individual disk drive sled assemblies, power supplies and blower assemblies can be
replaced with the unit fully operational. Special instructions need to be followed to perform these operations.
Disk drives
The following cautions must be observed when hot
swapping disk drives.
• Individual disk drive sled assemblies may be
replaced while the array is operating with no
other intervention only if there is absolutely no
activity on that drive. Failure to ensure no activity
may destroy any data on that drive and possibly
stop the entire array operation. Follow the
instructions below using CLI commands to
replace drives.
• Removing a drive sled that is part of a RAID
Level 0 group will result in the loss of all data in
the groups associated with that sled. Follow
your backup procedures when removing sleds.
• Do not leave empty openings on the front or rear
of the array under any circumstances. Empty
openings affect airflow and may cause the unit
to overheat and shut down.
• All modular components must be replaced by
qualified personnel only. Components are
electrostatic sensitive. Use a static wriststrap
when handling any of the cards inside the array.
Use proper grounding methods. Always store
spare components in proper ESD containers
when not in use.
Follow your backup procedures before removing a
sled. You may copy drives using the appropriate CLI
commands (Refer to
Drive Configuration Commands
on
page 45).
The following method is the safest way to perform a
hot swap of a drive.
The general approach: identify the disk drive sled to be
replaced, take it offline using the appropriate CLI
commands, turn off its power using CLI commands,
remove and replace with a new disk drive sled, power
up the new sled, and place back on line.
1 Connect to Diamond Storage Array services
(refer to
Accessing the Array
on page 17) and
enter the Command Line Interface mode.
2 The fault LED should be blinking on the disk
drive sled to be replaced. If it is not, type set
SledFaultLED [n] on. The LED of the drive
you want [n] will light.
3 Determine the Drive Sled Number. The disk
drive sled closest to the management card is
always the number 1 disk drive sled
The Drive Sled Number identified in step 2 is
the SledNum variable to be entered into the
CLI commands. Take the disk drive sled offline
by entering the following CLI commands at the
control computer Ready prompt
Set AtaDiskState (SledNum, 1, OFFLINE)
Set AtaDiskState (SledNum, 2, OFFLINE)
Set DriveSledPower (SledNum, OFF)
CAUTIONCAUTION
In a Hot Spare configuration, a drive sled should
only be taken offline if there is absolutely no
activity on that drive. If there is any activity, the
rebuild of the Hot Spare sled may be flawed.
4 Wait 30 seconds for the disk drive sled to spin
down and complete any remaining I/O activity.
5 Unscrew the two screws on the disk drive sled
with the appropriate tool.
6 Carefully pull the disk drive sled out of chassis
using its handle.
7 Mark or tag the disk drive sled with the array
serial number, the date removed, and its slot
number.
8 Place the disk drive sled in an appropriate ESD
container or bag.
9 Install the replacement disk drive sled into the
array chassis using proper ESD control steps
and with the proper orientation (The disk drive
sled assembly is keyed and can only be
inserted one way).
10 Tighten the two screws on the disk drive sled
with the appropriate tool.
11 If you do not have
AutoRebuild enabled
, using
the disk drive sled number identified in step 2,
on the control computer Ready
prompt type
1 2 3 4 5 6 7 8 9 1 0 11 12
Drive Sleds
Management Card