
Diamond Storage Array Installation, Operations, Maintenance Manual

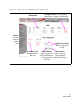
Table Of Contents
- Preface
- 1.0 Diamond Storage Array Product Overview
- 2.0 Diamond Storage Array Technical Overview
- 3.0 Installation Instructions
- 3.2 Physical Set Up
- 4.0 Determining Drive and Sled Designations
- 5.0 Accessing the Array
- Command Line Interface
- ATTO ExpressNAV
- In-band SCSI over Fibre Channel
- RS-232 port
- Ethernet port
- SNMP
- I/O details
- Browser compatibility
- Opening an ExpressNAV session
- Navigating ExpressNAV
- Exhibit 5.4-1 Atypical page in the ATTO ExpressNAV configuration tool.
- Status
- Ethernet
- SNMP
- Serial Port
- Fibre Channel
- Storage Management
- RAID
- Clear Data
- Logical Units
- Rebuild
- Configuration
- Advanced
- Restart
- Help
- FirmwareRestart
- Help
- RestoreConfiguration
- SaveConfiguration
- SystemSN
- VerboseMode
- EthernetSpeed
- FTPPassword
- IPAddress
- IPDHCP
- IPGateway
- IPSubnetMask
- SNMPTrapAddress
- SNMPTraps
- SNMPUpdates
- TelnetPassword
- TelnetTimeout
- TelnetUsername
- FcConnMode
- FcDataRate
- FcFairArb
- FcFrameLength
- FcFullDuplex
- FcHard
- FcHardAddress
- FcNodeName
- FcPortInfo
- FcPortList
- FcPortName
- FcWWName
- SerialPortBaudRate
- SerialPortEcho
- SerialPortHandshake
- SerialPortStopBits
- AudibleAlarm
- DiamondModel
- DiamondName
- DriveCopyStatus
- DriveInfo
- FcNodeName
- FcPortList
- FcPortName
- Help
- IdentifyDiamond
- Info
- LUNInfo
- SerialNumber
- SledFaultLED
- SMARTData
- Temperature
- VirtualDriveInfo
- FcScsiBusyStatus
- FirmwareRestart
- MaxEnclTempAlrm
- MinEnclTempAlrm
- Temperature
- Zmodem
- ATADiskState
- AutoRebuild
- ClearDiskReservedAreaData
- DriveCopy
- DriveCopyHalt
- DriveCopyResume
- DriveCopyStatus
- DriveInfo
- DriveSledPower
- DriveWipe
- IdeTransferRate
- LUNInfo
- LUNState
- QuickRAID0
- QuickRAID1
- QuickRAID5
- QuickRAID10
- RAID5ClearData
- RAID5ClearDataStatus
- RAIDInterleave
- RAIDHaltRebuild
- RAIDManualRebuild
- RAIDRebuildState
- RAIDRebuildStatus
- RAIDResumeRebuild
- RebuildPriority
- ResolveLUNConflicts
- RestoreModePages
- SledFaultLED
- VirtualDriveInfo
- 6.0 Configuring Drives
- JBOD (Just a Bunch of Disks)
- RAID Level 0
- RAID Level 1
- RAID Level 10
- RAID Level 5
- Interleave
- Hot Spare sleds
- Enhancing performance
- Sled-based versus disk-based
- Exhibit 6.2-1 Sled-based QuickRAID0 stripe groups with LUN designations in a fully populated Array set up as QuickRAID0 6 sled. If sled 6 were to be withdrawn from the array, LUN 3 (grayed boxes) would be unavailable.
- Exhibit 6.2-2 Drive-based QuickRAID0 stripe groups with LUN designations in a fully populated Array set up as QuickRAID0 6 Drive. If sled 6 were to be withdrawn from the array, LUNs 2 and 5 would be unavailable.
- Exhibit 6.2-3 Configurations of a fully populated Diamond Storage Array in RAID Level 0.
- Exhibit 6.3-1 Drive sleds, LUNs and mirror partners in a RAID Level 1 configuration.
- Hot Spare sleds
- Configuring a fully-populated array
- Configuring a partially-populated array
- Removing RAID groups
- Hot Spare sleds
- 7.0 Hardware Maintenance
- 8.0 Copying Drives
- 9.0 Updating Firmware
- 10.0 System Monitoring and Reporting
- RS-232 monitoring port and CLI
- Ethernet monitoring port and CLI
- Power On Self Test (POST)
- Ready LED
- Audible alarm
- Thermal monitoring
- Power supply monitoring
- System fault LED and error codes
- Disk drive activity and disk fault LEDs
- Windows 2000 special instructions
- Error messages
- Specific situations and suggestions
- Default
- Factory Default
- Appendix A ATA Disk Technology
- Appendix B Information Commands Results
- Appendix C Product Safety
- Appendix D Specifications
- Appendix E Warranty

23
ATTO Technology Inc. Diamond Storage Array Installation and Operation Manual
5.3 Ethernet Access: Telnet and SNMP Protocols
The optional 10/100 BaseT Ethernet port provides Telnet- or SNMP-based monitoring and management.
The 10/100 Base T Ethernet management services
card provides Telnet-based monitoring and
management, including firmware update using
FTP.
Remote system monitoring is also available using
Simple Network Management Protocol (SNMP).
An agent resides in the array which takes
information from the Array and translates it into a
form compatible with SNMP. If certain conditions
arise, the agent sends asynchronous notifications
(traps) to a client.
To connect to the Ethernet port
1 Connect a cross-over cable (for a direct
connection to a PC) or regular network cable
from a network device to the optional RJ45
Ethernet port on the Ethernet management
card on the front of the array.
2 If using a direct connection, power on and boot
up the host computer.
3 Attach a DB-9 null modem serial cable (the
cable must be no longer than three meters)
from the RS-232 port of the array to a host
computer and open a terminal emulator
program on the host to set the Ethernet
parameters. Turn on the array.
4 First time use: Upon successful power up and
diagnostics, set the host computer with the
appropriate settings.
The host computer must have appropriate
network settings to allow it to communicate with
the array. Please see your system
administrator for more information.
To use Telnet
1 If you have not already done so, change the IP
address from the default by first accessing the
serial connection and changing it using the CLI.
Change the IP address to a network specific
value or, if the local network uses DHCP, you
may enable automatic IP addressing (set
IPDHCP enabled) using the CLI.
2 Open a Telnet session on the host computer.
• IP address
• Port type: telnet
• Terminal type:
vt100
3 If you make any changes to the network setting
on the Diamond Array, use the
SaveConfiguration and FirmwareRestart
commands.
4 Username/password: You will be prompted for
a username and password, up to eight
characters each, case insensitive. Only one
username/password combination is available
per array.
• You may change the telnet username and/or
password after entering a CLI session using
the commands
set TelnetUsername [username]
set TelnetPassword [password]
• Or change the telnet username and/or
password using the ExpressNAV interface
Configuration page.
• RestoreConfiguration default sets the
telnet username and password to the default
values.
• The username default is telnet.and
password default is diamond.
5 You should now be in the CLI. To see a list of
available commands, type help at the
Ready
prompt or refer to this manual’s Index. Or,
access the ExpressNAV interface (refer to
ATTO ExpressNAV: Browser-based Interface
on
page 25).
6 Configure the unit as a JBOD, RAID Level 0,
RAID Level 1, RAID Level 10 or RAID Level 5
array with or without hot spare sleds as
described later in the manual.
To use SNMP
1 Enter the CLI through the serial port or
Ethernet.
2 Change the IP address to a network specific
value or, if the local network uses DHCP, you
may enable automatic IP addressing.
3 Set the number of trap client addresses by
typing
set SNMPTrapAddress [1-6] [IPAddress]
[Level]