
Diamond Storage Array Installation, Operations, Maintenance Manual

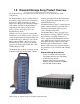

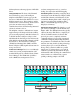

Table Of Contents
- Preface
- 1.0 Diamond Storage Array Product Overview
- 2.0 Diamond Storage Array Technical Overview
- 3.0 Installation Instructions
- 3.2 Physical Set Up
- 4.0 Determining Drive and Sled Designations
- 5.0 Accessing the Array
- Command Line Interface
- ATTO ExpressNAV
- In-band SCSI over Fibre Channel
- RS-232 port
- Ethernet port
- SNMP
- I/O details
- Browser compatibility
- Opening an ExpressNAV session
- Navigating ExpressNAV
- Exhibit 5.4-1 Atypical page in the ATTO ExpressNAV configuration tool.
- Status
- Ethernet
- SNMP
- Serial Port
- Fibre Channel
- Storage Management
- RAID
- Clear Data
- Logical Units
- Rebuild
- Configuration
- Advanced
- Restart
- Help
- FirmwareRestart
- Help
- RestoreConfiguration
- SaveConfiguration
- SystemSN
- VerboseMode
- EthernetSpeed
- FTPPassword
- IPAddress
- IPDHCP
- IPGateway
- IPSubnetMask
- SNMPTrapAddress
- SNMPTraps
- SNMPUpdates
- TelnetPassword
- TelnetTimeout
- TelnetUsername
- FcConnMode
- FcDataRate
- FcFairArb
- FcFrameLength
- FcFullDuplex
- FcHard
- FcHardAddress
- FcNodeName
- FcPortInfo
- FcPortList
- FcPortName
- FcWWName
- SerialPortBaudRate
- SerialPortEcho
- SerialPortHandshake
- SerialPortStopBits
- AudibleAlarm
- DiamondModel
- DiamondName
- DriveCopyStatus
- DriveInfo
- FcNodeName
- FcPortList
- FcPortName
- Help
- IdentifyDiamond
- Info
- LUNInfo
- SerialNumber
- SledFaultLED
- SMARTData
- Temperature
- VirtualDriveInfo
- FcScsiBusyStatus
- FirmwareRestart
- MaxEnclTempAlrm
- MinEnclTempAlrm
- Temperature
- Zmodem
- ATADiskState
- AutoRebuild
- ClearDiskReservedAreaData
- DriveCopy
- DriveCopyHalt
- DriveCopyResume
- DriveCopyStatus
- DriveInfo
- DriveSledPower
- DriveWipe
- IdeTransferRate
- LUNInfo
- LUNState
- QuickRAID0
- QuickRAID1
- QuickRAID5
- QuickRAID10
- RAID5ClearData
- RAID5ClearDataStatus
- RAIDInterleave
- RAIDHaltRebuild
- RAIDManualRebuild
- RAIDRebuildState
- RAIDRebuildStatus
- RAIDResumeRebuild
- RebuildPriority
- ResolveLUNConflicts
- RestoreModePages
- SledFaultLED
- VirtualDriveInfo
- 6.0 Configuring Drives
- JBOD (Just a Bunch of Disks)
- RAID Level 0
- RAID Level 1
- RAID Level 10
- RAID Level 5
- Interleave
- Hot Spare sleds
- Enhancing performance
- Sled-based versus disk-based
- Exhibit 6.2-1 Sled-based QuickRAID0 stripe groups with LUN designations in a fully populated Array set up as QuickRAID0 6 sled. If sled 6 were to be withdrawn from the array, LUN 3 (grayed boxes) would be unavailable.
- Exhibit 6.2-2 Drive-based QuickRAID0 stripe groups with LUN designations in a fully populated Array set up as QuickRAID0 6 Drive. If sled 6 were to be withdrawn from the array, LUNs 2 and 5 would be unavailable.
- Exhibit 6.2-3 Configurations of a fully populated Diamond Storage Array in RAID Level 0.
- Exhibit 6.3-1 Drive sleds, LUNs and mirror partners in a RAID Level 1 configuration.
- Hot Spare sleds
- Configuring a fully-populated array
- Configuring a partially-populated array
- Removing RAID groups
- Hot Spare sleds
- 7.0 Hardware Maintenance
- 8.0 Copying Drives
- 9.0 Updating Firmware
- 10.0 System Monitoring and Reporting
- RS-232 monitoring port and CLI
- Ethernet monitoring port and CLI
- Power On Self Test (POST)
- Ready LED
- Audible alarm
- Thermal monitoring
- Power supply monitoring
- System fault LED and error codes
- Disk drive activity and disk fault LEDs
- Windows 2000 special instructions
- Error messages
- Specific situations and suggestions
- Default
- Factory Default
- Appendix A ATA Disk Technology
- Appendix B Information Commands Results
- Appendix C Product Safety
- Appendix D Specifications
- Appendix E Warranty

6
Installation
4 Enter this address into your browser.
5 The ATTO ExpressNAV screen appears. Log in
using the Telnet defaults:
Username: Telnet
Password: Diamond
6 Follow the screens to find information about the
array or to configure the array from the factory-
default settings. The Diamond Storage Array
may be set up in a JBOD, RAID Level 0, 5 or 10
configuration with or without Hot Spare sleds
If the Diamond Storage Array is not attached to
a DHCP server and you wish to change the
defaults
1 At the Ready prompt after POST (see above),
type set IPAddress [desired IP address].
2Type set IPSubnetMask [desired IP Subnet
Mask]
3Type set IPGateway [desired IP Gateway]
4Type SaveConfiguration Restart to save the
configuration and restart the Diamond Storage
Array
5 After the powerup and POST complete, type
the IP address from step 1 above into your
browser.
6 The ATTO ExpressNAV screen appears. After
logging in (refer to Step 2b: connect to
Ethernet, Step 5 on page 6), follow the screens
to find information about the array or to
configure the array from the factory-default
settings. The Diamond Storage Array may be
set up in a JBOD, RAID Level 0, 1, 5 or 10
configuration with or without Hot Spare sleds.
Step 3: set up RAID configuration
The simplest way to set up configurations is to use
the ExpressNAV interface. Refer to
ATTO
ExpressNAV: Browser-based Interface
on page 23 for
more information on the interface. After logging
in (refer to
Step 2b: connect to Ethernet
, Step 5 on
page 6
), follow the screens to find information
about the array or to configure the array from the
factory-default settings
.
You may the CLI, the
QuickRAID
commands
to
set up RAID and hot spare sleds, if required.
• Each Hot Spare sled configuration requires
a certain number of Hot Spare sleds. These
sleds, once designated as Hot Spares, are
not available for other use.
• RAID Level 10: 10 drive sleds and two Hot
Spare sleds (sleds 11 and 12).
Note
All arrays using RAID level 10 and Hot Spare
sled options must be fully populated.
• RAID Level 5: 10 drive sleds and two Hot
Spare sleds (sleds 11 and 12)
• RAID Level 5: five drive sleds (sled positions
1 through 5) and one Hot Spare sled (sled
12).