
Diamond Storage Array Installation, Operations, Maintenance Manual

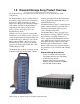
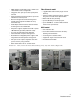

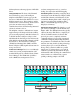

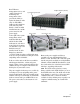
Table Of Contents
- Preface
- 1.0 Diamond Storage Array Product Overview
- 2.0 Diamond Storage Array Technical Overview
- 3.0 Installation Instructions
- 3.2 Physical Set Up
- 4.0 Determining Drive and Sled Designations
- 5.0 Accessing the Array
- Command Line Interface
- ATTO ExpressNAV
- In-band SCSI over Fibre Channel
- RS-232 port
- Ethernet port
- SNMP
- I/O details
- Browser compatibility
- Opening an ExpressNAV session
- Navigating ExpressNAV
- Exhibit 5.4-1 Atypical page in the ATTO ExpressNAV configuration tool.
- Status
- Ethernet
- SNMP
- Serial Port
- Fibre Channel
- Storage Management
- RAID
- Clear Data
- Logical Units
- Rebuild
- Configuration
- Advanced
- Restart
- Help
- FirmwareRestart
- Help
- RestoreConfiguration
- SaveConfiguration
- SystemSN
- VerboseMode
- EthernetSpeed
- FTPPassword
- IPAddress
- IPDHCP
- IPGateway
- IPSubnetMask
- SNMPTrapAddress
- SNMPTraps
- SNMPUpdates
- TelnetPassword
- TelnetTimeout
- TelnetUsername
- FcConnMode
- FcDataRate
- FcFairArb
- FcFrameLength
- FcFullDuplex
- FcHard
- FcHardAddress
- FcNodeName
- FcPortInfo
- FcPortList
- FcPortName
- FcWWName
- SerialPortBaudRate
- SerialPortEcho
- SerialPortHandshake
- SerialPortStopBits
- AudibleAlarm
- DiamondModel
- DiamondName
- DriveCopyStatus
- DriveInfo
- FcNodeName
- FcPortList
- FcPortName
- Help
- IdentifyDiamond
- Info
- LUNInfo
- SerialNumber
- SledFaultLED
- SMARTData
- Temperature
- VirtualDriveInfo
- FcScsiBusyStatus
- FirmwareRestart
- MaxEnclTempAlrm
- MinEnclTempAlrm
- Temperature
- Zmodem
- ATADiskState
- AutoRebuild
- ClearDiskReservedAreaData
- DriveCopy
- DriveCopyHalt
- DriveCopyResume
- DriveCopyStatus
- DriveInfo
- DriveSledPower
- DriveWipe
- IdeTransferRate
- LUNInfo
- LUNState
- QuickRAID0
- QuickRAID1
- QuickRAID5
- QuickRAID10
- RAID5ClearData
- RAID5ClearDataStatus
- RAIDInterleave
- RAIDHaltRebuild
- RAIDManualRebuild
- RAIDRebuildState
- RAIDRebuildStatus
- RAIDResumeRebuild
- RebuildPriority
- ResolveLUNConflicts
- RestoreModePages
- SledFaultLED
- VirtualDriveInfo
- 6.0 Configuring Drives
- JBOD (Just a Bunch of Disks)
- RAID Level 0
- RAID Level 1
- RAID Level 10
- RAID Level 5
- Interleave
- Hot Spare sleds
- Enhancing performance
- Sled-based versus disk-based
- Exhibit 6.2-1 Sled-based QuickRAID0 stripe groups with LUN designations in a fully populated Array set up as QuickRAID0 6 sled. If sled 6 were to be withdrawn from the array, LUN 3 (grayed boxes) would be unavailable.
- Exhibit 6.2-2 Drive-based QuickRAID0 stripe groups with LUN designations in a fully populated Array set up as QuickRAID0 6 Drive. If sled 6 were to be withdrawn from the array, LUNs 2 and 5 would be unavailable.
- Exhibit 6.2-3 Configurations of a fully populated Diamond Storage Array in RAID Level 0.
- Exhibit 6.3-1 Drive sleds, LUNs and mirror partners in a RAID Level 1 configuration.
- Hot Spare sleds
- Configuring a fully-populated array
- Configuring a partially-populated array
- Removing RAID groups
- Hot Spare sleds
- 7.0 Hardware Maintenance
- 8.0 Copying Drives
- 9.0 Updating Firmware
- 10.0 System Monitoring and Reporting
- RS-232 monitoring port and CLI
- Ethernet monitoring port and CLI
- Power On Self Test (POST)
- Ready LED
- Audible alarm
- Thermal monitoring
- Power supply monitoring
- System fault LED and error codes
- Disk drive activity and disk fault LEDs
- Windows 2000 special instructions
- Error messages
- Specific situations and suggestions
- Default
- Factory Default
- Appendix A ATA Disk Technology
- Appendix B Information Commands Results
- Appendix C Product Safety
- Appendix D Specifications
- Appendix E Warranty

5
ATTO Technology Inc. Diamond Storage Array Installation and Operation Manual
3.0 Installation Instructions
If you are familiar with the Diamond Storage Array, Fibre Channel, SCSI and RAID configurations, you
may set up and configure the Diamond Storage Array using these instructions. Find details, illustrations
and other guidance for more involved operations and special cases in the rest of this manual.
CAUTIONCAUTION
Before configuring the Diamond Storage
Array, ensure that any computer data to be
stored on the array is properly backed up
and verified. The operation and storage of
computer data on any disk storage array
should be accompanied by a regular
program of computer data backups and
verification for the data stored on such an
array.
The Manufacturer is not responsible for the
loss of any data stored on the Diamond
Storage Array under any circumstances
and any special, incidental, or
consequential damages that may result
thereof.
Three major steps are required to set up the
Diamond Storage Array
1 Physically set up Diamond Storage Array
2 Connect to Ethernet
3 Configure the drives
Step 1: physical setup
1 Make sure the Diamond Storage Array is
mounted properly and has adequate air flow
around it.
2 Insert the appropriate connector into the
interface card in the back of the Diamond
Storage Array.
3 Connect the Fibre Channel or SCSI cable from
your host computer system to the connector. To
use ExpressNAV browser-based management
interface and configure your Diamond Storage
Array, you must connect to the Ethernet port.
4 To set up the Ethernet connection: connect a
cross-over cable (for a direct connection to a
PC) or regular network cable from a network
device to the RJ45 Ethernet port on the
Ethernet management card on the front of the
Diamond Storage Array.
Step 2a: set up the Ethernet connection
The Diamond Storage Array supports service
operations over the RS-232 serial port using
standard terminal emulation software available
with most systems.
1 Connect a DB-9 null modem serial cable
between the port marked RS-232 on the front of
the Diamond Storage Array and the computer’s
serial port. The cable must be no longer than
three meters.
2 Make sure the power switches on the power
supplies on the rear of the unit are in the Stand-
by position.
3 Plug in the power cords to the back of the unit,
then into an appropriate power source (100-240
VAC).
4 Reboot your host computer system.
5 Press the Stand-by power switch for each
power supply on the Diamond Storage Array to
the ON position.
6 Upon successful power up and diagnostics, the
unit displays the POST (power up self test)
information.
The Diamond is now in Command Line Interface
mode. You may modify the setup of the Diamond
Storage Array using the CLI (refer to
CLI: Interface
via ASCII-based Commands
on page 27), but the
easiest method to configure the array is by using
ATTO ExpressNAV software, a graphical user
management interface accessed through a
standard Internet browser. Refer to
ATTO
ExpressNAV: Browser-based Interface
on page 23.
Step 2b: connect to Ethernet
If the Diamond Storage Array is attached to a
DHCP server
1 At the Ready prompt after POST (refer to Step
6 above), type set IPDHCP enabled
2Type SaveConfiguration Restart
3At the Ready prompt after POST (see above),
type get IPAddress