COMMERCIAL 8QT ERGO BACKPACK VACUUM OWNER’S MANUAL Model: C8EVB 120V 12A, 1400W ETL US Canada Atrix 1350 Larc Industrial Blvd. Burnsville, MN 55337 www.atrix.com sales@atrix.com Telephone: 952.894.6154 Toll Free Telephone: 800.222.6154 Fax: 952.894.
IMPORTANT SAFETY INSTRUCTIONS When using an electrical appliance, basic precautions should always be followed, including the following: READ ALL INSTRUCTIONS BEFORE USING APPLIANCE WARNING: TO REDUCE THE RISK OF FIRE, ELECTRICAL SHOCK OR INJURY: 1. Do not leave appliance when plugged in. Unplug from outlet when not in use and before servicing. 2. Electrical shock may occur if used outdoors or on wet surfaces. 3. Do not allow to be used as a toy. Close attention is necessary when used by or near children. 4.
13. Turn off all controls before unplugging. 14. Use extra care when cleaning on stairs. 15. Do not use to pick up any liquids, including flammable or combustible liquids such as gasoline or use in areas where they may be present. 16. Connect to a properly grounded outlet only. 17.
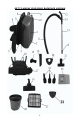
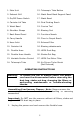
GET TO KNOW YOUR ERGO BACKPACK VACUUM 4
1. Main Unit 15. Telescopic Tube Button 2. Exhaust Grill 16. Waist Band Back Support Panel 3. On/Off Power Switch 17. Waist Band 4. Canister Lid Tabs 18. Oval Dusting Brush 5. Waist Band 19. Crevice Tool 6. Shoulder Straps 20. Blowing Port 7. Back Board Panel 21. Furniture Nozzle 8. Carry Handle 22. Floor to Carpet Brush 9. Hose Inlet 23. Exhaust Filter 10. Canister Lid 24. Blowing attachments 11. Flexible Hose 25. HEPA Dust Bag 12. Flexible Hose Handle 26. Shake-Out Bag 13.
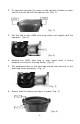
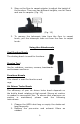
2. To open the canister lid, press on the canister lid tabs on each side of the unit and lift the canister lid. (Fig. 1) (Fig. 1) 3. Pull the tab on the HEPA dust bag holder out slightly and flip upwards. (Fig. 2) (Fig. 2) 4. Holding the HEPA dust bag in your hand, slide it firmly between the slots in the bag holder. (Fig. 2) 5. The cardboard face to the new bag should rest securely in the dust bag cover guidelines. (Fig. 3) (Fig. 3) 6. Ensure that the shake-out bag is in place. (Fig. 4) (Fig.
. Flip the HEPA bag holder over, pressing the tab on the bag holder until it clicks, then replace the canister lid. 8. The canister lid can be replaced on the unit with the hose opening on the right or left, as per your preference. (Fig. 5) (Fig. 5) Attaching the Flexible Hose to the Vacuum The flexible hose should be connected to the vacuum before strapping the unit to your back. 1.
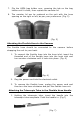
2. Push forward on the plastic button and pull the inner tube outward to extend for a longer reach. (Fig. 8) (Fig. 8) 3. To remove the telescopic tube from the flexible hose, pull on the telescopic tube and flexible hose handle to pull it out. Note: Always remove the power plug from the wall outlet before attaching or removing accessories. Manual Suction Control Your vacuum cleaner includes a manual variable suction control on the flexible hose handle.
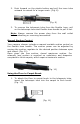
2. Step on the floor to carpet selector to adjust the height of the brushes. There are two different heights, one for floors and one for carpets. (Fig. 12) (Fig. 12) 3. To remove the telescopic tube from the floor to carpet brush, pull the telescopic tube out from the floor to carpet brush. Using the Attachments Oval Dusting Brush The dusting brush is used for furniture. Crevice Tool Use for radiators, crevices, corners, baseboards and between cushions.
3. Ensure that the rotating brush is kept free of hair and string, which may accumulate and decrease brush performance. 4. To attach the air driven turbo brush, insert the telescopic tube into the air driven turbo brush. 5. To adjust the suction control on the air driven turbo brush, slide the suction control for more or less as desired.
3. To place the power port into the exhaust outlet, align the lower tabs on the blower port with the slots on the exhaust. Pull up on the exhaust tab and push the tab and push the top of the blower port until it snaps into place. (Fig. 14) (Fig. 14) 4. To attach the hose to the blower port, align the flexible hose and turn counter-clockwise until it stops. The hose is now securely in place. (Fig. 15) (Fig. 15) 5.
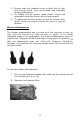
Using the Blower Attachments The blower attachments are extremely useful for vacuuming in hard-to-reach crevices and small compartments such as in cars. Important Note: When blocking the air holes. Grasp the blower attachment firmly so that they do not blow off. Do not use blower function to clear dust of fragile or delicate objects unless they are secured or held firmly in place as the blower action is quite strong and may cause damage. Using Your Vacuum 1.
Removing & Replacing HEPA Dust Bag Important Note: DO NOT use the vacuum without all filters, shake-out bag, and with or without HEPA dust bag in place. 1. To remove the HEPA dust bag, press on the canister lid tabs on each side of the unit and lift canister lid. (Fig. 18) (Fig. 18) 2. Pull the tab on the HEPA dust bag holder out slightly and flip upwards. 3. Hold the HEPA dust bag in your hand, slide it out from the slots in the bag holder.
Cleaning & Replacing the Shake-Out Bag - Note: Clean the shake-out bag outdoors when changing the HEPA dust bag. Optimum performance is achieved by using the HEPA dust bag with the shakeout bag decreasing the need for washing the shake-out bag. Cleaning & Replacing when used with the HEPA Dust Bag: 1. Replace the shake-out bag, holding the handle at the bottom of the bag, shake outdoors vigorously over a garbage receptacle until there is no more dust. 2. Inspect shake-out bag regularly for tears or damage.
least once a decreased.
Ergo Backpack Schematic Product SKU: C8EVB 16
Atrix Commercial 8Qt ERGO Backpack Vacuum WARRANTY INFORMATION Warranty/Service Information: For warranty service information, please contact Atrix or your local Atrix distributor. Atrix ERGO Backpack Vacuum Limited Warranty: To the original user purchasing the Atrix ERGO Backpack Vacuum, Atrix warrants that the vacuum will be free of defects in material and manufacture for a period of one (1) year from the date of purchase.