Test Equipment Depot - 800.517.8431 - 5 Commonwealth Ave Woburn, MA 01801 - TestEquipmentDepot.
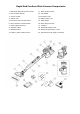
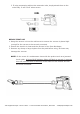
Rapid Red Cordless Stick Vacuum Components 1. Motorized Illuminated Floor Brush 11. Dust release button 2. Floor Release button 12. Tool Holder 3. Crevice nozzle 13. Extension tube 4. Combo Tool 14. Battery Pack (x2) 5. Extension tube release button 15. Wall Hanger 6. Dust container release button 16. Wall Hanger Screws 7. Power adjustment key 17. Charger 8. Indicator lights 18. Round Microfiber Filter 9. ON/OFF button 19. Motorized upholstery nozzle 10. Battery pack release button 20.
IMPORTANT SAFETY INSTRUCTIONS WARNING-to reduce the risk of fire, electric shock, injury PLEASE READ ALL INSTRUCTIONS BEFORE USING THIS VACUUM. 1. Never charge the battery or appliance for extended periods of time. 2. Do not use this vacuum cleaner if the charger or battery are damaged. 3. Do not use this product without the dust container and filter in place. 4. Do not handle the plug, charger or appliance with wet hands. 5.
ACCESSORIES Extension Tube: Use for extended reach when using as an upright unit or for hard to reach places. Motorized Illuminated Floor Brush: Use this for hard floors and tight knit rugs and carpets. Easily picks up dirt dust and small debris. Motorized Upholstery Nozzle: Use this for upholstery, stairs, vehicles etc. Combo Tool: Use this for vacuuming fabric furnishings such as sofas armchairs and curtains.
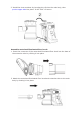
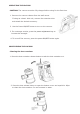
2. Install the dust container by inserting the clip into the main body, then put the upper side into place. It will "click" to secure. . Assemble motorized illuminated floor brush: 1. Insert the connector of the motorized illuminated floor brush into the base of the extension tube by clicking it into place. 2. Attach the motorized illuminated floor brush and extension tube to the main body by slotting it into place.
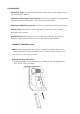
3. If using accessories without the extension tube, simply attach them to the main body. It will "click" when secure. BEFORE FIRST USE 1. Hang the vacuum unit on the wall mount to ensure the vacuum is placed high enough for the vacuum to be securely mounted. 2. Ensure the dust bin is clean and the vacuum is free from blockages. 3. Remove any sharp or large objects from the path before using, as these may damage the vacuum.
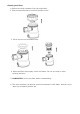
Battery Charging 1. Push the release button and take the battery module out. Plug the cable into the power inlet located on the side of the battery. When charging, the indicator light will be illuminated RED. Once fully charged this indicator light will turn Blue. Once fully charged, remove the charger plug from the outlet. 2. You can also charge the battery while it is inside the vacuum. The three blue indicator lights will indicate one by one to show the battery being charged.
OPERATING THE VACUUM CAUTION: The vacuum must be fully charged before using for the first time. 1. Remove the vacuum cleaner from the wall mount. If using as a hand held unit, remove the extension tube and attach the desired accessory. 2. Use the Power ON/OFF button to turn on the vacuum. 3. For a stronger suction, press the power adjustment key to increase the strength. 4. To turn off the vacuum, press the power ON/OFF button again. MAINTAINING THE VACUUM Cleaning the dust container 1.
Cleaning the filter: 1. Remove the dust container from the main body. 2. Twist counterclockwise to remove the filter cover. 3. Lift to remove the microfiber filter. 4. Rinse the filters thoroughly under cold water. Do not use soap or other cleaning solvents. 5. COMPLETELY air dry the filter before reassembling. 6. The dust container can also be rinsed and cleaned in cold water. Must air dry or wipe dry completely before use.
Cleaning the brush roller: 1. Remove the brush roller from the brush housing. Slide the brush roller fastener (A) away from the brush as below. 2. Carefully clean and remove the hair and debris from the brush roller. Wipe to clean only, do not use any soap or harsh cleaning solvents. 3. If brush roller is damp, allow to dry completely before replacing. 4. Slide fastener (A) to original position to secure the brush roller.
TROUBLESHOOTING The vacuum will not power on. This may be caused by a dead battery. This can occur if the vacuum has been used or stored for an extended period of time. Connect the vacuum to the charger and allow for a full charging cycle to complete. The vacuum stopped suddenly: This will occur if the safety/ thermal cut-out device has been activated. This device is designed to prevent your vacuum from overheating.
Input Voltage - Charger 100-240V 50/60Hz Operating Voltage 22V Operating Power 200W Floor Brush Power 12W Battery Capacity 2200mAh Charging Time 2 Hours Dust Bin Capacity 2 Quart DISPOSAL This vacuum cleaner is supplied with a lithium-ion battery. This must be disposed of properly, in accordance to your local laws and ordinances. Test Equipment Depot - 800.517.8431 - 5 Commonwealth Ave Woburn, MA 01801 - TestEquipmentDepot.
Atrix Rapid Red Stick Vacuum WARRANTY INFORMATION Warranty/Service Information: For warranty service information, please contact Atrix or your local Atrix distributor. Atrix Rapid Red Stick Vacuum Limited Warranty: To the original user purchasing the Atrix Rapid Red Stick Vacuum, Atrix warrants that the vacuum will be free of defects in material and manufacture for a period of one (1) year from the date of purchase.