ATOMOS NINJA STAR USER MANUAL Have you registered your Ninja Star yet? Register now to receive communication on all future updates Web: www.atomos.com Sales: sales@atomos.com Support: support@atomos.
Contents Contents 2 CFast Slots 9 Safety Instructions 2 Using the Ninja Star 10 Warranty & Conditions 3 Record 10 Introduction 4 Playback 12 What’s Included 5 Connecting & Editing 13 What you also need 6 Using Ninja Star with external power supplies 16 Powering up the Ninja Star 7 Software Updates 17 Ninja Star Connections 8 Ninja Star tech specs 18 Safety Instructions The Ninja Star is designed to a high standard but there are some things you should be aware of to prolong th
Warranty & Conditions Notice Copyright © 2014 ATOMOS Global Pty Ltd (‘referred to as ATOMOS’). All rights reserved. All information in this document is subject to change without notice. No part of the document may be reproduced or transmitted in any form, or by any means, electronic or mechanical, including photocopying or recording, without the express written permission of ATOMOS. A reference to ATOMOS includes its related entities, subsidiaries and parent company.
Introduction Thank you for choosing the Atomos Ninja Star: your 10-bit HDMI Recorder/Player. It’s the most compact portable recorder available, with extremely long battery life. Ninja Star preserves the pristine uncompressed video quality from your camera’s sensor by directly encoding it into Apple ProRes as it records to CFast, making it instantly compatible with your NLE time line.
What’s Included We try to provide you with as complete a package as possible: you don’t have to add anything except a media card (you can buy media cards from your Atomos Reseller) and some accessories to suit your set-up, like HDMI cables and tripod screws. All other parts necessary to use the Ninja Star are included. We recommend many CFast cards, for the most up-to-date information please visit: http://www.atomos.com/discovery-what-drives/ Your package will not contain any CFast cards.
What you also need CFast Cards Backing up and archiving These are the storage medium for Ninja Star. You can use either CFast 1.0 or CFast 2.0 cards. Remember that no storage medium, including tape, optical disks, spinning disks and flash memory, is completely immune from failure. You should bear this in mind when deciding how to manage your recorded content.
Powering up the Ninja Star Battery The Ninja Star is a battery powered device. Like all batteries, you will need to take care of them. Make sure that you don’t short circuit the connections because this can result in very high currents that can damage the cells and could pose a fire hazard. Charge new batteries before using them, using the battery charger supplied. To attach the battery, gently slide it down into the slot until it locks into position. To remove a battery, push the latch to release it.
Powering up the Ninja Star Turning ON power to the Ninja Star To power up the unit, press the Record button located on the front left hand side. The power LED should light up green immediately. The indicator LEDs will turn on moments later when the device starts up. Turning OFF power to the Ninja Star To turn the unit off press the red Rec button for 4 seconds. The unit will then power off.
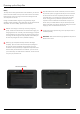
CFast Slots CFast Slot Hot swappable On the left hand side of the unit is a slot for CFast cards. To insert a CFast The CFast cards are hot-swappable, so you can do this at any time – even card, slide in card firmly in position. while the unit is turned on. But don’t do it while recording or you will get a Formatting card - See page 11 corrupted file that may be unplayable. Mounting options The Ninja Star comes with a mounting plate which features standard tripod 1/4” and 3/8” screw mounts.
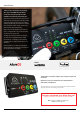
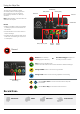
Using the Ninja Star The Ninja Star is controlled by a simple user-friendly interface. Pictured right are the main controls seen when the Ninja Star is first powered up and there is a video input connection. Time Remaining Battery Indicator Recording Quality Audio Levels Video Lock Note: HDMI TRIGGER + Timecode will be auto detected on the Ninja Star. Pulldown Status Record • CODEC and Pulldown mode can be selected by holding the previous and next buttons for two seconds.
Record post. You can change which signal is monitored on the audio level meters Requirements Before recording commences, you need a valid incoming signal locked and a formatted CFast card with space remaining in the CFast slot. by holding down the ‘Play’ button for 2 seconds. Make sure any analogue input is not too high or the recorded sound will be distorted. Pulldown Removal How to format your CFast card Many cameras do not output progressive signals natively over HDMI.
Playback: One touch review Play: Press to play/pause clip Record: Press to return to capture mode When paused: Frame by frame When playing: RWD / FWD Hold to Super RWD / Super FFWD Click to skip to Previous / Next Playback & Review on monitors: Recorded footage can also be played from the Ninja Star’s HDMI Out. This is ideal for large screen client viewing, feedback and editing on location.
Connecting & Editing Transferring Files Connect To access and edit your recorded material, connect the included CFast Card reader to a Mac or Windows editing workstation via USB 2.0 or ® ® Now your CFast Card reader is connected and your card is recognised by your operating system, you can edit directly from the drive or copy the files USB 3.0. to your own storage. Remove the CFast card from your Ninja Star and insert it into the CFast Windows Card reader.
Connecting & Editing Importing Final Cut Pro (version 7), Final Cut X , Adobe CS5 (with 5.51 update), You’ll see the folders in the Ninja Star drive. Select the folder containing the footage you want to import: EDIUS 6, Sony Vegas 10, Lightworks and Avid Media Composer 6 support imported files from your Ninja Star disk. Note: Quicktime Player on must be installed on Windows machines.
Connecting & Editing Final Cut Pro X Premiere Pro Edius Pro 7 Final Cut Pro 7 After Effects Edius Elite 7 Motion 5 Speed Grade Smoke Lightworks Atomos Ninja Star – User Manual Edition 1: October 2014 15
Using Ninja Star with external power supplies AC Adaptor (sold separately) This connects on the battery slot on the back of the Ninja Star. The end of the adaptor will connect to a mains plug. Alternatively you can use any NP-Compatible Charger or power supply, as long as they use a “Dummy Battery”. D-Tap Adaptor (sold separately) This adaptor allows you to take the power supply from any source that has a D-Tap connection such as external battery packs.
Software updates Updating AtomOS (Firmware) Checking firmware has been updated From time to time we will issue software updates for your Ninja Star. To check if the firmware has been successfully updated, you must record a To update the firmware (that’s the software that runs inside your Ninja Star), quick clip with the Ninja Star. Y ou can then look at the file name to check if there is a simple procedure you have to follow. the clip has been recorded with the new update.
Ninja Star tech specs NINJA STAR SPECIFICATIONS NINJA STAR SPECIFICATIONS Weight Realtime hardware encoding Without batteries & HDD 130g/4.6oz With batteries & HDD 230g/8.1oz Dimensions (W x H x D mm) 95 x 60 x 25mm Construction Advanced rubberised paint 1920x1080 8/10-bit 4:2:2 & SD to Onboard processing 25pSF > 25P (2:2 Pulldown) 30pSF > 30P (2:2 Pulldown) 60i > 24P (3:2 Pulldown) 59.94i > 23.98P (3:2 Pulldown) Power Operating power 3.5W / 4.