SHINOBI User Manual EDITION 1: FEBRUARY 2019 Register your SHINOBI to receive the latest software updates and user information Registering your product ensures you receive communication on all future updates
Contents Warranty & Conditions Introduction 1. What’s included 2. What you also need HDMI Cables Standard 1/4” 3. Powerng the Shinobi Power ON/Power OFF 4. Shinobi connections 5.
Warranty & Conditions International Hardware Limited Warranty ATOMOS warrants that: • The main product, not including the IPS screen, or any external accessories, will be free from defects in materials and workmanship for a period of 1 year from the date of purchase. • The TFT/LCD, HDD/SSD Docking Station, Master Caddy II and Cable will be free from defects in materials and workmanship for a period of 1 year from the date of purchase.
Introduction SHINOBI Thank you for choosing the Atomos Shinobi 5.2 inch HDR Monitor. Featuring a super high-resolution screen in a lightweight polycarbonate ABS chassis, and an array of essential production tools including waveform monitoring, vectorscope, luma, focus assist and the world’s leading support for HDR monitoring. This user manual will get you up to speed with all the amazing features packed into the Shinobi.
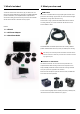
1. What’s included 2. What you also need HDMI cables Your Shinobi includes base accessories to get you started, such as a mains power supply. Additionally you will need a compatible HDMI cable (Camera out/Shinobi in) and compatible batteries. Optional AtomX accessories including power and accessory kits and are also available. Visit the Atomos website for the latest accessory options. Take care to use HDMI cables of the appropriate grade and take care to protect them from damage.
3. Powering the Shinobi Battery Eliminator (included) NP-F Battery (optional) Battery slot Gently slide down into battery slot and lock into position Push the release button to unlock the battery and slide battery upwards to remove. Choosing your power source The Shinobi can be powered by the included AC-powered Battery Eliminator, or by using a compatible DC battery.
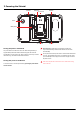
3. Powering the Shinobi Ventilation Battery Slot 1/4” screw hole Ventilation Power Battery release 1/4” screw hole Turning ON power to the Shinobi The power button is located rear of the unit. With a charged battery or supplied battery eliminator attached momentarily press the recessed circular button to power up the unit. After a couple of seconds you will see the Atomos logo, and then the Shinobi Home Screen.
4. Shinobi Connections 4 1 2 1. SD Card Slot Use SD cards to load LUTs and/or update firmware. 3 Mounting options The Shinobi unit includes 1/4”-20 screw mounts top and bottom, ensuring it is secure on gimbals, and compatible with the latest mounting solutions. 2. Remote/Calibration Port The remote 2.5mm jack on the right hand side (looking from the front), Top view allows for the connection of the ATOMOS USB to Serial LANC cable to any computer device.
5. Using the Shinobi - Best Practice Understanding the basic controls and functions will save you time in the future. Before you start enjoying your Shinobi it will help to review these simple procedures a. Screen Lock b. Firmware Updates a. Screen Lock Lock the Display Screen You can lock the display of the Shinobi by tapping the power button. This will ensure no changes can be made by mistakenly touching the screen.
5. Using the Shinobi - Best Practice 10. When the firmware upgrade is finished, the Shinobi will prompt you to restart the device. 11. Turn on your Shinobi again with a short press of the Power Button. 12. When the Shinobi has booted, return to Settings and then select the Info tab and check that the version number is the version expected. Please ensure your batteries have plenty of charge and that you do not interrupt your Shinobi while its firmware is upgrading.
5. Using the Shinobi Setting up for monitoring As soon as you connect a supported signal to the Shinobi input the following will happen; • The input source & format will be shown in the top left corner of the information bar • Image will appear on screen • Audio input meters will be responding to source.
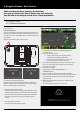
5. Using the Shinobi The Main Screen - Information Bar At the top of the Shinobi screen is the area referred to as the Information Bar. Info here relates to the settings of your input device/camera, Shinobi, The content of the Information Bar is dependent on the settings from your input device. Your Shinobi will automatically detect the incoming signal and audio and more. Touching any of these areas will take you to the relevant display the information.
5. Using the Shinobi Input Video Input Simply tap the source input menu to the top left of the screen to bring up the input control panel. This panel is a command center for all devices connected to the Shinobi and will assist you with connectivity by indicating if the signal is active or if attention is required. SOURCE The current input resolution and framerate of the selected input source is displayed.
5. Using the Shinobi Audio Audio Battery The audio settings are easily accessible by touching the Battery The Battery icon on the left of the screen indicates the audio meters (shown below) on the monitor screen. remaining power in the attached battery. Touching the meters will take you directly to the Audio When using the supplied Battery Eliminator, the menu where you can adjust output volume. remaining power indicator will remain green and show 100% full.
5. Using the Shinobi The Main Screen - Monitoring Features At the bottom of the Monitoring screen are the Monitoring Features, accessible by toggling the MON icon. Monitoring Features do not affect your recorded file and can be turned on and off, or adjusted whilst recording (unless you choose to burn a LUT file into your footage). Not all Monitoring features are available at first glance – to reveal all Monitoring features, swipe monitoring icons to the left.
5. Using the Shinobi Using Waveform Monitoring tools (WFM) Luma Waveform The Luma or Luminance Waveform is a great way to visualize the dynamic range of your image, allowing you to protect exposure of both your highlights and shadow detail. It’s particularly useful when shooting with a low contrast LOG curve and works in perfect partnership with HDR to illustrate the highlight clipping point to allow you to correctly expose you image.
5. Using the Shinobi Opacity Brightness The Brightness slider directly controls the intensity of the waveform while the opacity slider adjusts the transparency values of the waveform display on screen. Experiment with these controls to achieve your desired monitoring setup. Histogram Histogram will monitor the level of Red, Green and Blue from an input source. The RGB channels are displayed side by side and each channel color is shown under the corresponding waveform.
5. Using the Shinobi Using Monitor Assist tools AtomOS10 features monitoring tools that help with making your shot Focus Assist Outline picture perfect. Easily access Focus Peaking, Zebra, False Color and Blue Only Exposure to check image is in focus, noise free and correctly exposed. Options for safe area/title area markers along with aspect ratio markers and anamorphic desqueeze functions are also available. Focus Peaking Focus peaking allows the user to ensure their recordings are always in focus.
5. Using the Shinobi False Color Scale To help you determine the exposure range with more accuracy, please use the scale on the left hand side of the display. Cinema Guides / Safe Areas / Anamorphic De-Squeeze AtomOS 10 has advanced frame guides and safe areas. You can cycle through your required cine or TV frame guides by repeatedly pressing the guides icon. Action safe area and title safe areas can then be turned on and are proportional to the frame guides based on SMPTE standards.
5. Using the Shinobi LUTs A LUT or Look Up Table is a table that transforms the color response, and To load a LUT, select the desired slot (log curve button) and press any log as such adjusts the ‘Look’ of the input. 3D LUTs have a combination of three curve icon; tap the folder file icon (load) and when the screen prompt inputs defining the combination of R, G, and B (red, green & blue) values; appears, press the ‘Confirm’ button.
5. Using the Shinobi LUTs are designed to work within the boundaries of REC.709, meaning they may apply the color adjustments you are looking for, but may also affect the luminance of the image. In which case these LUTs should only be used for delivery of content designed to be viewed in REC.709 or SDR. When working with 3D LUTs, you can use color correction applications, as well as applications like Davinci Resolve, Photoshop or dedicated applications like LUTCalc.
5. Using the Shinobi Understanding HDR and Log The first step in HDR is to recognize you have a HDR scene. Look for a good range of contrast across the brightest and darkest parts of your image and also across the color and tonal range as each color also contains its own brightness or luminance information. One of the key elements to understand is that if your camera can shoot in Log then is can already capture the more dynamic range than you can display in SDR.
5. Using the Shinobi Display With this mode selected you have the option to change the screen brightness by adjusting the slider when in Native mode. As you slide to the right the brightness will increase and when at 100% the image will be using the full 1000nits of the display. As with any electronic screen device increasing the brightness will increase the power draw and battery life will be effected accordingly. Adjustments can also be made to the Lift, Gamma and Gain of the display.
8. Technical Specifications Weight and Dimensions Optional Accessories Without batteries 196g / 7oz. Dimensions (W x H x D mm) 151 x 91.5 x 31.5mm Construction Polycarbonate ABS Mounting points 1/4”-20 screw mount. 1x top and 1x bottom Compatible optional accessories Power Operating power 4-7W Compatible batteries NP-F series and supporting accessories. AtomX or other. Input voltage (battery) 6.2V to 16.8V Battery time* (based on 7.
/atomosglobal Atomos Shinobi – User Manual Edition 1: February 2019 © Atomos 2019. TM @atomos_news @Atomos_News /AtomosVideo ®All trademarks and registered trademarks are the property of their respective owners.