
User Guide


Please refer to the following
descriptions of the timecode
configuration parameters (shown
with Advanced View on the right):
1. Vinyl – Choose this option if
you are using timecoded vinyl.
2. CD – Choose this option if you
are using timecoded CDs.
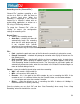
3. Mode – You can choose
between 3 different timecode
ence how the timecode
is controlling playback position
tracking modes. These modes
will influ
on the corresponding deck:
Absolute – This mode is similar
up the needle and
that location in the track.
Please note that in Absolute
mode you will not be able to
use some of the software
features, such as looping and
cue points.
Relative
to how music is normally played
on vinyl. The beginning of the
record corresponds to the
beginning of the track and
picking
moving it to another location on
the vinyl, also known as needle
dropping, will move playback to
– In this mode, the software will track the relative movement of the record
(forward, backward) but will not track the position of the within the control timecode. So,
for example, you will not be able to seek to another location of the song by picking up the
needle and dropping it on another part of the record. This mode is perfect for scratch DJs
since it allows you to scratch without worrying about the needle skipping around on the
record – the software will compensate for any skip that might occur. In this mode, you are
also allowed to use some additional software features, such as looping and cue points.
Smart
(default) – This is the default timecode tracking mode and is the mode that we
recommend most users use. In Smart mode, you have the ability to do needle drops but
can also use the additional features of the software, such as pitch, loops and cue points.
4. Lead Time – Specifies when the time-code signal begins playing the song, by moving the
point at which the track begins to a position further into the vinyl. For example, this is
useful if your records have cue burn in the beginning. Simply set the lead time to another
bumber.
57