Revision 4 Copyright © 2007
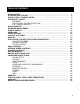
TABLE OF CONTENTS INTRODUCTION . . . . . . . . . . . . . . . . . . . . . . . . . . . . . . . . . . . . . . . . . . . . . . . . . . . . . . . . INTRODUCTION TO DJING . . . . . . . . . . . . . . . . . . . . . . . . . . . . . . . . . . . . . . . . . . . . . . . INSTALLATION / UPGRADE NOTES . . . . . . . . . . . . . . . . . . . . . . . . . . . . . . . . . . . . . . . INTERFACES - ZONES . . . . . . . . . . . . . . . . . . . . . . . . . . . . . . . . . . . . . . . . . . . . . . . . . . BROWSER . . . . . . . . . .
INTRODUCTION Welcome to VirtualDJ! VirtualDJ is revolutionary software which allows audio and video mixing right from a computer. We designed VirtualDJ to be simple and intuitive to use but do not be fooled — there are many advanced features to explore and customize.
INTRODUCTION TO DJING The work of a disc jockey can be divided into three tasks: 1. Choosing the music (programming) 2. Mixing the music 3. Modifying the music (remixing) The first task consists of choosing the appropriate music, which obviously depends on the type of evening and your style. Generally a good rule of thumb is to avoid playing all the hits” from the very start of the evening and to keep some in reserve to generate new interest when the audience starts to become tired.
The effects traditionally used are scratch, loops, and samples: A scratch consists of creating an entirely new sound by playing a small portion of music repeatedly. This is achieved by moving that same portion of music back and forth at different velocities while using the crossfader to sharply cut the sound in and out of the mix. A loop consists of isolating a passage from a title and playing it repeatedly in a looping fashion.
VirtualDJ installs files into the following locations: Default application path – C:\Program Files\VirtualDJ\ All Application Configuration, Plug-in, Skins, Database, and Support Files are stored in – Windows XP: C:\Documents and Settings\username\My Documents Windows VISTA: C:\_UserName\Documents\VirtualDJ *For Power Users who have changed the location of their My Documents from the default Microsoft setting your new/copied files are stored there in the VirtualDJ folder.
INTERFACE - ZONES Before beginning to use VirtualDJ, familiarize yourself with the controls and “zones” of the software. Upon opening the application, an interface menu is displayed. Interfaces called “skins” feature different configurations, layouts and functionalities of the software. Let’s begin by selecting “Internal mixer interface” to become familiar with the most important features of the software.
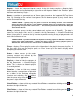
BROWSER The Browser Zone is where to navigate and organize files stored on a local, external, or network hard disk. The browser contains the compatible file types (i.e. whose extensions are associated with the decoders in VirtualDJ) to access the compatible extensions list. Click the “Config” menu then choose the “Codecs” tab. See the “Codecs” section of the manual for further details. The Browser zone is divided into 4 key panels. 1. File System / Folder Structure 2. File / Search Results 3.
Napster – shows the integrated Napster search. Using this feature requires a Napster login. Login information can be provided by a right-click on the Napster Globe in the “Browser” panel interface and choosing “Login…” Genres – provides a generated tree of Genre types based on the imported ID3Tag Genre field. By selecting on the various listed genres the file browser panel (2) only shows those entries that match the tag.
File / Search Results Panel (2) VirtualDJ provides several elements of information about each track. The information is a combination of ID3 Tag and VirtualDJ defined data fields. By default the title of the song and artist are listed for each file along with columns for beats per minute (BPM) and duration (Length) with additional columns, explained further in the manual (page 13). The width size for each column can be modified individually and by clicking on a column the contents are sorted.
ID3 TAG SUPPORT ID3Tag support is not the same support that other applications implement. VirtualDJ has always provided the fasts information access about stored tracks in the database. Adding direct ID3Tag access to every file would have considerably SLOWED VirtualDJ’s ability for browsing and search as experienced in other applications. VirtualDJ stores identified ID3Tag fields as part of its own database and the stored data can be updated at anytime.
Retrieving ID3Tag Data (cont’d) Next possible way of retrieving ID3Tag information is by right clicking on a file in the browser and selecting File Info. The below dialog displays the database stored information along with the ID3Tag information that is retrievable. Under each field with a button will have the read ID3Tag info next to it that can be read from the tag. Click on the button to copy that data into the VirtualDJ data field. This data will be stored and used by the VirtualDJ database.
Displaying VirtualDJ data fields (ID3Tag) Columns In the file browser (2) or playlist panels (3) right clicking on any column and choose from the pop-up list any or all of the available data fields now stored in the VirtualDJ database. Changing the order of the columns is very easy by selecting the Order… option from the bottom of the list. Then in the presented dialog choose the order by highlighting the field and using the up and down arrows.
Additional VirtualDJ Data Fields The VirtualDJ database now stores additional data about each track for additional search features and the NEW Filter folders. Key – stores the key value of a song for use doing Harmonic Mixing. ** VirtualDJ does not analyze and populate this field. Manual entry using the File Info.
The other options for managing the databases are CHECK – this runs a validation of the database to ensure that all database file references are still valid and existing stored files on that drive. The process simply re-labels the FilePath entry for the file if it can not be found. Data about that file is not lost. CLEAN – this process will REMOVE any database information about files that are no longer valid. This is necessary for cleaning up the Global Search capabilities.
In the following example, a search on ‘ba’ is entered into the search box. The center file browser panel displays the results of the search. The file(s) listed above the dividing line represent the file(s) found in the folder that is currently highlighted in the left folder browser panel. All other files below the dividing line are files that exist elsewhere in the database. What can be searched? Searching in VirtualDJ is versatile and variable.
PLAYLIST & AUTOMIX Automix features work from one deck. By default it is Deck 1; however, prior to starting the Automix if Deck 2 is selected as the active deck then Deck 2 is used. By utilizing 1 deck this frees the opposite deck for staging the first song to be used once you decide to stop the Automix process. In addition to drag and drop, playlists can be created. Playlists are groups of tracks prearranged in a desired order of play.
Playlist & Automix Management Using the Playlist management menu by clicking on the icon choose from the options how the automix functions and tracks are managed in the playlist.
Sequential Order Play Display The playlist navigation during automix play of what is playing and what is next is sequential from top to bottom (like most media players). The currently playing track is always highlighted. With the repeat option on for the entire playlist the navigation will return to the top after the last track is played in the list. Add, Move or Remove Track Reordering tracks by adding more, moving their order, or removing can be done at any time.
automix will then check if both ‘Allow’ for Mix Cut are checked. If yes it will do a cut mix (using the cut entry/exit points), otherwise the SMART automix mode will do a standard fade using the Mix Fade entry/exit points. In all other automix modes only the Mix Fade entry/exit points are used. SIDELIST VirtualDJ incorporates it’s own version of a waitlist called the Sidelist. The Sidelist panel (4) can be used to hold tracks that the DJ knows they will play sometime during their session.
FILE SYSTEM / FOLDER STRUCTURE ORGANIZATION In order to simplify browsing and provide better and robust file management capability, VirtualDJ provides three (3) methods for the user to organize the database.
VIRTUAL FOLDERS Virtual folders also aid in quick access to tracks. A virtual folder holds a collection of shortcuts to tracks. Create a virtual folder by clicking on the red title. VirtualFolder icon and giving the new folder a Now browse the database or run various searches looking for tracks that are being grouped together. Drag and drop the tracks into the new VirtualFolder and next time you want to play these tracks refer to the virtual folder.
Now enter nter the Filter to be used for creating the results desired. This is where it can be complicated or simple. This example is simple, use the keyword ‘top’ with the number ‘100’ and the element ‘nbplay’. ‘nbplay’ looks at the Play Count data field. As the filter statement is entered VirtualDJ evaluates that the statement is properly created. The OK button will remain ‘grayed’ out if the statement is not well-formed. So the entire filter statement would look like ‘top 100 nbplay’.
DECK CONTROLS There are two virtual “decks” on the screen. Drag and drop files into each of the decks to load music tracks or video clips. The two decks are equipped with the following controls and displays: 1. Title of track currently loaded 2. Waveform display for currently - This view shows the visual waveform of the entire track, allows for viewing the remaining duration of the audio, as well as what has already been played.
4. Loop Sampler Sample Selection Drop-down arrow - Choose which sample to use. There are 12 slots which are available to record, load and play samples. Sample Selection window - When clicked this will play the sample listed in the selection window. REC button - When initiated, this function records the loop to the sample slot selected. If no loop is currently set on this deck, a 4 bar loop will be recorded by default. Wet / Dry knob - Controls the level of gain applied to the loop sample. 5.
Stutter/Play - Starts the music. Pressing “Stutter/Play” while the song is already playing, will restart the music from the last position you pressed “Play” from, creating a “stutter” effect. Pause - Stops the audio where it is currently playing. Subsequent clicks while stopped cycles through the beginning of the song and all the Cue Points. Right-clicking while stopped automatically goes to the first detected beat in the song. 8.
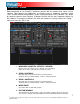
INTERNAL MIXER CONTROLS VirtualDJ features an internal mixer section as part of the InternalMixer skin. The mixer can be accessed by selecting the “VirtualDJ:InternalMixer” in the Configuration Skin section. It can be used just like a regular DJ mixer. The controls on the mixer include: 1. Channel Gain This knob sets the gain level for the corresponding channel (deck). (Right clicking will bring it to the value that matches the other deck level. Double clicking brings it back to 0) 2.
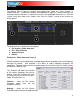
TOP TOOLBAR CONTROLS Not all skin interfaces provide this set of controls, however; there are some elements common in all the skins (those are annotated with an asterisk * ). 1. Headphone level Volume control for headphone level. 2. Cue/Mix blend Fade to hear just the cue, cue/mix, or mix signal only in the headphones. 3. BPM button * Opens BPM edit window. Each button respective to it positioned deck. 4. Master Volume * Controls main output of program 5.
RHYTHM WINDOW Above the players, a window posts curves corresponding to the two rates/rhythms of the music. These curves are represented in a waveform, allowing you to see your music. The peaks in the curve represent beats. In order to synchronize the music, these peaks should occur at the same time. The present is represented by the feature in the middle of the screen. All on the left was already played, while what is on the right represents the next seconds of the track.
MANUAL BPM CORRECTION The CBG is calculated automatically when a track is loaded for the first time. VirtualDJ uses powerful algorithms to calculate the BPM and the CBG of music (1 of 2 algorithms can be chosen - a fast but effective algorithm which works well for techno and house, and a slower algorithm which is effective on any type of music). However, in some rare cases, the CBG is not correctly positioned on the beats of the song. In this case, you can easily carry out a manual correction.
CONFIGURATION SETTINGS VirtualDJ is designed to be very simple and easy to use but it is also fully customizable to match your preferred system performance. button. This will bring you To make changes to VirtualDJ’s configuration, click on the to the “Settings” dialog.
OPTIONS The Options settings control the multiple features and actions to accommodate the DJ’s style for using the VirtualDJ application. BPM Engine – Allows you to choose between the two different algorithms available for the analysis of BPM. The first algorithm, “techno/house,” bases itself on the detection of the beats in the music, and should be used with music that has a very pronounced beat. The second, “any music”, should be used with music which does not have a distinct, pronounced beat.
OPTIONS AutoLoad Playlists – See page 18 – “Playlist Setup” AutoSave Unplayed – See page 21 – “AutoSave Unplayed” Auto Pitch Matching – When loading a song, automatically adjusts the pitch so that the BPM matches the BPM of the song currently playing. Auto Gain – This is the gain adjustment setting for VirtualDJ. If you Select “always 0db,” VirtualDJ will automatically modify the level of the tracks to always obtain a level of 0dB (the loudest level without clipping the signal).
PERFORMANCE SETTINGS VirtualDJ provides a simple, yet complex; interface for optimizing performance to the capabilities of the computer based on its specifications. Depending on the system’s resources, some settings will work better than others. It is recommended that the DJ take time to experiment with the settings in order to achieve the best performance of their system prior to using VirtualDJ in a live performance.
PERFORMANCE SETTINGS Safe Mode – When using a DirectX mode setting (like Simple, Dual, Mono or 4.1), VirtualDJ is less likely to produce glitches and pops if your CPU is momentarily busy. The performance trade off is scratching and pitch adjustments will use more CPU, especially with advanced algorithms. So, if using advanced Master Tempo this will probably need to be disabled, unless the computer is very fast.
PERFORMANCE SETTINGS 48kHz <-> 44kHz Describes how VirtualDJ will interpolate between the 48kHz and 44.1kHz sample rates. Choosing “Basic Interpolation” will save some system resources and could improve performance. For better quality interpolation, choose “Lowpass Filter”. 11 taps is the best quality/CPU ratio. NOTE: Most commercially available music is recorded at 44.1kHz (including MP3s) so it is a good idea to set your soundcard’s output to 44.1kHz.
SKINS VirtualDJ allows you to choose between several different “skins”. VirtualDJ:Basic – a basic, simple skin. VirtualDJ:Full – a skin which features full VirtualDJ controls. VirtualDJ:FullVideo – a skin featuring full VirtualDJ controls plus a video section in the middle. VirtualDJ:InternalMixer – a skin featuring full VirtualDJ controls plus a full-features audio mixer in the middle.
Shortcut Macros A shortcut macro is the process of assigning multiple actions to the same key or key combination. The power of the macro comes from the order they are listed. So open the Configuration dialog and select the Keyboard Shortcuts tab. Here is an example of a highly request macro that provides a ‘Mix Now’ capability. The actions to be used are auto_crossfade, play, and select and assigned to the Space bar for activation.
NETWORK VirtualDJ can be synchronized between multiple instances and/or synchronize multiple computers running VirtualDJ. No synchronization – turns synchronization off. Local synchronization – allows multiple instances of the VirtualDJ software to run and synchronize together on the same computer. Network synchronization – allows several computers running VirtualDJ to synchronize over a network.
REMOTE CONTROL VirtualDJ can be controlled using a wide array of external controllers. The “Remote Control” section of the Settings menu provides the setup to ‘enable’ VirtualDJ to work with the external controller. Once the controller is connected, start VirtualDJ, select the “Config” and select the “Remote Control” tab and enable the controller by clicking on the corresponding graphic for the controller. Then select ‘Activate’ from the pop-up menu.
CODECS VirtualDJ is able to decode several formats natively with its audio and video decoders. The Codec tab identifies what file types (by extension) use what specific decoder for play in VirtualDJ. At install, VirtualDJ includes the some of the common sound and video file extensions. If, VirtualDJ is not already associated with a specific extension for an audio or video codec then select the ‘Add’ button.
VIDEO ENABLE / DISABLE – Provides the ability to have the application’s video engine enabled or disabled. By disabling the video engine ALL video features of the application are not usable and may increase performance for DJ’s using only the AUDIO features of the application. Activate – Turn the video engine on or off. TV Output – Select the monitor that will display the video master output. NOTE: Only Monitors which are part of the windows desktop can be selected.
INFO The VirtualDJ Info tab provides the version number along with copyright statement for the application. There are three useful buttons: Check for Updates: makes and internet query to the VirtualDJ Download Center and checks to see if any updates are available. [Internet Connection required] Download Plug-ins: Launches the browser associated with http request an directs the browser to the ‘Add-ons’ section of the website.
SAMPLER VirtualDJ features a powerful sampler, which provides the ability to record, load, save and play samples on the fly. The sampler can be accessed by clicking on the “Sampler” tab in the lower window and features 12 slots for samples which are available to use at any given point in time. There are two types of samples that are supported – linear (one shot), and circular (looping) samples. Linear samples are samples which are played beginning to end.
Samples can be played from the loop sampler menu found as part of the controls for each deck. Simply select the sample from the pull-down menu, and then click on the sample title to begin play. The frame around the title will light up during playback. If the sample is a loop, then click the sample title again to stop the loop. Linear samples will stop when the end is reached. The play volume of the sample can also be controlled using the Volume knob.
EFFECTS VirtualDJ features a comprehensive set of audio and video effects and transitions which can be accessed by clicking the “Effects” tab on the lower window. The effects list is displayed on the left side of the window and each of these effects can be activated for both decks. Multiple effects, both audio and video; can be applied. To use an effect, select the effect and activate it on whichever deck the effect should be applied.
If the installed video card has a TV output or a second output screen, the secondary output can be specified as the output for full-screen display, instead of the windowed output. The desired output is specified by using settings in the Configuration dialog on the Video tab. If full-screen output does not appear, check that the output is recognized in Windows display properties, and that Windows is in a dual monitor mode (not clone). For more information, see the video card manufacture’s instruction manual.
There are two ways to mix video clips: automatically or manually. To mix manually, use the video crossfader to go from one video to another. Or, just click on one of the video preview windows to smoothly crossfade to that deck. And, if the “Link the Video crossfader” is checked in the Video configuration tab, the skin’s audio crossfader will crossfader the video when it is move from one deck to the other. Alternatively, VirtualDJ do the video mixing automatically.
Optimization In general, video mixing is much heavier in computer resources than audio mixing so certain optimization may help performance, especially when dealing with full frame rate video (such as DVD in high definition).
KARAOKE In addition to being able to play music and other video content, VirtualDJ allows provides support to play and mix karaoke files. VirtualDJ is compatible with MP3+G, WAV+G, WMA+G, OGG+G, and .ZIP files. The tracks will appear with a “K” in its icon . When loaded on the deck, VirtualDJ will load the audio track on the deck and display the CDG file in the video mixer. VirtualDJ supports the binding of the CDG files with its MP3 counter parts as one single .ZIP file.
BROADCASTING AND RECORDING VirtualDJ provides an additional ability to record or broadcast the output. To access the recording and broadcasting features click on the “Record” tab. The following interface is displayed. The following methods are available: • • • Record File Burn CD Broadcast To access the recording settings click on the “Config” button at the top center of the interface. Record From In the “Config” dialog, three different sources for recording are available.
Recording to a file (“Record File”) “Record File” provides recording a mix session to a .WAV or .MP3 file direct to the system’s hard drive. When the recording is completed, it can then be listened to in VirtualDJ, edited with an audio editing application, or written to a CD using a CD burning software. To setup the “Record File”, click on “Config” to access the configuration settings for recording a file.
Burn CD VirtualDJ can record the session in a CD image format for quick burning of a session to CD. Select “Burn CD” for VirtualDJ to record the session as a .BIN/.CUE file type which contains all the necessary information for burning software that supports image types of BIN and CUE. Click on “Config” to access the configuration settings for CD recording.
Broadcasting to the Internet (“Broadcast”) VirtualDJ provides a method for broadcasting the session in realtime on the Internet as a “webcast.”. This way people around the world can listen to the mix session. Click on “Config” to access the configuration settings for recording a file. Record From – • chooses the recording source • Auto-Start – checking this box will automatically begin the recording when the first track begins playing.
Caution: If using a floating Internet connection, the address of the webcast could change from session to session. In this case, the broadcasting address should be communicated each time to the listeners. Caution: To listen to the mix, the software used by the listeners must be able to communicate with the broadcasting computer via the webcast server.
TIMECODE CONTROL When you open the Timecode Configuration window, you can choose to view the window in Simple or Advanced view. For the most part, you might never have to go into the Advanced View – the Simple View shows the most essential timecode configuration that you will probably need. You will notice that there is an Auto-Config button for each virtual deck. This button can be used to automatically detect the required timecode settings for the software to function properly.
Please refer to the following descriptions of the timecode configuration parameters (shown with Advanced View on the right): 1. 2. 3. 4. Vinyl – Choose this option if you are using timecoded vinyl. CD – Choose this option if you are using timecoded CDs. Mode – You can choose between 3 different timecode tracking modes. These modes will influence how the timecode is controlling playback position on the corresponding deck: Absolute – This mode is similar to how music is normally played on vinyl.
Pitch Sensitivity – This is the time that it takes for the waveform display to become adjusted after you alter the pitch of the timecode signal. Too small of a value will attempt to redraw the waveform when you scratch the timecode, which is not recommended. Setting too high of a value will take longer to redraw the waveform, which may be visually confusing. Please experiment with a few different values to find the one best suited for your style. 6.
LEGAL INFORMATION http://www.atomixproductions.com http://www.virtualdj.com Atomix Productions PO Box 324 Warren, PA 16365 USA VirtualDJ Copyright: Copyright 1997-2007 Atomix Productions All Rights Reserved Number IDDN.FR.001.040012.01.R.C.2000.000.31400. Trademarks: The Logo is a registered trademark of Atomix Productions VirtualDJ is a registered trademark of Atomix Productions iCDX, DMC2, DMC1 (v2), Total Control is a registered trademark of Numark, Inc.