Version 6
Quick Guide – Welcome and Software Registration Welcome to VirtualDJ! Overview VirtualDJ is the latest state-of-the-art software in music mixing for DJs. Very easy to use and with a very smooth learning curve, it includes all the professional features a real DJ needs.
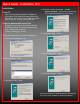
Quick Guide – Installation (PC) Installation From CD • Insert the VirtualDJ Installation CD-ROM into your system. The installation should start automatically. If not, browse the CD-ROM and double click on the file “install_virtualdj_v6.exe” D. End User License Agreement — Please Read thoroughly … then Next to agree with the terms and conditions of the License. From the downloaded install file • Navigate to the location where you saved the downloaded install file (most likely your Desktop).
Quick Guide – Installation (Mac) Installation From CD • B. Click Continue after reading the License Agreement Insert the VirtualDJ Installation CD-ROM into your system. The installation should start automatically. If not, browse the CD-ROM and double click on the file “install_virtualdj_v6.exe” From the downloaded install file • Navigate to the location where you saved the downloaded install file (most likely your Desktop). Double-click on the file “install_virtualdj_pro_v6.
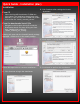
Quick Guide – Installation (Mac) Opening VirtualDJ for the first time … E. Enter you system’s password for installing applications. A. Double click on the VirtualDJ icon on the desktop. B. Enter the serial number you received with your purchase … OK C. VirtualDJ will then check for a new version. (This can be disabled in the Configuration section.) F. Files will now copy onto your system. G. Click Close to finish the installation. D.
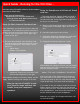
Quick Guide – Running for the first time … Now lets setup VirtualDJ with one of the common Setup for Headphones with Internal Sound uses with a sound card— card use… Basic Internal Sound card, Headphones with Internal Sound card, External mixer with Multi-channel card, or Timecode Control. Setup for Basic Internal Soundcard use… From installation you should not have to make any adjustment. So to familiarize yourself with the interface lets look at the Sound Setup in the Config. A.
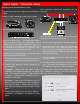
Quick Guide – Basic Setup Now, The Next Level ! External Mixer setup … Since you would be preview/cueing your mixes from the mixer, you can use the previous Monoseparated configuration to have each deck assigned to a dedicated output. If you simply change the Headphones output option to External Mixer, you will see that instead of Left: Master / Right : Headphones; you get Left deck:Left Chan and Right Deck:Right Chan. This will provide a MONO signal to each channel of the mixer.
Quick Guide – External Mixer Setup F. Click on the Options tab of the Config dialog. G. From the Left hand list, the first item listed is Crossfader. This controls the crossfader curve of the internal VirtualDJ mixer. Since an external mixer is being used and all crossfading of the tracks will be done externally, set the internal crossfader to DISABLED. With the VirtualDJ internal crossfader disabled, this will allow the audio to flow freely from in VirtualDJ to the external mixer channels. H.
Quick Guide – Timecode Setup Building on the External Mixer setup … Your connections should look something like the Now you have some new components and different following: cables. Maybe a couple turntables or table-top CD decks. Your ASIO supported 4-IN/4-OUT Soundcard. With the connections in place, we can now open VirtualDJ and configure the software. And your external mixer. The appropriate cables should be furnished with all the components. Most A. Click on the Config button on the skin interface.
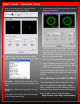
Quick Guide – Timecode Setup E. Now click on the button “Timecode Config …” to access the configuration dialog… F. From the Vinyl drop-down select the correct vinyl or CD timecode version that you are using. H. You should see the following concentric circles display for each deck. At this point you can make global adjustments using the Left/Right, Phase/Anti, Gain, and Silence settings. If you only need to adjust one deck, then select the appropriate deck tab and make the adjustments there. I.
Copyright © 2009 written by Christopher J.