
User's Manual


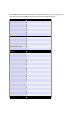


Recording Controls
Start Recording Stop Recording
Start Recording: starts writing the audio output to the selected file. Click a second time to
abort recording.
AtomixMP3 supports .WAV output format.
Cut
Cut: continues recording in a second file. Use this feature to burn a multi track mixed audio
CD.
Every written file is named as follows:
1. set the file name
for example my_file.wav
2. start recording
3. AtomixMP3 writes my_file000.wav
4. click the cut button
5. AtomixMP3 writes my_file001.wav
6. click the cut button
7. AtomixMP3 writes my_file002.wav
8. And so on...
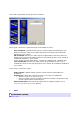
Once the recording has started, you can monitor your recording, by using the recording
status window, below the record button:
Recording status window
Recording status: displays information about the recording process:
the file name, and its path
the total recorded time in this file
the file size (in Mo)
the overall recorded time (if many recorded files in the same session)