
User Manual
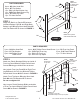

STEP 1:
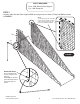
Attach two Back Leg Panels P7 between
Left Back Bottom Leg P3L and Right Back
Bottom Leg P3R using Allen Head Bolts H5
with Flat Washer H7 as shown in FIGURE 1.
5
© 2012 Escalade Sports
For Customer Service Call 1-888-996-2729
PARTS REQUIRED:
8 pcs - H5 Allen Head Bolt
8 pcs - H7 Flat Washer
1 pc - P3L Left Back Bottom Leg
1 pc - P3R Right Back Bottom Leg
2 pcs - P7 Back Leg Panel
1 pc - T1 Allen Wrench
FIGURE 1
H5
H7
P7
P7
P3R
P3L
H5
H7
H5
H7
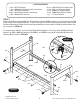
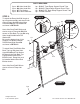
PARTS REQUIRED:
2 pcs - H6 Allen Head Bolt 4 pcs - H13 Phillips Round Head Screw 1 pc - P6 Front Leg Panel
2 pcs - H7 Flat Washer 1 pc - P1R Right Front Leg 2 pcs - P16 Plastic Bracket
8 pcs - H8 Phillips Round 1 pc - P1L Left Front Leg 1 pc - T1 Allen Wrench
Head Screw 1 pc - P2 Front Top Apron
FIGURE 2
STEP 2:
Attach two Plastic Brackets P16 to top inside of
Front Leg Panel P6 with Phillips Round Head
Screws H8 using pre-drilled holes as shown.
Next, attach Front Leg Panel P6 to Right Front
Leg P1R and Left Front Leg P1L with Phillips
Round Head Screws H13 as shown in FIGURE 2.
Attach Front Top Apron P2 using Allen Head
Bolts H6 with Flat Washers H7 as shown.
Do not overtighten H6.
Next, secure Plastic Brackets P16 to underside
of Front Top Apron P2 with Phillips Round Head
Screw H8 as shown in FIGURE 2.
P6
P2
P16
H8
H8
H6
H7
H13
P1R
P1L
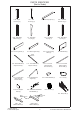
NOTE:
Inside hook to
top of each
Leg P1.
All Rights Reserved
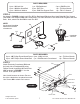
Note:
Make sure to place
steel inserts this side.
Note:
Make sure
to place steel
inserts this
side.
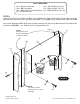
NOTE:
Cutout on
top side.
NOTE:
Small radius
on this side.
NOTE:
Laminate on this side -
Basketball Graphics other (Front) side.