
User's Manual


4
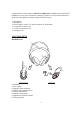
INSTALLATION
Please follow this quick set-up guide to ensure trouble free installation of your headphones.
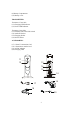
Step 1:
Connect the 3.5mm Stereo Audio Cord (18) to the audio output socket (i.e. PHONE/
HEADPHONE 3.5mm socket) of your audio source, e.g. TV, HiFi, CD, DVD player etc.
*** If your audio source has 2 RCA output sockets (red and white in colour), use the 90mm
Y-connection Cord (17) for connection, if necessary.
Step 2:
Connect the other end of the 3.5mm Stereo Audio Cord (18) to the Audio IN Socket (14) at
the rear side of the transmitter.
Step 3:
Connect one end of the AC/DC Adaptor (19) to the DC IN Socket (16) at the rear side of the
transmitter, and the other end to the main electric wall outlet.
Step 4:
The transmitter will be automatically ON when there is audio signal from the audio source
(please make sure that the transmitter is powered on by the AC/DC adaptor in Step 3). Then
the Power LED Indicator (12) will glow GREEN to confirm that the transmitter is ready for
operation. Place the transmitter on a dry, cool place preferably above head level.
*** The transmitter has auto-cut-off function. When there is no audio signal for over 70+/-
10 seconds, the power of the transmitter will be automatically cut off.
Step 5:
Open the Battery Cover (10). Insert 2 pcs AAA size batteries into the Battery Compartment
(9) at the Left hand side of the headphones observing the correct polarity. Then close the
Battery Cover (10), and press the headphones ON (7), the Power led (5) glow red.
Step 6:
Switch on your music device (TV. HiFi, CD, DVD etc.) and start your media playing.
Step 7:
Press the digital-tuning Button (6) once until the Correct Channel of the headphones then you
can hear a good quality sound. Adjust the Volume UP / DOWN button (3,4) to a desired
level.