
Operating instructions


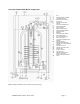

ATMOS MULTI Mk 2 version 2007
Page
10
3. Filling, de-aerating
and commissioning
• Filling or topping up the central heating
circuit
The Atmos Multi does not have an integral central
heating filling and drainage tap. Your installer will have
filled the boiler and system to its effective working
pressure of 1.5 bar, and shown you where the filling
and draining point is found in your central heating
installation.
The water pressure of the central heating circuit at the
appliance should be 1.5 bar. If the central heating
water pressure is lower than 0.5 or higher than 3 bar,
a warning will appear on the diagnostic display (the
letter
'
C
' alternating with the operating status of the
appliance). If this warning is given, the appliance will
run at minimum capacity. See also section 6.
Warning!
For the constant correct operation of the appliance, it is
important that the central heating installation is clean
and free of air. Only fill the installation with clean tap
water. If additives such as anti-freeze or leak sealer
are used, the guarantee will become null and void in its
entirety. The only permitted additive is Sentinel X100
corrosion inhibitor.
1.
The central heating pump must be switched off -
remove the plug from the socket.
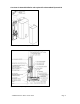
2.
Check that the cap of the automatic vent is
loosened.
3.
Connect one end of the filler hose to the water
pipe.
First allow the hose to fill with water and
then connect the other end to the central heating
filler tap. This will prevent air from getting into the
central heating circuit.
Alternatively if using the optional Pre-
Assembled Pipework kit : Open the cold fill
valve in the filling loop.
4.
Slowly fill the installation to a pressure of 1.5
bar and check for water leakage.
5.
Open all vents on the central heating radiators
and close them when the air has escaped.
6.
If the pressure after de-aeration falls below 1.5
bars, refill the installation to a pressure of
approximately 2 bars.
7.
Close the water tap and disconnect the filler
hose.
Alternatively if using the optional Pre-Assembled
Pipework kit : Close the cold fill valve in the filling
loop.
NB!
The water pressure must never be lower than 1 bar
at the appliance. If the pressure drops below 1 bar,
top up the installation yourself or contact your
installer.
The following procedure should be followed when
filling the installation for the first time:-
•
De-aerate the system regularly during the first
few weeks.
•
Check that the automatic de-aerator is
working correctly and not leaking any water.
•
Top up the system if the pressure at the
appliance falls below 1.5 bars.
If the pressure drops on a regular basis, the central
heating installation must be leaking water. The leak
must be traced and repaired.
• Filling the hot water system
1.
Close the stopcock of the cold water (CW) inlet
combination.
2.
Open the main tap of the water system and
check the pipes and connections to the CW inlet
combination for leakage.
3.
Open the stopcock of the CW inlet combination.
4.
Open the hot water taps so that the air can
escape from the water heater and the pipes.
5.
Wait until water comes out of all hot water taps
and is clear of impurities. The water heater has
now been filled and the
hot water taps can be
closed.
6.
Check the pipes and connections for leaks.
• Starting the central heating circuit
1. With the appliance gas tap in the ‘Off’
position, switch on the electrical supply to
the boiler.
NB!
If an 'L' appears on the display, the live and neutral wires
have been wrongly connected and must be swapped
over at the plug.
2.
Check the water pressure of the central heating
circuit. This should be approximately 1.5 bar at
the appliance.
3.
Open the appliance gas tap.
4.
Switch off the hot water heater by pressing the
hot water button on the control panel. The
indication light 'On' will go out.
5.
Set the room thermostat at the highest position.