
Installation manual


MonoSolar & Solar Panels Installation Manual Page 6 of 29
2.0
Installing Roof-Integrated Solar Panels (For pantiles, etc, but not slates)
2.1 Before commencing installation, please ensure that the flashing kit is correct
for the size and type of panel configuration being used. For a single panel, it
should contain the following items:-
1 x lead bib mounted on wooden lath, with solar panel clips.
2 x side flashings.
1 x top flashing.
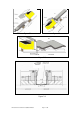
For a double panel configuration, it should contain an additional zinc joining
channel as shown in Fig 2.4
Check that the sensor has been fitted to the panel before taking up to the roof.
2.2 Mount the lath with the attached lead bib in the location, on the untiled roof,
where the bottom of the solar panel is to be sited. This should be 140mm –
160mm above the first tile lath below the panel. Ensure that the lead flashing
is square to the roof. Screw the lath to the roof trusses (Note – Use a
minimum of 3 screws into the roof trusses) and seal the screw holes with lead
flashing sealant. Fill any gaps between the tiles and the lath that might cause
the lead flashing to sag with a wooden fillet.
2.3 Insert the template (this is part of the solar panel packing) into the clamps on
the lath, and use this to mark the position of the three holes required in the
roof for the flow and return pipes, and the sensor pocket.
2.4 Ensure that the marked positions do not intersect with any of the roof trusses.
Cut the holes as marked, these should be a minimum of ∅80mm.
2.5 Remove the screws in the panel glazing frame (Note – Use marking tape to
help realign the cover later), allowing the cover to be removed. Hoist the panel
base to the roof (Note – Care must be taken not to touch or damge the
selective surface of the panel). Place the panel in position, with the bottom
edge mounted in the clamps (see Fig.2.1), check that the holes in the roof are
aligned with those in the panel. Using the 6 supplied screws, fix the panel to
the roof laths.
2.6 Install the side and top flashings (see Figures 2.2 & 2.3), ensuring that the top
flashing sits on top of the side flashings. Use several stainless or galvanised
roof sheeting screws down the side flashings into the battens, leaving them
slightly proud, to hold the flashings in place. Hoist the solar panel cover to the
roof. Firmly locate the flashings against the side of the panel by replacing the
glazing cover. Re-secure the glazing frame with the screws. Ensure that the
top flashing locates under the securing strip on the side flashing. Fold the lip
to stop the side flashings sliding downwards.
2.7 Tile around the panel, cutting tiles as necessary, dress the lead bib down on
to the lower row of tiles. For some roof tiles, it might be necessary to fill the
gap between the flashing kit and tiles with lead tiles. Finally check that the roof
is completely watertight.