
User`s guide


www.uTasker.com
µ
Tasker – AT91SAM7X Tutorial
V1.4
uTaskerV1.4_SAM7X.doc/0.03 7/36 31.07.2009
6. OK. So at least you are convinced that it is really running our project code, but it is
not exactly something to write home about.
Let’s get down to more serious stuff:
There are some menu items in the µTasker environment simulation window. Open
“LAN | Select working NIC” and select the network card you would like the
simulator to use – don’t worry, it will be shared with anything else which is already
using it.
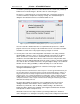
Open a DOS window and do the standard PING test - “ping 192.168.0.3” if you
didn’t need to change anything, or the IP address you defined if you did.
The simulated device should now be responding. That means that your PC has sent
PING test messages to the network and received answers from some network device
(or course our internal simulated device – but no one will know the difference).
You can also try sending the ping test from another PC on the network and it will also
receive an answer.
If you have a network sniffer you can also record the data from the network – don’t
worry if you haven’t used a network sniffer before because we will come back to this
later on and use Wireshark to do the job.
Watch the LAN indicators on the processor’s virtual LAN connector. The left one will
blink green when a frame is received – if it is accepted by the device (matching
address, broadcast or all when in promiscuous mode). The right one will blink red
whenever the simulated device sends a frame to the network.
7. I suggest that you now close the µTasker environment simulation window using the
‘normal’ method File | Exit or by clicking on the close cross in the top right hand
corner.
This standard termination will cause the selected NIC to be saved to a file in the
project simulation directory called NIC.ini and so you will not have to configure it the
next time you start the µTasker environment simulation.
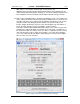
8. Now I’m sure you are not yet satisfied with the progress, so let’s execute the project
again (short cut F5) and this time we will do something a bit more interesting. Start
your web browser (Internet Explorer, Firefox, Chrome, etc.) and establish a
connection with the simulated target: In the URL line type in http://192.168.0.3
(assuming its address has not been changed) and hit the ENTER key. The web
browser will request the start page on the web server, which will return the following
page the first time used:
Figure 2. µTasker web server displaying that it has no web pages loaded