
User`s guide


www.uTasker.com
µ
Tasker – AT91SAM7X Tutorial
V1.4
uTaskerV1.4_SAM7X.doc/0.03 15/36 31.07.2009
5. Downloading the Code to the Target
The following explains how to download the FLASH based target code to the ATMEL
AT91SAM7X-EK using the SAM-BA utility from ATMEL.
The SAM-BA utility can be downloaded from the ATMEL web site http://www.at91.com/ as
part of the AT91-ISP tool package. Once you have installed the tool package you can start.
Here’s a set by step guide so that it should work with no hassles the first time for you:
Step 1: Connect a cross over cable between the ATMEL AT91SAM7X-EK connector labelled
SERIAL DEBUG PORT and a COM port on your PC. The cross over cable is
delivered with the evaluation board.
Alternatively connect the USB device connector to a free USB socket on the PC – this
will only work when the SAM7X is fully erased; see Step 3 if this is not yet the case
and then return to step 1.
Step 2: Power on the evaluation board – its power LED should light. Power can be supplied
via USB cable.
Step 3. Short circuit the jumper marked ERASE. This will cause the complete internal FLASH
to be erased so that we know that everything is fresh and that all NV bits (non-volatile
flag bits) in the device have been reset. Reposition the jumper as it originally was
(connected to only one of the two pins) and reset the board.
Step 4. Start the SAM-BA program and select the COM port which you have connected and
the target AT91SAM7X256-EK. (If you have connected via USB it will display the
USB interface as alternative, possibly as virtual COM port depending on the operating
system used). Then start the connection by clicking on “Connect”.
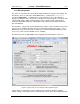
Step 5. Assuming the connection is successful you will see a window allowing you to display
the internal memory contents of the device and also load new code to FLASH. Fill out
the file to be loaded in “Send File Name” and then start by clicking on “Send File”.
The loading takes several seconds after which the tool will ask you whether you want to lock
regions in the FLASH. Answer with “NO”.
Step 6. Although the program has been loaded into the internal FLASH of the SAM7X you
would find that it can still not run. The reason is that the device will still boot into its
SAM-BA debug program and not to our code.
To arrange for your board to actually boot from the new code it is necessary to
program a NV bit. To do this, use the “Script” called “Boot from FLASH (GPNVM2)”
and execute it. This will program the corresponding bit to the correct state so that our
code will actually start.
Step 7. Quit the SAM-BA program and reset the evaluation board. You will see that it is now
running the µTasker demo program!!
Since the FLASH was completely deleted, it will start using default parameters and
have no web pages loaded. Therefore you will have to repeat the steps in the tutorial,
after which the web server will be complete.