
User`s guide


www.uTasker.com
µ
Tasker – AT91SAM7X Tutorial
V1.4
uTaskerV1.4_SAM7X.doc/0.03 12/36 31.07.2009
software using this method (as well as by FTP and even USB). For further details
about using this capability on the SAM7X see the document
http://www.utasker.com/docs/uTasker/BM-Booloader_for_SAM7X.PDF :You will see
that you will then be able to develop code for a real target on the internet, including
uploading it from anywhere where you have web access to it!
I hope that the introduction has shown that we are dealing with something which is very
simple to use but is also very powerful in features. There are lots of details which need to be
learned to understand and use everything to its fullest capabilities and it is up to you to
decide whether you want this or would like to simply use the µTasker and its capabilities as a
platform for your own application development. In any case you have just learned the basics
of a powerful tool which is not only great fun but can really save you lots of development
time.
3. Testing on the Target
Up until now we have been using the simulator and hopefully you will agree too that it is a
very useful tool. We have tested some quite useful code designed to run on the SAM7X and
done this in an environment enabling us to do embedded IP stuff in real time. We haven’t
actually done any debugging or added new code but you can probably already imagine the
advantages of being able to write and test it on the PC before moving to the target.
At the same time you are probably thinking about how that will all work on the real device.
Perhaps you are worried that it is all a show after all and the real device will remain as dead
as a door nail or at the best crash every time the user breaths heavily. So let’s prove that this
is not the case by repeating the first part of the tutorial, but this time we will go live…
We will use the ATMEL AT91SAM7X-EK or the OLIMEX SAM7X-EX256 (both will operate
equivalently).
4. Compiling the Project for the Target
Warning: the µTasker demo project V1.4 is delivered with graphical LCD support activated.
This can cause the SW to hang if there is no real LCD connected. Before compiling for the
target it is recommended to disable SUPPORT_GLCD in config.h so that this cannot occur.
The first thing that we need to do is to compile the project for the target. This means that we
will be cross compiling the code which we already have been testing with the simulator, using
an assembler, a C-compiler and a linker. There are a number of such tools available and
unfortunately they are not all compatible in every aspect, even if ANSI compatible. Basically
there is always the chore of getting the thing to reset from the reset vector, meaning that the
start-up code must be available and at the correct location. Then there are specialities
concerning how we force certain code or variables to certain addresses or regions and how
we need to define interrupts routines so that they are handled correctly. Sometimes there is
also need for some special assembler code which does such things as setting the stack
pointer or enabling and disabling interrupts.
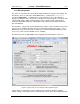
The µTasker demo project for the SAM7X is delivered with projects for IAR Embedded
Workbench (IAR4 and IAR5), Keil uVision3, Rowely Crossworks and a standalone GNU
makefile. The IAR and Keil compilers are very good compilers, producing highly efficient