
User guide


9
6310A–ATARM–26-Mar-07
Application Note
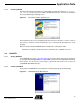
4.5.2 Installing GDB Server
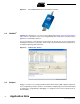
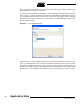
The J-Link software package is delivered as a ZIP file containing the setup program. After
decompressing and launching it, the following window appears:
Figure 4-8. J-Link Software Installer Main Window
Simply click on the “Next >” button until the setup completes.
5. Using the Toolchain
This section demonstrates how basic tasks are performed using the newly-installed toolchain. It
uses the “Getting Started with the AT91SAM7S Microcontroller” software example that can be
downloaded along with the corresponding application note on the Atmel web site, at this
address: http://www.Atmel.com/dyn/products/app_notes.asp?family_id=605.
The Getting Started example shall be unzipped in any directory of the file system. This is the
project which is going to be referred to in the following subsections. However, keep in mind
that the make utility does not currently support spaces in directory or file names, so they
should be avoided.
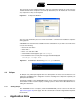
5.1 Importing an Existing Project
The first step is to launch the Eclipse IDE. A shortcut to the program can be found in:
Start Menu > Programs > YAGARTO IDE > Eclipse Platform X.Y
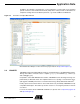
Upon startup, Eclipse will ask for a workspace directory. This is the directory where new projects
will be saved. For the purpose of this example, any location can be chosen.
Figure 5-1. Eclipse Workspace Launcher Window