
User guide


10
6310A–ATARM–26-Mar-07
Application Note
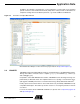
After a workspace has been chosen, the Eclipse main window opens. Initially, it will be com-
pletely empty since no project is created yet.
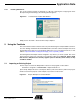
To import an existing GNU project in Eclipse, start by creating a new project by selecting the
“New > Project...” option in the file menu. The project wizard window should appear. It offers a
list of standard templates which can be used to construct the new project. Since the Getting
Started example is written in C and has its own makefile, the “Standard Make C Project” tem-
plate should be selected.
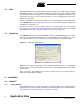
Figure 5-2. Project Wizard Window
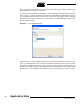
The next step is to name the project and select its root directory. The name can be set to any
value, e.g. “Getting Started”. The root directory must be set manually however, since the goal is
to import an existing project and not create a new one in the workspace. Therefore, the “use
default location” option should be unchecked and the path of the getting started example should
be set in the “Location” field. Once both values are setup correctly, click on the “Next >” button.