
Product Manual
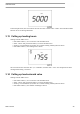
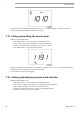
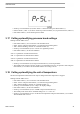
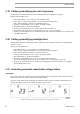
Table Of Contents
- Table of contents
- 1 Safety precautions
- 2 General description
- 3 Elektronikon Base Controller
- 3.1 ElektronikonTM Base Controller
- 3.2 Control panel
- 3.3 Icons used on the display
- 3.4 Main screen
- 3.5 Main function
- 3.6 Shutdown warning
- 3.7 Shutdown
- 3.8 Service warning
- 3.9 Scrolling through all screens
- 3.10 Calling up running hours
- 3.11 Calling up motor starts
- 3.12 Calling up module hours
- 3.13 Calling up loading hours
- 3.14 Calling up load solenoid valve
- 3.15 Calling up/resetting the service timer
- 3.16 Calling up/modifying pressure band selection
- 3.17 Calling up/modifying pressure band settings
- 3.18 Calling up/modifying the unit of temperature
- 3.19 Calling up/modifying the unit of pressure
- 3.20 Calling up/modifying backlight time
- 3.21 Activating automatic restart after voltage failure
- 3.22 Keyboard lock
- 4 Installation
- 5 Operating instructions
- 6 Maintenance
- 7 Adjustments and servicing procedures
- 8 Problem solving
- 9 Technical data
- 10 Instructions for use
- 11 Guidelines for inspection
- 12 Pressure equipment directives
- 13 Declaration of conformity

• Scroll Up or Down buttons (4-8) until <PrSL> is shown and then press Enter button (7).
• Pressure band 1 (<SEL.1>) is shown. Scroll Up or Down buttons (4–8) to pressure band 2 (<SEL.2>).
• Press Enter button (7) on the desired pressure band.
3.17 Calling up/modifying pressure band settings
Starting from the Main screen:
• Press Enter button (7) for 3 seconds to enter the Main menu.
• Select <ProG> and press Enter button (7) to enter the Programming menu.
• After <PASS> blinking, confirm <0> with Enter button (7).
• Scroll Up or Down buttons (4-8) to <reG.P> for regulation pressure.
• Press Enter button (7) to enter the submenu.
<LPr.1> is parameter of Load Pressure band 1
<uPr.1> is parameter of Unload Pressure band 1
<LPr.2> is parameter of Load Pressure band 2
<uPr.2> is parameter of Unload Pressure band 2
• Scroll Up or Down buttons (4-8) and press Enter button (7) to select parameter.
• The actually used pressure is shown. Scroll Up or Down buttons (4-8) to set pressure value and press
Enter button (7) to confirm. The unit blinks and the new setting is saved.
3.18 Calling up/modifying the unit of temperature
The unit of temperature measurement can only be changed when the compressor is stopped.
Starting from the Main screen:
• Press Enter button (7) for 3 seconds to enter the Main menu.
• Select <ProG> and press Enter button (7) to enter the Programming menu.
• After <PASS> blinking, confirm <0> with Enter button (7).
• Scroll Up or Down buttons (4-8) to <diSp> for display settings.
• Press Enter button (7) to enter the submenu.
• Scroll Up or Down buttons (4-8) to <tEMP> and press Enter button (7).
• The actually used unit is shown. Possible settings are <˚C > and <˚F >.
• Scroll Up or Down buttons (4-8) to set the unit of temperature and press Enter button (7) to confirm.
The unit blinks and is saved.
Instruction book
2920 7191 00 41