
Operating Instructions and Installation Instructions


40
InstallationManual
40
Installation
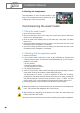
1.Installingthewaterheater
• Putthewaterheaterwhereitisprotectedfromfrost(4to5°Cminimum).
• Positionitascloseaspossibletothemostfrequentlyusedtaps.
• Ifitisinstalledinanuninhabitedroom(store-room,cellar,garage)thepipesand
safetydevicesshouldbeinsulated.
• Thecontinuousambienttemperaturearoundthewaterheatermustnotexceed
40°C,soprovideventilationifnecessary.
• Makesurethatthewall-bracketisstrongenoughtocarrytheweightofthewater
heaterwhenfullofwater.
• Allow550mminfrontofeachelectricalelementforperiodicmaintenanceofthe
heatingelement.
• Adriptraymustbeinstalledunderthewaterheaterifitispositionedinafalse
ceiling,anatticorabovelivingareas.Anoutletconnectedtoadrainpipeisneces-
sary.
• Ventilationmustbeprovidedindamplocations.
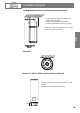
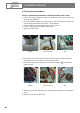
1.1 Installing a vertical wall-mounted water heater (VM)
Theheateriseasilymovedbyliftinghandlesbuiltintotheends.Thereareseveral
waysofxingit,dependingonthenatureofthewalls.
Thin walls (plasterboard partitions):
Ø10mmthreadedrodstraversingthewall,connectedbyprolesorbackplates.
Hard, thick walls (concrete, stone or brick):
GroutinØ10mmbolts,ordrilltotakeØ10mmplugs.
Forbothtypesofwalls,usethedrillingtemplateprintedonthecartonandcheckthe
measurementsbeforedrilling.
Walls not able to bear signicant weight
Theverticalwall-mountedwaterheaterscanbeplacedon a pedestal if the wall
cannotsupporttheweightoftheappliance.Thetopbracketmusthoweverbexed.
Usethepedestalrecommendedbythemanufacturer.
1.2
Installing a vertical water heater on a pedestal (VS)
Theheaterisplacedonthegroundwithshoesxedunderitsbase.Nowallattach-
mentisneeded.
Aheighteningframemaybexedundertheheatertoleavespaceforthepipes(H:
220mm–optionalaccessory).
1.3
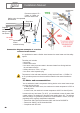
Installing a horizontal wall-mounted water heater (HM)
Oncethewaterheaterisinstalled,thehydraulicconnectionsandthecovermust
alwaysbeverticalandbelowtheappliance.
5
Manuel d’utilisationFR
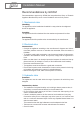
3. La commande nomade
3.1 Vérifications préalables
Charge de l’accumulateur
Le chauffe-eau doit être mis sous tension pendant au moins seize heures
en continu pour pouvoir recharger l'accumulateur assurant la transmis-
sion vers la commande nomade.
Dans le cas d'une double tarification (heures creuses / heures pleines),
utiliser le contacteur du chauffe-eau pour le mettre en marche forcée.
Si l'accumulateur n'est pas suffisamment chargé, la communication radio
peut connaître des coupures
Installation des piles sur la commande nomade
S'assurer que les piles sont bien installées dans la commande nomade.
Voir le paragraphe Mise en place des piles, page 40.
Réglage date et heure
Vérifier le réglage du jour et de l'heure en appuyant sur la touche
Voir le paragraphe Réglage du jour et de l’heure, page 42.
Un mauvais réglage du jour et de l'heure peut engendrer un
dysfonctionnement du chauffe-eau.
Une fois ces vérifications réalisées, vous pouvez procéder à la mise en
place de la commande nomade.
Manuel utilisation FR.book Page 5 Mercredi, 23. décembre 2009 11:32 11