
User Guide


System 20 LCR and SR InWall Speakers
● ● ● ● ● ● ● ● ● ● ●
5
● ● ● ● ● ● ● ● ● ● ●
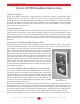
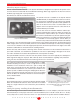
Left speaker to the left side of the room and the Right on the right side. As much as possible keep the null
centered on the prime listening position.
IMPORTANT: Please note that there are dedicated left and right Dipole surround speakers and they are
labeled as such. This is done to ensure that the drivers facing the front of the room are in phase with
the system’s front speakers. Left and right refer to the left and right wall when you are seated facing
the screen. If the speakers must be mounted upside down, as outlined above, be sure to swap them
from side to side in order to maintain proper phasing with the fronts.
In any case, please note that for the greater part of any movie you should not be directly aware of the surround
speaker’s presence. They’re there to create those environmental sounds
of the location up on the screen. So in a rain filled scene you should be
thinking, “Is it raining outside my house?”, not “Hey, I hear the rain in the
surround speakers!”
If you decide to use a direct radiator for the surrounds (in a non-THX
Ultra certified installation) keep the following in mind. When using non-
Dipole surround speakers, the more directly they are aligned with your
ears, the more localizable their sound will be. And since the vast majority
of movie surround channel information consists of environmental sonic
cues that aren’t supposed to be localized, this is particularly undesir-
able. Generally then, non-Dipole surrounds should be placed well above
ear level on the rear or side walls. As opposed to Dipoles, which work best when placed directly to the sides of
the listening position, direct radiators work best when placed on the side or rear wall, well behind, and not
aimed directly at the listening position.
Now That You Have Chosen the Right Locations ... Installation Issues
IMPORTANT:
We always recommend a professional be involved in the installation of InWall Theater System
speakers, if at all possible. Note that
the Installation Bracket is required for all installations, new construction or
retrofit, except when the InWall back box enclosure is used (IN-BOX-20LCR) because the Installation Bracket
is pre-mounted in the enclosure. Please see the installation instructions for the IN-INST-20LCR or 20SR for
information pertaining to Installation Bracket mounting, and its use as a rough-in assembly in new construction.
The following instructions primarily apply to the final installation of the speaker system (either System 20 LCR
or System 20SR) into the already mounted Installation Bracket.
Horizontal or Vertical? To Tilt or Not to Tilt
The System 20 LCR can be mounted horizontally or vertically. However, when mounted horizontally it will
not fit between standard 16 inch on center studs. There is no practical benefit to mounting the speaker
horizontally, unless there is an issue of limited vertical space or aesthetics. If you wish to mount the speaker
horizontally in a 16 inch on center wall, modifications will have to be made to the wall framing.
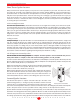
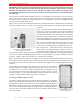
Rotating and Tilting the Mid-high Baffle
If mounting the 20 LCR horizontally, remove the 8 mid/high baffle mounting screws and rotate the baffle 90
degrees as shown in Fig. 4. At the same time determine whether the mid/high baffle should be level or tilted up
or down. If the speakers are significantly above or below ear level (more than 2 feet) when seated, the baffle
should be tilted to compensate. While the 8 screws are removed, lift the mid/high baffle from the speaker and
remove the leveling spacer located under and within the baffle. The spacer is taped to the baffle at the top edge,
so cut through the tape before trying to remove the spacer. The spacer is flexible and can be removed without
disconnecting any wires. Simply lift one corner of the spacer over the baffle corner and then spread the spacer
while removing it the rest of the way. See Fig. 5 Rotate the baffle to achieve the desired tilt and reinstall using
the same 8 screws, being careful not to overtighten them. There is a strip of self adhesive acoustic foam
included in the Owners Manual packaging that should be attached to the flat section of the woofer baffle or
bezel assembly that has been exposed by tilting the baffle.
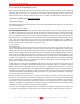
Fig 3
Bipole operation (no null)