
Operating instructions


22
Adjusting the saw
Replacing the saw blade
(p. 78 – 81)
Before replacing the saw blade remove the
plug from the mains.
Do not use any saw blades made of HSS steel
Do not use any cracked saw blades or those that have
changed their shape
Only use well-sharpened saw blades
Splitting wedge setting
The splitting wedge (13) is set in the factory at the
correct measurement.
The splitting wedge is an important safety device as it
prevents the workpiece from recoiling
To guarantee the function of the splitting wedge, its distance
from the toothed wheel its distance from the teeth of the saw
blade above the table must not be more than 5 mm.
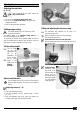
Set the cutting height
The cut height
can be fully
adjusted with the
aid of the
handwheel (B)
from 0 – 76 mm.
Set the cutting
height 5 mm
higher than the
material
thickness.
Adjust saw blade pitch
The saw blade must not be set to the inclined position
when the blade is turning. The motor must be switched
off first.
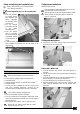
Adjusting between 0° - 45°
1. Loosen the clamping screw (A).
2. Turn the handwheel until the required angle is shown
(0° - 45°).
3. Hold the handwheel and at the same time, tighten the
clamping screw again, to fix the adjusted angle.
Fitting and adjusting the transverse stop
The transverse stop supplied can be used as a
transverse or mitre stop.
L
Make sure that the fences are correctly adjusted.
(See "Working instructions")
Fit the transverse stop to the saw table plate
Push the transverse stop into one of the two grooves on
the saw table plate.
Setting the angle
Loosen the clam-
ping screw of the
transverse stop by
turning. You can
now set the stop to
the required angle.
Turn the clamping
screw tight again.