
Operation Manual


18
Repairs to other parts of the machine must be carried out
by the manufacturer or one of his customer service
points.
Use only original spare parts, accessories and special
accessory parts. Accidents can arise for the user through
the use of other spare parts. The manufacturer is not li-
able for any damage or injury resulting from such action.
Â
D
D
e
e
s
s
c
c
r
r
i
i
p
p
t
t
i
i
o
o
n
n
o
o
f
f
d
d
e
e
v
v
i
i
c
c
e
e
/
/
s
s
p
p
a
a
r
r
e
e
p
p
a
a
r
r
t
t
s
s
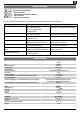
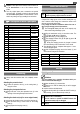
Pos. Denomination Order-No.
1
Protective hood
380821
2
Cutting head
---
3 Plant protection bow 380820
4 Clamping screw
5 Wheel set
380824
6 Charging unit 364149
7 Battery 364148
8
Trip switch
---
9
ON-OFF switch
---
10
Adjusting knob
---
11
Thread knife
380822
12 Clamping nut ---
13
Front handle
380807
14 Clamping nut ---
15
Adjusting knob
---
16
Lawn trimmer – upper part
---
17
Lawn trimmer – lower part
---
18
Spool cover
380823
19
Thread spool cpl.
380898
20
Battery release button
---
21
Safety label
380825
22
Spring
---
23
Carrying strap
---
A
A
s
s
s
s
e
e
m
m
b
b
l
l
i
i
n
n
g
g
Always start the machine when it is completely assem-
bled.
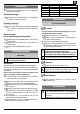
Attaching the protective hood
 Fasten the protective hood (1) to the cutting head (1)
using the screws.
Attaching the plant protection bow
 Plug both ends of the plant protection bow (3) in the
openings of the cutting head provided for them.
Attaching the wheel set (only for use as edge trimmer)
 Unscrew the clamping screw (4) out of the wheel set (5).
Â
Slide the wheel set (5) on the holder on the cutting
head (2).
Â
Firmly tighten the clamping screw (4).
B
B
e
e
f
f
o
o
r
r
e
e
t
t
h
h
e
e
f
f
i
i
r
r
s
s
t
t
s
s
t
t
a
a
r
r
t
t
-
-
u
u
p
p
C
C
h
h
a
a
r
r
g
g
i
i
n
n
g
g
t
t
h
h
e
e
r
r
e
e
c
c
h
h
a
a
r
r
g
g
e
e
a
a
b
b
l
l
e
e
b
b
a
a
t
t
t
t
e
e
r
r
y
y
L
Always use the supplied charger to charge the
lithium ion battery supplied with the machine.
Mains connection
Compare the voltage given on the machine model plate e.g.
230 V with the mains voltage and connect the device to the
relevant and properly earthed plug.
Fully charge the lithium ion batteries before first use or
after a longer storage period of the machine.
L The rechargeable battery will reach its full capacity only
after several charge-discharge cycles.
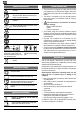
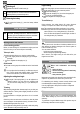
 Plug the transformer unit (6) in the mains socket. The
LED (A) lights red Î ready for operation.
Â
Slide the battery (7) in the charging unit.
Â
The charging indicator LED (B) will light up green. Î
Charging is in progress.
L During the charging process, the charger is heated
and a low humming noise can be heard.
This is normal.
 The charging process is completed after approx. 1 hours.
The LED (B) lights green.
Â
After completed charging, remove the battery (7) and
disconnect the charger from the mains.
Red LED Green LED Meaning
ON OFF Ready
ON Flashes Battery is being charged.
ON ON Battery fully charged.
Flashes OFF Battery overheated.
Flashes OFF Internal fault
S
S
t
t
a
a
r
r
t
t
-
-
u
u
p
p
S
S
w
w
i
i
t
t
c
c
h
h
i
i
n
n
g
g
o
o
n
n
/
/
o
o
f
f
f
f
S
S
w
w
i
i
t
t
c
c
h
h
o
o
n
n
The lawn trimmer has a protective shut-down which pre-
vents an unintended switching on.
Â
Insert the battery (7) in the machine.
Â
Make sure to slide the battery fully in until it engages
with a click.
 Hold the machine with both hands.
Â
Press the trip switch (8) and then the ON/OFF switch (9).
While working, you can release the trip switch (8).
L
To protect the battery the machine automatically
switches off at a low battery.
Do not continue to operate the ON/OFF switch. Oth-
erwise the battery may be damaged.
Charge the lithium ion battery (Â „Charging the bat-
tery“).