Logio ® Secure Password Organizer User's Manual
Contents Contents Software License Agreement....................................................................................2 Need Help?...............................................................................................................3 Product Overview......................................................................................................4 Quick Reference Guide..............................................................................................5 Initial Setup........
Software Licence Agreement Software License Agreement PLEASE READ THE SOFTWARE LICENSE AGREEMENT CONTENTS IN THE BACK OF THIS USER’S MANUAL CAREFULLY BEFORE USING THIS PRODUCT. ATEK, INC. IS WILLING TO LICENSE THE SOFTWARE CONTAINED WITHIN THIS PRODUCT TO YOU ONLY ON THE BASIS THAT YOU ACCEPT ALL THE TERMS AND CONDITIONS CONTAINED IN THIS LICENSE AGREEMENT. THIS IS A LEGAL AGREEMENT BETWEEN YOU (EITHER AN INDIVIDUAL OR AN ENTITY) AND ATEK, INC.
Need Help? Need Help? If you have any problem using your Logio® Secure Password Organizer, do not return it to the dealer. First read this User’s Manual. If you still have difficulties, check our website www.atek.com for possible additional information. Or contact our technical support department Monday through Friday from 9 a.m. to 5 p.m. Pacific Time at 1-888-889-9990 or 714-258-0100, or at support@atek.com. You may register your purchase at www.atek.com/registration.htm. Registration is optional.
Product Overview Product Overview Logio is a single-user, secure electronic organizer for storing user IDs and passwords for websites and computer logins. You can also store ATM and cell phone PIN codes, credit card numbers, alarm codes, passport and driver’s license numbers, and even less sensitive information such as airline frequent flyer program account numbers.
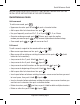
Quick Reference Guide BEFORE USING YOUR LOGIO THE FIRST TIME, INSTALL THE BATTERY PER THE INITIAL SETUP INSTRUCTIONS IN THIS USER’S MANUAL.
Quick Reference Guide Delete record • To delete an entire record, navigate to the record in “view” mode, then push & hold & push . Or, in “edit” mode, delete all characters on all lines, then with cursor on line 3 push or .
Initial Setup Initial Setup IMPORTANT NOTE: Your Logio automatically turns off after a set period of inactivity to save battery power and protect against intrusions by other people. The default auto-off time is one minute.
Initial Setup After several seconds, the screen will display: Push one time. 4. Set up master passcode THIS SECTION IS VERY IMPORTANT. MAKE SURE YOU HAVE READ IT COMPLETELY BEFORE PROCEEDING. The screen will display: Push one time. The screen will display: Starting at the blinking cursor on line 3, you will enter a random 8 to 15 digit master passcode.
Initial Setup maximum number of 15 allowed, the higher level of security you will have. (If you enter more digits than can display on one screen, the screen will shift to the right.) It is very important that for your Logio master passcode you use random numbers that nobody else will be able to guess. Numbers that are not random sequences, such as 11111111, 12345678, 87654321, and 11223344 must be avoided.
Initial Setup Then you would push beginning. to start entering your master passcode from the If you enter a master passcode that is 8 to 15 digits long, the screen will display: Enter your master passcode again and then push passcode does not match, the screen will display: . If the confirming master And then several seconds later the screen will display: Pushing would allow you to try to confirm the master passcode again. If you wanted to start over with a new master passcode, you would push .
Initial Setup Push . The screen will display: Lost & found lets you display your name and telephone number on lines 1 and 2 of the screen when you turn on your Logio (you enter your master passcode on line 3). If you lose your Logio and someone finds it and turns it on, they will see whom it belongs to and hopefully arrange to return it to you.
Initial Setup when you go back to the main screen, you will see a right arrow on the right side of any line that has overflowed, indicating that you can push to go to the right screen. When you are done entering characters, or if you want to leave the name field blank, push or . The cursor will move to the “Tel:” field and again the title will flash but then disappear when you start entering characters.
Initial Setup using the button, which can input a total of 31 different characters. When you are done entering ID1, or if you do not want to enter anything, push or . Do the same for the ID2 and ID3. Note that if you leave any of user IDs 1, 2, and/or 3 blank, then when you are adding a new record, Logio will skip them when you push .
Initial Setup Push . The screen will display: Auto-off time is the amount of time until Logio will turn off automatically due to inactivity (i.e., after you stop pushing buttons but have not turned it off manually). The default setting is one minute. A longer time period means more power consumption and higher vulnerability to intrusion and is therefore not recommended.
Initial Setup Push when you are done. You can always change this setting later (except when the battery is low) by pushing the setup options button . Note that you can also directly change the contrast level, even when the battery is low, in “view” mode by pushing and holding and then pushing or . The new setting will be saved automatically as a semi-permanent setting, not a temporary setting. The initial setup process is now done and all settings are saved.
Adding New Records Adding New Records After you finish the initial setup, the screen will display: Again, a “record” is one set of data consisting of a website name and/or address on line 1, a user ID on line 2, and a password on line 3, for example: You can set up new records now or later. Whenever you want to set up new records, push . The screen will display: Site (website name and/or address) The title “Site:” on line 1 will flash. When you start entering characters, this title will disappear.
Adding New Records ID (user ID) The title “ID:” on line 2 will flash. When you start entering characters, this title will disappear. If you have stored any of your frequently used user IDs 1, 2, and 3 during initial setup or set them up later and want to use one of them for this website, instead of entering them character by character, you can push the button 2, 3, or 4 times to enter user ID 1, 2, or 3 (it will skip any of the three IDs that you have not set up).
Adding New Records you to remember strong ones, or you used the same password on multiple websites, now is a good opportunity to change to stronger passwords, and different ones for each website, because you have Logio to help you keep track of your passwords. After you finish entering the password, push or and the screen will display: Push to save this new record. If you push , the entire record will disappear.
Viewing Records Viewing Records Each time you turn on Logio, it is in “view” mode, but first you need to enter your master passcode. The screen will show lost & found information on lines 1 and 2 (or blank lines if you did not set up lost & found information) and the cursor will flash at the beginning of line 3: Enter your master passcode and then push .
Viewing Records If you push , the screen will jump to the right so you can view the rest of the characters on the right side screen. Once on that screen, you will see a left-pointing arrow on the left side of any lines that have characters on the left (main) screen, which indicates you can push to jump back to the left screen. Scrolling through records Push or to go from one record to the next.
Editing Records Editing Records To edit existing records, first navigate in “view” mode to the record you want to edit, and then push . The cursor will blink on the first character of line 1. You can edit the website name and/or address, user ID, and password of any record.
Editing Records Push to delete the entire line of characters or push to cancel deletion. Inserting and replacing characters Logio inserts characters rather than overwriting characters, so if you want to replace characters, first use the arrow buttons to navigate to the location, delete any characters you want to replace by pushing , and then enter the new character(s). Adding spaces You can add spaces at the end of a line of characters by pushing characters to the right of the cursor.
Deleting Records Deleting Records There are two ways to delete entire records: 1. Navigate to the record in “view” mode and then push and hold and push . 2. Navigate to the record in “view” mode, then push to change to “edit” mode, then delete all the characters on all three lines (see “Editing Records” section above for information about ways to delete single characters, multiple characters, and entire lines). After deleting all three lines of characters and with the cursor on line 3, push or .
Changing Setup Options Changing Setup Options You can change your master passcode, lost & found information, user IDs 1, 2, and 3, button tone volume, auto-off time, and contrast level by pushing the setup options button when in “view” mode. When you push , Logio will take you through all six of these setup options, much in the same way as when you initially did them. But now you will have a choice of quickly skipping any of them by pushing .
Changing Setup Options If you want to skip changing your master passcode and go to the next setup option, push , otherwise push to retry. After the correct old master passcode is entered, the screen will display: Enter your new passcode (remember, it is numbers only and must be 8-15 digits): When done push and the screen will display: Enter the new master passcode again: When done push screen will display: .
Changing Setup Options Pushing will allow you to try to enter and confirm the master passcode again. If you want to start over with a new master passcode, push and the screen will display: And then several seconds later it will display: At this point you can start the master passcode changing process again by pushing , or you can skip this setup option and go to the next one by pushing .
Changing Setup Options And then several seconds later it will display: Push if you want to skip to the next setup option (button tone volume). If you push , the screen will display your current user IDs with the cursor flashing on the first character of line 1, or the title “ID1:” will flash if you do not have user ID 1 set up. After editing line 1 or leaving it as is, push or to go to line 2, and then the same to go to line 3. When done, or .
Changing Setup Options Push if you want to skip to the next option (contrast level). If you push , the screen will display your current auto-off time setting. Change the time by pushing the and buttons. Push when done. The next screen will display: And then several seconds later it will display: Push if you want to skip changing contrast level and exit the setup options menu. If you push , the screen will display your current contrast level setting. Change the contrast level by pushing the and buttons.
Auto-Off Time - Semi-Permanent & Temporary Settings Auto-Off Time - Semi-Permanent & Temporary Settings Your Logio is set by default to turn off after one minute of inactivity in order to save battery power and protect against intrusions. Although it is not recommended, as described above you can change this setting to two or three minutes in the setup options menu. After the set time of inactivity elapses, your Logio will automatically shut off.
Auto-Off Time - Semi-Permanent & Temporary Settings If later in the same session you want to increase the number of auto-off minutes, when you push and hold and push the screen will display the next one minute increment above what you have already added.
Usage Suggestions - Hardware Usage Suggestions - Hardware Backup For security purposes and other product design reasons, there is no way to back up the data on your Logio, no way to recover data if you forget your master passcode, and no way to reset the Logio. So, as a precaution in case you lose your Logio, you may want to consider having a second Logio and entering your data into it for backup purposes.
Usage Suggestions - Software Usage Suggestions - Software You can use your Logio for securely storing all kinds of personal information.
Usage Suggestions - Software Line 3: Expiration date and 3 or 4 digit security code (and you may also want to store the card’s customer service telephone number in case you need to call them urgently about a lost card) TIP: If you access your credit card account online, you could have one record in Logio called “Credit card name - acct info” and another record called “Credit card name - Web”, or you could combine all the information together in one record Alarm codes Line 1: Alarm type and/or location Line
Better Security & Stronger Passwords Better Security & Stronger Passwords No security measures are 100% effective against all kinds of attacks, but there are various steps you can take to greatly improve your security.
Display Character Reference Display Character Reference Most characters in Logio display as you would expect, but due to the specifications of the LCD screen, pay special attention to how the following characters are displayed: • The number 0 (zero) is displayed with a diagonal line through it to differentiate it from the uppercase letter O: • Number 5 and uppercase letter S look like this: • Number 2 and uppercase letter Z look like this: • Number 1, uppercase letter i, lowercase letter L, and the “|”
Sorting (Alphabetizing) Order Sorting (Alphabetizing) Order Logio sorts records according to the first character(s) of line 1, first by numbers, then by special characters (symbols and punctuation marks), then by letters, in this order: 0 1 2 3 4 5 6 7 8 9 (space) ! “ # $ % & ‘ ( ) * , - .
Field Lengths Field Lengths Maximum numbers of characters: Site: 50 ID: 50 PW: 20 Lost & Found - Name: 48 Lost & Found - Telephone: 32 User IDs 1, 2, and 3: 48 Logio User’s Manual, page 37
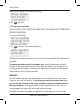
Button Reference Button Reference On/off • Turns Logio on and off • Used in combination with the button to add more auto-off time temporarily Enter • Used to complete entry of master passcode when logging in to Logio • In “edit” and “new” modes, when used on line 1 or line 2, moves cursor to next line, and when used on line 3, completes the input process for that record (same as the button does) • In “edit” and “new” modes, used to save changed records, save new records, and confirm deleting records in r
Button Reference • In “edit” and “new” modes, used to move cursor down to next line within the current record, and in some setup screens used to move cursor down to next line • In “edit” and “new” modes and some setup options, used in combination with the button to jump cursor directly to line 3 • In “edit” and “new” modes, when used on line 3, completes the input process for that record (the same as does) • In some setup screens, used to complete actions Left arrow • In “view” mode, used to jump right scre
Button Reference current line, one space per push (to insert a blank space before or between existing characters, push and hold and push ) • Moves selection to right in some setup screens • In “view” mode, used in combination with button to adjust contrast level Shift • In “edit”, “new”, and “setup” modes, functions like the shift key on a computer to make letters uppercase (must be held down) • Used in combination with the button to add more auto-off time temporarily • In “edit” and “new” modes, used i
Button Reference Edit & delete • In “view” mode, used to change to “edit” mode to edit the current record • In “edit”, “new”, and “setup” modes and when entering master passcode, used to delete characters (push and hold down to delete multiple characters after a slight delay). Note that the button only requires a single push to do deleting if you are already in one of these three modes.
Button Reference . - _/ ~ ` ! # $ % ^ & * ( ) + = { } [ ] | \ : ; “ ‘ < > , ? On the Logio screen they display like this: • In “view” mode, push the button the corresponding number of times to search for records that begin with the corresponding character • In “edit”, “new” and setup modes, push the button the corresponding number of times to input the corresponding character Since the @ character is on the button, it is not included on the button.
Button Reference repeated multiple times would not be considered to be a strong master passcode or Web password and is not recommended!) Alphanumeric 2 - 9 (numbers & letters) • In “edit”, “new” and “setup” modes, pushed the corresponding number of times to enter the corresponding letters and numbers • In “view” mode, pushed the corresponding number of times to search for records that begin with the corresponding letters or numbers on the button • When entering master passcode, which is numeric only, these
Low Battery Warning & Changing the Battery Low Battery Warning & Changing the Battery Battery life depends on how often you use your Logio. If it is low on battery power, when you turn it on you will see a flashing low battery icon on the right side of line 3 of the screen (master passcode entry line). When you start entering your master passcode, the icon will disappear.
Storage Capacity Storage Capacity Logio can store approximately 200 typical size records. The number of records you can store will vary depending on whether your records generally use a large or small number of characters.
Frequently Asked Questions Frequently Asked Questions Q: If I forget my master passcode, or if I want to delete all my records, can I just reset my Logio? A: Your Logio does not have a reset button because we do not want you to accidentally reset it and lose all your data and because we do not want the finder of a lost Logio to be able to use it and therefore have less incentive to return it to its owner. However, you can delete as many individual records as you want to, one at at time.
Frequently Asked Questions records? A: Logio was not designed with the ability to interface with a computer because many people prefer to have a self-contained device for storing their passwords. If you are concerned about the possibility of losing your Logio, you could buy a second Logio and enter the same records into that one, or you could store a paper list of your passwords in a secure place such as a safe deposit box.
Maintenance Maintenance CAUTION: The LCD screen is made of glass and can break if bent. If you will be placing your Logio in a wallet, be warned that keeping your wallet in your back pocket and sitting on it could damage the product, possibly causing injury to you and rendering the product inoperable. This product is for use in normal home and office environments only and not for use in extreme (high or low) temperature, humidity, pressure, electromagnetic, electrostatic, or liquid environments.
Regulatory Statements Regulatory Statements FCC notice This equipment has been tested and found to comply with the limits for a Class B digital device, pursuant to part 15 of the FCC rules. These limits are designed to provide reasonable protection against harmful interference in a residential installation. This equipment generates, uses and can radiate radio frequency energy and, if not installed and used in accordance with the instructions, may cause harmful interference to radio communications.
Specifications Specifications Model number: LG10B (black) or LG10W (white) Battery type: CR2016 coin cell Logio User’s Manual, page 50
One Yeard Limited Warranty One Year Limited Warranty The following limited warranty applies only to the United States and Canada: Atek, Inc. warrants to you, as the original purchaser of this hardware, that this hardware will be free from relevant defects in material and workmanship at the time of original purchase and for a period of one year thereafter, and Atek, Inc.
One Year Limited Warranty void this warranty. As with any electronic hardware device, it is your responsibility to be careful not to expose this device to water or to other fluids, or to do anything that creates a risk of electrical shock, or to expose it to high heat, freezing temperatures, high pressure, and/or physical shock. Any replacement product will be warranted for the remainder of the original warranty period or ninety (90) days, whichever is longer.
Contact Infomation Contact Information If you have any problem using your Logio Secure Password Organizer, do not return it to the dealer. First read this User’s Manual. If you still have the problem, check our website www.atek.com for possible additional information. Or contact our technical support department Monday through Friday from 9 a.m. to 5 p.m. Pacific Time at 1-888-889-9990 or 714-258-0100 or support@atek.com. You may register your purchase at www.atek.com/registration.htm.
Other Atek Products Other Atek Products If you like Logio, you may want to try some of Atek’s other products.
Software Licence Contents Software License Contents THROUGH YOUR PURCHASE OF THIS PRODUCT, ATEK, INC. GRANTS YOU A NONEXCLUSIVE LICENSE TO USE THE SOFTWARE CONTAINED WITHIN THE PRODUCT. Atek retainS all rights not expressly granted. USE of the software STARTS FROM THE FIRST TIME YOU TURN ON THE PRODUCT. This License does not constitute a sale and does not authorize a sale of thE SOFTWARE or anything created thereby. YOU MAY NOT MAKE ANY COPIES OF THE SOFTWARE WHETHER IN ELECTRONIC OR PRINT FORMAT.
Software Licence Contents to the Agreement. If you do not agree to any such modifications, you must immediately stop using the software in the PRODUCT. Jurisdiction and venue for any legal action arising out or relating to this agreement shall be exclusively in the United States District Court or the California state courts located in Orange County, California, U.S.A. You agree by use of the Software that your violation of any provision of this Agreement may cause irreparable harm to Atek, inc.
Logio User's Manual Rev.