LCD TV Overview and Installation LCD Display Overview 1-11
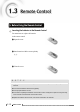
Before Using the Remote Control Inserting the batteries in the Remote Control You must insert or replace the batteries in the remote control. ❶ Open the cover. ❷ Insert batteries with the correct polarity (+, -). ❸ Close the cover. N O T E S ▶ Always use recommended batteries only; use of other batteries may result in battery leakage or corrosion. ▶ Do not insert the batteries with the wrong polarity. ▶ Do not put spent batteries in a fire.
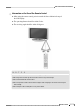
LCD TV Overview and Installation Information on the Use of the Remote Control ● When using the remote control, point it towards the Power Indication Lamp of the LCD Display. ● The operating distance should be within 23 feet. ● The receiving angle should be within 30 degrees. N O T E S ▶ Do not subject the remote control to shock. It may get damaged. ▶ Be caregul not to let water get into the remote control. It may cause damage. ▶ Do not disassemble the remote control.
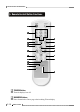
LCD TV Overview and Installation Remote Control Button Functions 1 22 2 3 21 4 5 6 20 19 18 7 17 8 16 9 15 10 11 12 13 14 1 POWER Button Turns the display On or Off. 2 NUMBER Buttons Direct channel select. Direct page selection during Teletext display.
LCD TV Overview and Installation 3 ‘ ’ Button Set a channel on the digital TV. 4 PSM (Picture Status Memory) Button Recalls your preferred picture setting. (Dynamic, Standard, Game, Mild, User) N O T E ▶ PC Mode(CSM) : Warm, Normal, Cool, User 5 SSM (Sound Status Memory) Button Recalls your preferred sound setting. (Flat, Music, Movie, Speech, User) 6 MENU Button Displays OSD Menu. 7 VOL ◀/▶(-/+) Buttons Increases or decreases the volume.
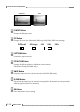
LCD TV Overview and Installation <4:3> 11 P.INPUT Button Changes the PIP input source. 12 PIP Button Changes the screen size. PIP(Small), PIP(Large), POP, PBP1, PBP2 screen change. PIP(Small) PIP(Large) POP PBP1 PBP2 13 CAPTION Button Controls the caption decoder. 14 P.POSITION Button Changes the PIP sub-window to 4 different corner locations. PIP Position Change (PIP Mode only). 15 SWAP Button Swaps the main screen for a sub-screen (only in PIP, POP, PBP mode). 16 Q.
LCD TV Overview and Installation 18 CH ▼/▲ Buttons Press CH ▼ or CH ▲ to change channels. Also used to select in the OSD menu or select the channel providing teletext service. 19 MUTE Button Press to temporarily cut off the sound. 20 MTS Button Press to choose stereo, mono or Separate Audio Program (SAP broadcast). 21 EPG(Electronic Program Guide) Button View a program guide for the digital TV. 22 SOURCE Button Selects the external input source.
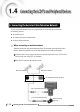
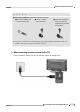
Connecting the Aerial or Cable Television Network To view television channels correctly, a signal must be received by the set from one of following sources: ● An outdoor aerial ● An indoor aerial (not recommended) ● A cable television network When connecting an outdoor antenna Antenna connection is the most important factor for obtaining clean and sharp video quality. Whenever possible, use an external antenna in areas with weak signals.
LCD TV Overview and Installation N O T E S ▶ Connecting 300Ω Ω feeder cable to the antenna converter ❶ Remove the insulation from the 300Ω feeder cable. ❷ Use the driver to loosen the screw. ❸ Connect the 300Ω feeder cable, and secure it by retightening the screw with the screwdriver. ▶ If the video is not clear because of weak signals, install a signal amplifier to obtain clearer video. (An amplifier is often necessary when using an indoor antenna.
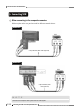
LCD TV Overview and Installation Connecting VCR When connecting to the composite connector Different jacks on the rear panel are used for different external devices. Method 1 VCR Composite Audio/Video cable (Optional) Method 2 VCR Composite Audio/Video cable (Optional) N O T E ▶ S-video and composite video signals share the audio signals.