
Manual


3
1 . D e s c r i p t i o n
The SCM20 Pro series consits of two models of loudspeaker; one passive,
one active. Passive units are denoted by a PSL suffix and active units by
an ASL suffix.
Passive monitors are equipped with a “bi-wire” connection
panel to enable separate amplification of mid/bass and high frequency
drivers if required.
Active units feature a built in two-way amplifier with frequency,
gain and phase correction which has been individually optimised at the
ATC manufacturing facility. Adjustment of input sensitivity and bass boost
is available to the user via controls on the amp rear panel.
2 . U n p a c k i n g a n d H a n d l i n g
Both the SCM20PSL Pro and SCM20ASL Pro are large heavy items and
should be handled with care. Always employ a second person to assist in
moving them. Unpacking is best carried out on the floor or a large low
table, with adequate open space around the carton, preferably close to
their final position.
Ÿ Open the carton and remove all loose items, leaving the packing foam
in place.
Ÿ Up-end the carton so the open end is facing down.
Ÿ Lift the carton off the contents (speaker & foam ‘end-caps’).
Ÿ Lift the upper foam end cap off.
Ÿ Flip the speaker over so it is resting on its base and lift the remaining
foam end cap off.
Ÿ Remove the tape sealing the plastic bag, open the bag and remove
the baffle protector.
Ÿ Remove the speaker from the bag and position in the listening/control
room.
3. Monitor Placement
The subjective performance of any monitor loudspeaker will be
influenced by the acoustic character of the room in which it is used and
its position within the room. Most often, monitors are installed in rooms
which are comfortable to sit and talk in. A mixture of carpets, curtains
and soft furnishings will help ensure that the middle and high
frequencies are reasonable well controlled. There may, however, be
low frequency problems; either too much or too little bass. To minimise
low frequency problems:
Ÿ Try to position speakers away from walls
Ÿ Try to position speakers away from corners
Ÿ Try not to position speakers exactly 1/4, 1/3, 1/2, 2/3, 3/4 between
parallel walls
In professional installations, try to avoid placing the loudspeakers on the
console/desk meter bridge. Typically, this compromises the frequency
balance of the loudspeaker, especially in the lower mid range.
Mounting the speakers on stands behind the console/desk usually gives
better results.
If the balance is bass light the monitors can be moved
towards the back walls. If the balance is bass heavy try moving the
monitors away from walls/corners. The SCM20ASL Pro features a bass
boost/cut control. This should be used for fine tuning rather than to
compensate for poor positioning.
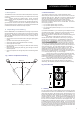
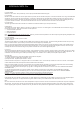
For stereo listening, the loudspeakers should be positioned
so they form an equilateral triangle with the listening position (see Fig.
1). Loudspeaker stand height should be chosen so the acoustic axis is
at ear level (see Fig.2). For most seating positions in professional
scenarios, a suitable stand would be 900 - 1000mm or 35.5 - 39.4" tall.
Suitable stands should be heavy, rigid and resonance free. If the
loudspeakers have to be positioned so the acoustic axis is above ear
level, they can be tilted downwards. For loudspeaker positioning for 5.1
or 7.1 surround, please see Fig. 3 on the next page.
All rooms vary, and it is a good idea to experiment with both
listening and speaker position until a good compromise is reached. For
professional installations the requirements are often very specific.
Please consult an experienced professional acoustician if necessary.
If the monitors are to be placed in any kind of cabinet or
enclosure, adequate clearance around the amplifier and a means of
cool air entering and hot air exiting the cabinet must be provided.
Alternatively, the amplifiers should be removed and installed remotely.
4. Listening
The ear and brain tend to interpret distorted sound as loudness and thus
underestimate the actual level of undistorted sound. The SCM20SL Pro
(both active and passive), like all ATC monitors, demonstrate very much
lower levels of distortion than conventional systems of a similar size. It is
therefore advisable to begin listening at an artificially low level and
carefully increase the volume. It is also possible for the SCM20SL Pro to
produce sufficient sound pressure levels for your ears themselves to
become a source of distortion and make the sound appear harsh. Any
audible distortion indicates that either the system or your ears are being
overloaded and that volumes should be reduced. The user should also
bear in mind that the monitoring level in a professional environment can
change the way certain sounds are perceived and that for consistent high
quality results, consistent and moderate monitoring levels should be used.
Look after your ears! You only get the one pair!
310mm
.
power/limit
acoustic
axis
SCM20ASL/SCM20PSL Pro
30°
30°
distance x
distance y
distance z
distance x = distance y = distance z
Fig. 1 Stereo Loudspeaker Positioning
Fig. 2 Acoustic Axis
Two Core Screened Cable
3 Pin Male XLR
Connector
3 Pin Female XLR
Connector
To Monitor Input
Hot
Return
Screen
To Source Output
1
2
3
1
2
3
4
Fig. 5. Balanced cable
SCM20ASL/20PSL Pro
SCM20ASL Pro
Fig. 4. Input connection pins
Pin 1, Screen
Pin 2, Signal (hot)
Pin 3, Signal (return)
2 1
3
PUSH
Phono (RCA)
Connector
To Source Output
Two Core Screened Cable
3 Pin Male XLR
Connector
To Monitor Input
1
2
3
Hot
Screen
Return
Fig. 6. Unbalanced cable
5. Signal Cable Options
Balanced cable configuration is the preferred option, however unbalanced connection is possible. Figures 5. & 6. illustrate the signal cable connections
required for each option. Balanced (XLR - XLR) connection offers lower noise and better immunity to “hum” pick-up. Unbalanced (XLR - RCA Phono or
two-pole jack) connection carries risk of “hum” caused by multiple signal earths. Hum problems resulting from unbalanced connection may be reduced
by making ONE of the following modifications to the signal cable:
Ÿ If the driving pre-amp or desk is “double insulated” (ie. has no mains earth), disconnect the signal cable screen at the RCA phono plug end.
or
Ÿ Disconnect the signal cable screen at the XLR end. This option will make the source the reference signal earth.
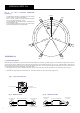
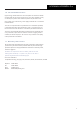
Fig. 3. 5.1 and 7.1 Surround Loudspeaker
Positioning
Ÿ All loudspeakers should be equidistant from the listening
position: distance L=C=R=LS=LR=RR=RS
Ÿ For 5.1 systems, position the surround speakers between
110° and 150° degrees (ITU spec. is 110°)
Ÿ If ideal positioning isn’t possible, position loudspeakers as
close as possible to ideal.
Ÿ Try to avoid placing subwoofers in corners, very close to walls,
and on the midpoint between two parallel walls
centre
left
right
left
side
left
rear
right
rear
right
side
sub
30°
30°
110°
110°
150°
150°
distance ‘R’
distance ‘L’
distance ‘C’
distance ‘RS’
distance ‘LS’
distance ‘RR’
distance ‘LR’