BP17 PRECHARGED PNEUMATIC AIR RIFLE User Instruction Manual
Contents Safety code ................................................................................. 4 BP17 air rifle overview ................................................................ 5 Specifications ............................................................................. 6 Rifle design and functions........................................................... 7 Rifle assembly ............................................................................ 10 Loading the magazine...
Read all instructions and warnings in this manual before using the airgun. This information could save your life and the lives of others. NOT A TOY. ADULT SUPERVISION REQUIRED. MISUSE OR CARELESS USE MAY CAUSE SERIOUS INJURY OR DEATH. MAY BE DANGEROUS UP TO 915 METERS / 1000 YARDS THIS AIRGUN IS INTENDED FOR USE BY THOSOSE 18 YEARS OF AGE OR OLDER. BUYER AND USER HAVE THE DUTY TO OBEY ALL LAWS ABOUT THE USE AND OWNERSHIP OF THIS AIRGUN. .
Safety code The rifle design ensures safe performance only if used properly. Please bear in mind! • Treat the rifle as loaded even with a safety on • Never point the airgun at any person, animal or anything you don`t intend to shoot. • Load the rifle only at the firing range. • After shooting and before leaving the firing range, open the bolt, check the barrel for the presence of pellets, and fire a dry shot into the ground. • Store the rifle and pellets out of reach of children and any unauthorized people.
It is mandatory to carry out a standard checkup procedure before shooting the rifle: • Check the tank for any signs of damage (dents, deep scratches). If there are any defects, the use of the rifle is STRICTLY FORBIDDEN due to the possibility of damaging the rifle as well as serious injury / death. • Check the gripping of the screws attaching the barrel to the receiver. The screws must not be too tight – no more than 6 N – to avoid any damage.
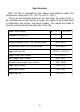
Specifications BP17 air rifle is intended for use indoors and outdoors within the temperature range from 0°С / 32°F to +50°С / 122°F. There are the following marks on the rifle body: the make of the rifle, manufacturer brand, country of origin, the caliber of the pellets used in millimeters and inches, and serial number. The marks are made in Russian and located on the right side of the rifle. Caliber, mm (inches) 4,5 (.177) 5,5 (.
Rifle design and functions The design of the rifle is continually updated, and the manufacturer reserves the right to implement some changes that do not affect the rifle specifications or improve them without notifying the customers and users. BP17 air rifle consists of barrel unit, receiver with trigger mechanism, bolt, firing mechanism, valve, under-barrel high pressure air tank, rails with clamps, assembled stock and safety lock. The coupling of receiver and barrel unit is detachable.
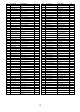
No. 1 2 3 4 5 6 7 8 9 10 11 12 13 14 15 16 17 18 19 20 21 22 23 24 25 26 27 28 29 30 31 32 33 34 35 36 37 38 39 40 41 42 43 44 45 46 47 48 49 50 51 52 53 54 Part number BP.01.09.01 (1) AP.01.09.02 BP.01.08.04 (1) BP.01.08.03 (2) AP.01.06.02 AP.01.06.03 AP.01.08.31 AP.01.01.01 AP.01.01.03 (1) AP.01.01.09 AP.01.08.01.01 (1) BP.17.01.08.01 BP.01.08.06 AP.01.08.10 AP.01.08.11 (1) AP.01.08.12 AP.01.08.14 AP.01.08.23 AP.01.08.25 AP.01.08.34 AP.01.08.35 BP.17.01.01.01 (1) BP.17.01.01.02 (2) BP.17.01.01.03 M2R.
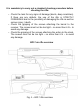
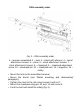
Rifle assembly order Fig. 2 – Rifle assembly order. 1 – receiver assembled; 2 – tank; 3 – barrel with silencer; 4 – barrel attachment screws; 5 – stock; 6 – stock attachment screws; 7 – stock attachment screws; 8 – cheekpad; 9 – cheekpad adjustment screw; 10 – cheekpad pin; 11 – cheekpad axis; 12 – magazine; 13 – safety.
Fig. 3 – Installing the safety. Loading the magazine Load the pellets into the magazine until they are fixed with the O-rings as shown at Figure 4. Do not allow the pellets to protrude out of the magazine surface. Fig. 4 – Loading the magazine Installing the magazine Open the bolt until the end, put in the magazine from above into the switch casing. Opening the bolt will automatically rotate the magazine thus opening the next chamber.
Check the gripping of the pellets in the magazine by O-rings so that the pellets wouldn`t fall off. If required, the O-rings can be lubricated or replaced if damaged. Shooting procedure 1. Open the bolt. In order to do it, move the bolt lever handle to the forwardmost position. There must not be any obstacles when opening the bolt! 2. Send the pellet into the barrel by closing the bolt. 3. Take a shot at the desired target by gently pulling the trigger. 4. Repeat the procedure from p. 1 to p.
the pull. After the lockwork adjustment it is necessary to check the rifle for safety use (spontaneous hammer disengage from the sear): • Cock and shoot the rifle several times without pellets, only using air, to make sure that the engaging of the hammer and the sear occurs every time.
airgun. • Do not charge/fill your airgun if there are children and/or pregnant women present nearby. Charging/filling procedure: 1. Attach the filling adapter to the compressed air source and tighten the bleeding screw. 2. Carefully insert the filling probe into the front plug filling port until the end. 3. Fill the airgun with compressed air (Fig. 7) until the desired level. 4. Close the valve on the compressed air source. 5.
Fig. 8 – Discharging the tank. 1 – tank discharging screw; 2 – Barrel adjustment screws. Barrel dismounting and mounting Required for periodic checkup and cleaning (see Fig. 8). • Using the Allen key untwist barrel adjustment screws in the upper side of the reciever; • Carefully remove the barrel; • Mount the barrel into the receiver so that its flat surface was located under the barrel adjustment screws (flat surface on top); • Tighten the barrel adjustment screws.
must have a thin layer of grease without any spots and stains. It is recommended to store the rifle in a case. The hammer must be de-cocked. The tank must keep the residual pressure of 100 BAR. It is possible to store the rifle depressurized; however, before using the rifle, it might be required to disassemble the tank and lubricate all the rubber O-rings. The rifle can be carried by any means of roofed transportation.
3. Velocity deviation is more than 1% Check the hammer guide for any unauthorized objects, grease, dirt and clean it; Substitute the pellets for those of higher quality; Increase the gap between shots to 10-30 seconds. 4. The rifle is slowly leaking Determine the leaking area: apply oil or kerosene to the places shown at Fig. 8. Foam (bubbles) will appear at the leaking place. Remove the damaged O-ring. Check if the tank discharging screw is tight.