User manual Dishwasher VA6311QF
Contents Safety information ................................... 2 Product description ................................ 3 Control panel .......................................... 4 First use ................................................. 4 Set the water softener ............................ 5 Use of dishwasher salt ............................ 6 Use of rinse aid ....................................... 7 Daily use ................................................. 8 Load cutlery and dishes ..............
Installation • Check your dishwasher for any transport damage. Never connect a damaged machine. If your dishwasher is damaged contact your supplier. • All packaging must be removed before use. • Any electrical and plumbing work required to install this appliance must be carried out by a qualified and competent person. • For safety reasons it is dangerous to alter the specifications or attempt to modify this product in any way.
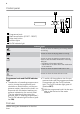
Control panel 1 2 3 4 5 Programme knob Start/cancel button (START - RESET) Delay start button Indicator lights On/Off indicator light Indicator lights Wash Comes on when the washing and rinsing phases are running. Comes on when the drying phase is running. Dry End Comes on when the washing programme has ended. It also has added functions of visual signalling as: • the setting of the water softener, • intervention of an alarm due to the malfunction of the machine.
• Ensure that the electrical and water connections comply with the installation instructions • Remove all packaging from inside the appliance • Set the water softener level • Pour 1 litre of water into the salt container and then fill with dishwasher salt • Fill the rinse aid dispenser If you want to use combi detergent tablets such as: ''3 in 1'', ''4 in 1'', ''5 in 1'' etc... follow the instructions given in "Use of detergent".
until the programme marker corresponds with the first washing programme. 3. Release the start/cancel button. The On/ Off indicator light and the start/cancel indicator light start to flash. This means that you have activated the water softener setting function. 4. Simultaneously the End indicator light starts to flash. The current level is indicated by the number of flashes of the End indicator light and a pause of about 3 seconds. Examples: 5 flashes, pause, 5 flashes, pause, etc.
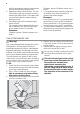
Use of rinse aid Warning! Only use branded rinse aid for dishwashers. Never fill the rinse aid dispenser with any other substances (e.g. dishwasher cleaning agent, liquid detergent). This would damage the appliance. Rinse aid ensures thorough rinsing, and spot and streak free drying. Rinse aid is automatically added during the last rinse. 1. Open the container by pressing the release button (A). 2. Add the rinse aid in the container. The maximum level for filling is indicated by "max".
Daily use • Check if it’s necessary to refill with dishwasher salt or rinse aid. • Load cutlery and dishes into the dishwasher. • Fill with dishwasher detergent. • Select a wash programme suitable for the cutlery and dishes. • Start the wash programme. Helpful hints and tips Sponges, household cloths and any object that can absorb water may not be washed in the dishwasher. • Before loading the dishes, you should: – Remove all left over food and debris.
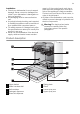
Load cutlery and dishes The lower basket The lower basket is designed to take saucepan, lids, plates, salad bowls, cutlery etc. The rows of prongs on the right side in the lower basket can lie flat to allow you to load pots, pans and bowls. If the handles protrude from the bottom of the basket, obstructing the lower spray arm, load the cutlery with the handles facing upwards. Mix spoons with other cutlery to prevent them from sticking together.
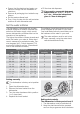
Maximum height of the dishes in the lower basket With upper basket raised 30 cm With upper basket lowered 29 cm To move to the higher position proceed as follows: 1. Pull out the basket until it stops. 2. Hold the upper basket by the handle on the side. 3. Carefully lift up the basket until it stops. Glasses with long stems can be placed upside down in the cup racks. For taller items the cup racks can be folded upwards. 4. Lower it vertically.
2. Fill the detergent dispenser (1) with detergent. The marking indicates the dosing levels: 20 = approximately 20 g of detergent 30 = approximately 30 g of detergent. 1 2 3. All programmes with prewash need an additional detergent dose (5/10 g) that must be placed in the prewash detergent chamber (2). This detergent will be used during the prewash phase. When using detergent tablets; place the tablet in compartment (1) 4. Close the lid and press until it locks in place.
– The indicator lights of the phases foreseen for the programme start flashing. 5. Press the start/cancel button. The programme starts automatically and the start/cancel indicator light comes on. – As soon as the programme starts, the phase indicator lights go off except for the indicator light for the phase in progress which will remain on with a static light.
When the washing programme has finished, it is recommended that the dishwasher is unplugged and the water tap turned off.
8. Place the coarse filter (A) in the microfilter (B) and press together. 9. Put the filter combination in place and lock by turning the handle clockwise to the stop. During this process ensure that the flat filter does not protrude above the base of the washing compartment. 3. Turn the handle about 1/4 a turn anticlockwise and remove the filter system NEVER use the dishwasher without filters.
3. Remove the water inlet and discharge hoses. 4. Pull the machine out together with the hoses. Avoid over tilting the machine during transportation. What to do if… The dishwasher will not start or stops during operation. Certain problems are due to the lack of simple maintenance or oversights, which can be solved with the help of the indications de- scribed in the chart, without calling out an engineer.
S.N. : . . . . . . . . . . . . . . . . . . . . . . . . . . . . . . The wash results are not satisfactory The dishes are not clean • The wrong programme has been selected. • The dishes are arranged in such a way as to stop water reaching all parts of a surface. The baskets must not be overloaded. • The spray arms do not rotate freely due to incorrect arrangement of the load. • The filters in the base of the washing compartment are dirty or incorrectly positioned.
Arrangement upper basket Arrangement cutlery basket Arrangement lower basket Installation Warning! Any electrical and/or plumbing work required to install this appliance should be carried out by a qualified electrician and/or plumber or competent person. Remove all packaging before positioning the machine. If possible, position the machine next to a water tap and a drain. This dishwasher is designed to be fitted under a kitchen counter or work surface.
Attention! Carefully follow the instructions on the enclosed template for building in the dishwasher and fitting the furniture panel. No further openings for the venting of the dishwasher are required, but only to let the water fill and drain hose and power supply cable pass through. The dishwasher incorporates adjustable feet to allow the adjustment of the height. During all operations that involve accessibility to internal components the dishwasher has to be unplugged.
Warning! Dangerous voltage Water drain connection The end of the drain hose can be connected in the following ways: 1. To the sink outlet spigot, securing it to the underside of the work surface. This will prevent waste water from the sink running into the machine. 2. To a stand pipe provided with venthole, minimum internal diameter 4 cm. The waste connection must be at a height of between 30 cm (minimum) and 100 cm (maximum) from the bottom of the dishwasher.
Electrical connection Warning! Safety standards require the appliance to be earthed. Prior to using the appliance for the first time, ensure that the rated voltage and type of supply on the rating plate match that of the supply where the appliance is to be installed. The fuse rating is also to be found on the rating plate. Always plug the mains plug into a correctly installed shockproof socket. Multi-way plugs, connectors and extension cables must not be used.
Nederland Home Product Service (ATAG) Postbus 249 6920 AE DUIVEN tel: 0900 - 5550001 fax: 026 - 8821444 België ATAG België NV 9420 Erpe-Mere tel: 053 - 806208 fax: 053 - 806057 Postbus 1033 • 6920 BA Duiven • Nederland 117970410 - 00 - 022008