HI4271B HI6271B Het toestel-identificatieplaatje bevindt zich aan de onderkant van het toestel. The appliance identification card is located on the bottom of the appliance. Plak hier het toestel-identificatieplaatje. Stick the appliance identification card here. Handleiding Manual Houd, wanneer u contact opneemt met de serviceafdeling, het complete typenummer bij de hand. When contacting the service department, have the complete type number to hand.
Gebruikte pictogrammen - Pictograms used Belangrijk om te weten Important information Tip 2
HANDLEIDING Inhoud Uw inductiekookplaat Inleiding Beschrijving Veiligheidsvoorschriften 4 5 6 Gebruik Even wennen Pannen 7-8 9 - 10 Bediening Instellen Koken 11 - 14 15 - 16 Reinigen 17 Onderhoud Storingen Algemeen 18 - 19 Algemeen Elektrische aansluiting Inbouwen 20 - 22 23 - 25 26 Installatievoorschrift Bijlage Afvoeren toestel en verpakking Technische gegevens NL 3 27 28
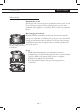
UW INDUCTIEKOOKPLAAT Inleiding Deze inductiekookplaat is ontworpen voor de echte kookliefhebber. Koken op een inductiekookplaat heeft een aantal voordelen. Het is comfortabel, omdat de kookplaat snel reageert en ook op een zeer laag vermogen is in te stellen. Dankzij het hoge vermogen gaat het aan de kook brengen zeer snel. De ruime afstanden tussen de kookzones maken het koken ook comfortabel. Koken op een inductiekookplaat verschilt met koken op een traditioneel toestel.
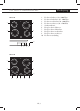
UW INDUCTIEKOOKPLAAT 1. 2. 3. 4. 5. 6. 7. 8. 9. 10.
UW INDUCTIEKOOKPLAAT Veiligheidsvoorschriften Lees de separate veiligheidsvoorschriften voordat u het toestel in gebruik neemt! Temperatuurbeveiliging • Elke kookzone is voorzien van een sensor. Deze sensor controleert ononderbroken de temperatuur van de bodem van de kookpan en van de onderdelen van de kookplaat om elk risico op oververhitting, bij bijvoorbeeld een drooggekookte pan, te vermijden.
GEBRUIK Even wennen Inductiekoken Inductiekoken is snel In het begin zult u verrast zijn door de snelheid van het toestel. Vooral het op een hogere stand aan de kook brengen gaat zeer snel. Om overkoken of droogkoken te voorkomen, kunt u er het beste altijd bij blijven. Geen warmteverlies en de handgrepen blijven koud bij inductiekoken. Het vermogen past zich aan Bij inductiekoken wordt alleen dat deel van de zone benut waar de pan op staat.
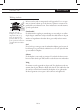
GEBRUIK Even wennen Werking inductie In het toestel wordt een magnetisch veld opgewekt. Door een pan met een ijzeren bodem op een kookzone te plaatsen ontstaat in de panbodem een inductiestroom. Deze inductiestroom wekt warmte op in de panbodem. De spoel (1) in de kookplaat (2) wekt een magnetisch veld (3) op. Door een pan met een ijzeren bodem (4) op de spoel te plaatsen ontstaat in de panbodem een inductiestroom. Comfortabel De elektronische regeling is nauwkeurig en eenvoudig in te stellen.
GEBRUIK Pannen Pannen voor inductiekoken Inductiekoken stelt eisen aan de kwaliteit van de pannen. Let op • Pannen waarmee al eerder op een gaskookplaat is gekookt, zijn niet meer geschikt voor inductiekoken. • Gebruik alleen pannen die geschikt zijn voor elektrisch- en inductiekoken met: º een dikke bodem van minimaal 2,25 mm; º een vlakke bodem. • Het beste zijn pannen met het “Class Induction” keurmerk. Tip Met een magneet kunt u zelf controleren of uw pannen geschikt zijn.
GEBRUIK Pannen Let op Gebruik nooit pannen met een vervormde bodem. Een holle of bolle bodem kan de werking van de oververhittingsbeveiliging belemmeren. Het toestel kan dan te warm worden waardoor de glasplaat kan barsten en de panbodem kan smelten. Schade, ontstaan door het gebruik van ongeschikte pannen of droogkoken, valt buiten de garantie. Minimale pandiameter De minimale pandiameter bedraagt 12 cm. Het beste resultaat bereikt u door een pan te nemen met dezelfde diameter als de kookzone.
BEDIENING Instellen Inschakelen en vermogen instellen Inschakelen 1. Zet een pan op een kookzone. 2. Draai de knop van de betreffende zone met de klok mee om het gewenste vermogen in te stellen. In de display verschijnt de stand die u heeft ingesteld. Vermogen instellen Stel een hoger of lager vermogen in door de knop te draaien. Het vermogen is in te stellen in 9 standen. Daarnaast is er bij de twee grote zones nog de stand ‘boost’.
BEDIENING Instellen Aankookautomaat De aankookautomaat is geschikt voor het snel aan de kook brengen van gerechten en vervolgens op een lagere stand doorkoken. De aankookautomaat schakelt zelf terug naar de doorkookstand. Aankookautomaat inschakelen 1. Zet een pan op een kookzone. 2. Draai de knop van de betreffende zone tegen de klok in. Een “A” verschijnt in het display. 3. Stel binnen 5 seconden een gewenste doorkookstand in met de draaiknop (1 t/m 8).
BEDIENING Instellen Boost De ‘boost’ stand gebruikt u om een korte tijd op het hoogste vermogen te koken. Deze stand komt na stand 9. De boost functie inschakelen 1. Zet een pan op een grote kookzone. 2. Draai de knop van de betreffende zone met de klok mee voorbij stand 9. Een “P” verschijnt in het display. Twee achter elkaar liggende kookzones Twee kookzones die achter elkaar liggen beïnvloeden elkaar. Wanneer deze kookzones tegelijk ingeschakeld zijn, wordt het vermogen automatisch verdeeld.
BEDIENING Instellen Kinderslot U kunt de kookplaat met het kinderslot vergrendelen. Onbedoeld inschakelen van de kookzones wordt hiermee voorkomen. De kookplaat naar kinderslot schakelen Draai beide (middelste) knoppen linksom (terwijl de andere knoppen in de nulstand blijven staan). In het display verschijnt een “L” als teken dat het kinderslot is ingeschakeld. Kinderslot uitschakelen Draai beide (middelste) knoppen weer linksom (terwijl de andere knoppen in de nulstand blijven staan).
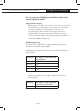
BEDIENING Koken Gezond koken Rookpunt van verschillende oliesoorten Om gezond te bakken, adviseert ATAG om de oliesoort af te stemmen op de baktemperatuur. Elke oliesoort heeft een ander rookpunt waarbij giftige gassen vrijkomen. In onderstaande tabel ziet u de rookpunten van verschillende oliesoorten.
BEDIENING Koken Kookstanden Het onderstaande overzicht is uitsluitend bedoeld als leidraad, omdat de instelwaarde afhankelijk is van de hoeveelheid en samenstelling van het gerecht en de pan. Gebruik ‘boost’ en stand 9 voor: • snel aan de kook brengen; • slinken van bladgroenten; • verhitten van olie en vet; • onder druk brengen van een snelkookpan. Gebruik stand 8 voor: • aanbraden van vlees; • bakken van vis; • bakken van omeletten; • bakken van gekookte aardappelen; • frituren.
ONDERHOUD Reinigen Tip Schakel, voordat u met schoonmaken begint, eerst het kinderslot in. Dagelijkse reiniging • • Hoewel overgekookt voedsel niet kan inbranden verdient het aanbeveling de kookplaat direct na gebruik schoon te maken. Voor de dagelijkse reiniging kunt u het beste een mild reinigingsmiddel en een vochtige doek gebruiken. Nadrogen met keukenpapier of een droge doek.
STORINGEN Algemeen Algemeen Voor het telefoonnummer van de servicedienst kunt u de bijgeleverde garantiekaart raadplegen of kijken op ‘www.atagservice.nl’. Indien u een barstje of scheurtje (hoe klein ook) op de glasplaat ziet, schakel dan de kookplaat onmiddellijk uit, neem direct de stekker van de kookplaat uit het stopcontact, verbreek de (automatische) zekering(en) in de meterkast of zet de schakelaar in de meterkast op nul bij een vaste aansluiting. Neem vervolgens contact op met de servicedienst.
STORINGEN SYMPTOOM Algemeen MOGELIJKE OORZAAK De kookplaat geeft bij de eerste Normaal voor een nieuw kookbeurten een lichte geur af. apparaat. Foutcode . OPLOSSING Dit verdwijnt na enkele keren koken. Een knop wordt te lang Knop loslaten. Neem contact bediend of er is een kabelbreuk. op met de serviceorganisatie wanneer storing blijft. Foutcode E4, E5, E6 of E9. Generator defect. Neem contact op met de serviceorganisatie. Foutcode E2. Kookplaat oververhit.
INSTALLATIEVOORSCHRIFT Algemeen Veiligheidsvoorschriften installatie • • • • • • • • • De aansluiting moet voldoen aan de nationale en lokale voorschriften. Het toestel moet altijd geaard zijn. Alleen een erkend elektrotechnisch installateur mag dit toestel aansluiten. Gebruik voor het aansluiten een goedgekeurde kabel (bijvoorbeeld type HO7RR) met de juiste kabel diameters behorend bij de aansluiting. De kabel ommanteling moet van rubber zijn.
INSTALLATIEVOORSCHRIFT Algemeen Inbouwmaten In de volgende illustraties zijn de afmetingen van de uitsparingen aangegeven. HI4271B 604 522 53 480 550 (53 + 15) - X = Y (min.) X = dikte werkblad min.40 560 X 490 Y (min.) 82 271b 495 * HI6271B Zie installatievoorschrift bij bedieningspaneel 604 522 53 480 550 min.
INSTALLATIEVOORSCHRIFT Algemeen Beluchting De elektronica in het toestel heeft koeling nodig. Het toestel schakelt na korte tijd uit wanneer er onvoldoende lucht circuleert. Aan de onderzijde van het toestel bevinden zich de ventilatie-openingen. Door deze openingen moet koele lucht aangezogen kunnen worden. Aan de voorzijde en onderzijde is het toestel voorzien van uitblaasopeningen. Inbouwen boven een oven, lade of vaste blende B C Beluchting vindt plaats via plint (A) en achterzijde kast (B).
INSTALLATIEVOORSCHRIFT Elektrische aansluiting Aansluitingen Gebruik voor het aansluiten een goedgekeurde kabel, afhankelijk van de voorschriften. De kabelommanteling moet van rubber zijn. Raadpleeg bij storingen de tabel op pagina 18 en 19. Aan de onderzijde van het toestel bevindt zich een etiket met daarop de aansluitschema’s. De aansluitklemmen zijn bereikbaar nadat u het aansluitkastje aan de onderzijde hebt geopend. Open de deksel van het aansluitkastje met behulp van een schroevendraaier.
INSTALLATIEVOORSCHRIFT • Elektrische aansluiting 3 fasen met 1 nul aansluiting (3 1N, 400 V ~/ 50 Hz): º De spanning tussen de fasen en de nul is 230 V ~. Tussen de fasen staat een spanning van 400 V ~. Breng een verbindingsbrug aan tussen de aansluitpunten 4-4. Fase 3 wordt niet belast. Uw groepen moeten afgezekerd zijn met minimaal 16 A (3x). De aansluitkabel moet een aderdoorsnede hebben van minimaal 2,5 mm2. 3L 1N a.c.
INSTALLATIEVOORSCHRIFT Elektrische aansluiting Speciale aansluitingen: • 1 fase aansluiting (1L 1N, 230 V ~ / 50 Hz): º De spanning tussen de fase en de nul is 230 V ~. Breng verbindingsbruggen aan tussen de aansluitpunten 1-2 en 3-4. Uw groep moet afgezekerd zijn met minimaal 32 A. De aansluitkabel moet een aderdoorsnede hebben van minimaal 6 mm2. 1L 1N a.c.
INSTALLATIEVOORSCHRIFT Inbouwen Inbouwen Controleer of het keukenmeubel en de uitsparing voldoen aan de gestelde eisen ten aanzien van afmetingen en ventilatie. Behandel van kunststof of houten werkbladen de kopse kanten met eventueel afdichtvernis, om uitzetten van het werkblad door vocht te voorkomen. Leg het toestel omgekeerd op het aanrechtblad. Monteer de aansluitkabel aan het toestel conform de gestelde eisen (zie pagina 23, 24 of 25).
BIJLAGE Afvoeren toestel en verpakking Afvoeren toestel en verpakking Bij de vervaardiging van dit toestel is gebruik gemaakt van duurzame materialen. Dit toestel moet aan het eind van zijn levenscyclus op verantwoorde wijze worden afgevoerd. De overheid kan u hierover informatie verschaffen. De verpakking van het toestel is recyclebaar. Gebruikt kunnen zijn: • karton; • polyethyleenfolie (PE); • CFK- vrij polystyreen (PS- hardschuim).
BIJLAGE Technische gegevens Vermogens- en inbouwtabel Deze toestellen voldoen aan alle relevante CE richtlijnen. Kookplaattype Inductie Aansluiting Aantal fasen Max.
MANUAL Contents Your induction hob Introduction Description Safety instructions 4 5 6 Use Getting used to it...
YOUR INDUCTION HOB Introduction This hob has been designed for the real lover of cooking. Cooking on an induction hob has a number of advantages. It is easy, because the hob reacts quickly and can also be set to a very low power level. Because, moreover, it can also be set to a high power level, it can bring things to the boil very quickly. The ample space between the cooking zones makes cooking comfortable. Cooking on an induction hob is different from cooking on a traditional appliance.
YOUR INDUCTION HOB Description 1. 2. 3. 4. 5. 6. 7. 8. 9. 10.
YOUR INDUCTION HOB Safety instructions Read the separate safety instructions before using the device! Temperature safety • Every cooking zone is equipped with a sensor that measures the temperature of the bottom of the pan to avoid any risk of overheating when a pan boils dry. In case of temperatures rising too high, the power is reduced or shut off automatically. Cooking-time limiter The cooking-time limiter is a safety function of your cooking appliance.
USE Getting used to it... Induction cooking Induction cooking is fast To start with you will be surprised by the speed of induction cooking. Especially at higher settings, foods and liquids will boil very rapidly. It is best not to leave pans unattended to avoid them boiling over or boiling dry. No heat loss and cold handles with induction cooking The power will be adjusted In the case of induction cooking, it is only the part of the zone on which the pan stands that is used.
USE Getting used to it... How induction works A magnetic field is generated in the appliance. By placing a pan with an iron base on a cooking zone, a current is induced in the pan base. This induced current generates heat in the base of the pan. The coil (1) in the hob (2) generates a magnetic field (3). By placing a pan with an iron base (4) on the coil, a current is induced in the base of the pan. Easy The electronic controls are accurate and easy to set.
USE Pans Pans for induction cooking Induction cooking requires a particular quality of pan. Attention • Pans that have already been used for cooking on a gas hob are no longer suitable for use on an induction hob. • Only use pans that are suitable for electric and induction cooking with: º a thick base (minimum 2.25 mm); º a flat base. • The best are pans with the ‘Class Induction’ quality mark. Tip You can check for yourself whether your pans are suitable using a magnet.
USE Pans Attention Never use pans with a misshapen base. A hollow or rounded base can interfere with the operation of the overheating protection, so that the appliance becomes too hot. This may lead to the glass top cracking and the pan base melting. Damage arising from the use of unsuitable pans or from boiling dry is excluded from the guarantee. Minimum pan diameter The diameter of a pan must be at least 12 cm. You will achieve the best results by using a pan with the same diameter as the zone.
OPERATION Settings Switching on and power setting Switching on 1. Put a pan on a cooking zone. 2. Turn the knob of the cooking zone clockwise to set the desired setting. The display shows the setting selected. Power setting Adjust the power of the cooking zone by turning the knob. You can choose 9 settings for each cooking zone and for the two big cooking zones you can also choose ‘boost’. The power for the big zone(s) can be set between 50 and 3000 Watt, for the small zone(s) between 50 and 1400 Watt.
OPERATION Settings Automatic heating The automatic heating is suitable for quickly bringing dishes to a boil and then to thoroughly cook at a lower setting. The automatic heating automatically switches back to the setting for thorough cooking. Switching on the automatic heating 1. Put a pan on a cooking zone. 2. Turn the knob of the cooking zone anti clockwise. A “A” appears in the display. 3. Set the desired setting for thorough cooking within 5 seconds with the knob (1 to 8).
OPERATION Settings Boost The ‘boost’ setting is used to cook at maximum power for a short period of time. This setting is the setting after number 9. Switching on ‘boost’ 1. Put a pan on a big cooking zone. 2. Turn the knob of the cooking zone clockwise, further than setting 9. A “P” appears in the display. Two cooking zones one in front of the other Two cooking zones one in front of the other effect each other.
OPERATION Settings Childproof lock Your induction hob is equipped with a childproof lock that lets you lock the appliance. It prevents unintended switching on. Switching on the childproof lock Turn both knobs (in the middle) anti clockwise. The other two knobs stay in setting 0. ‘L’ appears in the display to show that the childproof lock is switched on. Switching off the childproof lock Turn both knobs (in the middle) anti clockwise again. The other two knobs stay in setting 0.
OPERATION Cooking Healthy cooking Burning point of separate kinds of oil ATAG advises to choose an oil based on the baking temperature to bake in a healthy way. Every kind of oil has a different burning point at which toxic gases are released. You can see the burning points of different kinds of oil in the table below.
OPERATION Cooking Cooking settins Because the settings depend on the quantity and composition of the contents of the pan, the table below is intended as a guideline only. Use setting ‘boost’ and setting 9 to: • bring the food or liquid to the boil quickly; • ‘shrink’ greens; • heat oil and fat; • bring a pressure cooker up to pressure. Use setting 8 to: • sear meats; • fry flatfish, thin slices or filet; • fry boiled potatoes; • fry omelettes; • deep fry foods.
MAINTENANCE Cleaning Tip Activate the childproof lock before you start cleaning the hob. Daily cleaning • • Although food spills cannot burn into the glass, we nevertheless recommend you clean the hob immediately after use. Best for daily cleaning is a damp cloth with a mild cleaning agent. Dry with kitchen paper or a dry kitchen towel. Stubborn stains • • • • Stubborn stains can also be removed with a mild cleaning agent such as washing-up liquid. Remove water marks and lime scale with vinegar.
TROUBLESHOOTING General General The service department telephone number can be found on the guarantee card provided or on ‘www.atag.nl’ If you notice a crack in the glass top (however small), switch the hob off immediately, unplug the hob, turn off the (automatic) fuse switch(es) in the meter cupboard or, in the event of a permanent connection, set the switch in the power supply lead to zero.) Contact the service department.
TROUBLESHOOTING General SYMPTOM POSSIBLE CAUSE A slight smell is noticeable the first few times the hob is used. The new appliance is heating up. This is normal and will disappear once it has been used a few times. Ventilate the kitchen. Fault code A knob is operated too long or there's a break in a cable. Let go of knob. Contact the service organisation if the defect remains. Fault code E4, E5, E6 or E9. Defective generator. Contact the service department. Fault code E2.
INSTALLATION INSTRUCTIONS General Safety instructions for the installation • • • • • • • • • The connection must comply with national and local regulations. The appliance must always be earthed. This appliance may only be connected by a competent electrical installer. For the connection, use an approved cable (for example type HO7RR) in accordance with the regulations. The cable casing should be of rubber. The connection cable must hang freely and is not to be fed through a drawer.
INSTALLATION INSTRUCTIONS General Installation dimensions The dimensions and recesses are shown in the illustrations beneath. HI4271B 604 522 53 480 550 (53 + 15) - X = Y (min.) X = thickness worktop min.40 560 X 490 Y (min.) 82 271b 495 * HI6271B Refer to installation instructions with control panel 604 522 53 480 550 min.
INSTALLATION INSTRUCTIONS General Ventilation The electronics in the appliance need cooling. The appliance will automatically switch off if there is insufficient air circulation. There are ventilation openings on the underside of the appliance. It must be possible for cool air to be drawn in through these openings. There are outlet openings on the underside and at the front of the appliance.
INSTALLATION INSTRUCTIONS Electrical connection Connections For the connection, use an approved cable, in accordance with the regulations. The cable casing should be of rubber. In case of faults, consult the table on page 18 and 19. There is a label on the underside of the appliance with the wiring diagrams. The connection terminals are accessible once you have opened the junction box on the underneath. The junction box cover can be opened with a screwdriver.
INSTALLATION INSTRUCTIONS • Electrical connection 3 phases with 1 zero connection (3 1N, 400 V ~ / 50 Hz): º The voltage between the phase and the zero is 230 V ~. The voltage between the two phases is 400 V ~. Fit a connecting bridge between connecting points 4-4. Phase 3 carries no load. The groups must have fuses of at least 16 A (3x). The core diameter of the connecting cable must be at least 2.5 mm2. 3L 1N a.c.
INSTALLATION INSTRUCTIONS Electrical connection Special connections: • Single phase connection (1 1N, 230 V ~ / 50 Hz): º The voltage between the phase and the zero is 230 V ~. Fit a connecting bridge between connecting points 1-2 and 3-4. The group must have a fuse of at least 32 A. The core diameter of the connecting should be at least 6 mm2. 1L 1N a.c.
INSTALLATION INSTRUCTIONS Building in Building in Check that the cabinet and the cut-out meet the dimension and ventilation requirements. Treat the sawn ends of wooden or synthetic worktops with sealing varnish if necessary, to prevent moisture causing the worktop to swell. Lay the hob upside down on the worktop. Fit the connecting cable to the appliance in compliance with the requirements (see page 23, 24 or 25).
APPENDIX Disposal of package and appliance Disposal of package and appliance In the manufacturing of this appliance durable materials were used. Make sure to dispose of this equipment responsibly at the end of its lifecycle. Ask the authorities for more information regarding this. The appliance packaging is recyclable. The following may have been used: • cardboard; • polythene film (PE); • CFC-free polystyrene (PS hard foam).
APPENDIX Technical details Capacity and dimensions table This appliance complies with all relevant CE directives. Hob type Induction Connection Phases Max.