Lucent Technologies Bell Labs Innovations SPIRIT Communications System ® Model 2448 Administration Manual 999-500-235 105772644 Issue 5 June, 1989
LIMITED WARRANTY AND LIMITATION OF LIABILITY AT&T Information Systems, Inc. ("AT&T") warrants to you that your SPIRIT® Communications System ("SPIRIT system") will be free from defects in material and workmanship when title to your SPIRIT system passes to you.
Table of Contents Parts of the System Parts of the Telephone Used in Administration Groups and Intercom Extensions How to Use this Manual 2 3 3 4 SECTION 1 Customizing Description of Features that May be Customized How to Use the System Planner and the Customization Chart System Planner Customization Chart How to Customize Confirmation and Error Tones Instructions for Customizing Kinds of Customization System Reset to Factory-Set Values - 0 System Customization - 1 Telephone Customization - 2 System Speed
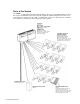
Parts of the System The SPIRIT ® Communications System, Model 2448, consists of a CONTROLLER that controls the system, TELEPHONES, and some optional equipment. Outside telephone lines from your local telephone company or from a PBX, or switchboard, system are connected to the controller. The controller is connected to all the telephones in the system.
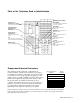
Parts of the Telephone Used in Administration Administration Overlay LINE NUMBERS Line number the button represents during Iine-by-line customization. LINE BUTTONS and INDICATOR LIGHTS Used to customize Iine-by-line features. ENTER ADMIN Used to choose another kind of customization. INTERCOM BUTTONS and INDICATOR LIGHTS Used when beginning System Administration. COPY TO Used to duplicate customization of one telephone to another.
How to Use this Manual This manual is divided into two basic sections. Following is a description of the parts of the manual. Customizing (Section 1) The SPIRIT Communications System can be customized to fit the needs of your company. This means that, as the administrator of the system, you will be able to change how some features operate. The system can be used just as it is installed. You may, however, want to take advantage of some of the customizing options.
SECTION 1 Customizing Following is a list and brief description of the features you can change. There are two kinds of features, SYSTEM FEATURES and TELEPHONE FEATURES. When you customize a system feature, you have made a change in the whole system that affects all the telephone extensions. In this manual, information about system features is always printed with a grey background. When you customize a telephone feature, the change is made for one telephone only.
Telephone Features (instructions for customizing begin on page 18) Telephone customization is used to make different telephones in the system work in different ways. ■ LINE BUTTON ASSIGNMENTS — The telephones in your system have six or twenty-four buttons that can be line buttons assigned by you or multi-purpose buttons that the user programs (see User Manual). When you have assigned a line to a button, that button cannot be used for anything else unless you change the customization for that telephone.
Telephone Features ■ OUTSIDE SERVICE — This feature determines the kinds of outside calls that may be made from each telephone. The three choices are the following: Restricted. No outside calls may be placed at that telephone except 911 and unrestricted System SpeedCall numbers. (see page 23). ● Outward ● Unrestricted. Calls may be placed at that telephone with no restriction. (Installed setting) Restricted.
System Planner INCOMING LINES Use this page to plan the customization for your system. Permission is granted to make a copy of this page to record your decisions for the whole system.
System Planner TELEPHONE CUSTOMIZATION GROUP(S) LOCATION(S) TELEPHONE(S) Make a copy of this page for every different Telephone Customization. Complete one page for each telephone or group of telephones that will be customized identically. LINE BUTTON ASSIGNMENTS Check below the lines assigned to buttons on telephone(s).
Customization Chart At Telephone Set 10 Press INTERCOM Press SPEAKER Dial * 9 2 4 4 8 Install Administration Overlay Guide for use on page 11.
CALL REPORT Dial 4 SYSTEM SpeedCall Dial 3 ENTER A NUMBER: Dial telephone number ● Press MEMORY ● Enter two-digit code Repeat these three steps for each telephone number to be stored. PRINT CUSTOMIZATION INFORMATION Dial 5 ● DAY OF WEEK Press FEATURE Dial 1 Enter digit 1-7 (1 is Sunday) CHANGE A NUMBER: Dial telephone number ● Press MEMORY ● Enter two-digit code of number to be changed ● Listen for confirmation tone Repeat these four steps for each telephone number to be changed.
How to Customize Getting Started When you have finished your plans you are ready to customize the system. You must do all customizing from telephone set 10, which must be a 24-button set. You cannot use an attendant adjunct for customization. For telephone customization, including the COPY functions, the telephone(s) being customized must not be in use.
Instructions for Customizing Following are step-by-step instructions for customizing. ■ STEP 1 PRESS ONE OF THE INTERCOM BUTTONS ON TELEPHONE SET 10 An INTERCOM button press times out after five seconds. If more than five seconds elapse before you proceed to STEP 2, press the INTERCOM button again. ■ STEP 2 PRESS SPEAKER (or lift the receiver) You will hear a dial tone. ■ STEP 3 DIAL ✱ 9 2 4 4 8 You will hear a confirmation tone. If you do not hear the confirmation tone, hang up and start over.
System Reset to Factory-Set Values-0 CAUTION: Use of reset eliminates all customization. If you dialed 0 in STEP 5 on page 13, and if all telephones except the one you are using are idle, you can reset the system to the installed settings shown on the chart on pages 10-11. If all telephones are not idle, you will hear the busy signal. Enter the System Reset code 09009. If you make a mistake you will hear the error tone, and you must exit and re-enter reset to try again (press ENTER ADMIN and dial 0).
System Customization - 1 If you dialed 1 in STEP 5 on page 13 you began System Customization. The features on the following pages may be programmed in any order, and you may exit customization at any time, leaving unchanged features at previously-set values. You may also use System Customization to check the setting of a feature. You do not have to make changes. Features are customized by entering a digit, as shown on the following pages.
System Customization ■ AUTOMATIC PRIVACY Press FEATURE. Dial 1. The indicator light for Line 1 will show the current system-wide privacy status. If the light is ON, AUTOMATIC PRIVACY is On. If the light is OFF, AUTOMATIC PRIVACY is Off. To change the privacy status, enter one of the following: DIAL 1 2 INDICATOR LIGHT OFF ON SETTING Privacy Off Privacy On (installed) ■ TOLL CALL CHECK Press FEATURE. Dial 2. All the line indicator lights will go OFF.
System Customization ■ PBX/CENTREX LINE ACCESS CODE Press FEATURE. Dial 5. All of the line indicator lights will go off. To ENTER a system-wide PBX/Centrex dial code. Dial the desired dial code. Press ADD button. You will hear the confirmation tone when the code is added. If there are already four other codes programmed you will hear the error tone. The digit 9 is preset as the PBX/Centrex code, so there is room for three other codes. You may, of course, erase the 9 code if you want.
Telephone Customization - 2 If you dialed 2 in STEP 5 on page 13, you began Telephone Customization. The features on the following pages may be programmed in any order, and you may exit customization at any time, leaving unchanged features at previously-set values. You may also use Telephone Customization to check the setting of a feature. You do not have to make changes.
Telephone Customization COPY TO is a useful procedure if you plan identical customizing for more than one set. If you want to copy the telephone customization you have completed for one telephone to another telephone, use the COPY TO TELEPHONE feature (see page 22). If you want to copy the telephone customization to all the other telephones in a group, use the COPY TO GROUP feature (see page 22).
Telephone Customization ■ LINE BUTTON ASSIGNMENTS Press FEATURE. Dial 1. The line indicator lights will show which lines have or have not been assigned to buttons on that telephone. (Line assignments are labeled on the system administration overlay and shown in the table on page 15.) To remove a line from a button, press the line button and dial 1. To assign a line to a button, press the line button and dial 2. You may change multiple lines by pressing more than one line button before dialing 1 or 2.
Telephone Customization ■ AUTOMATIC LINE SELECTION Press FEATURE. Dial 3. Each line indicator light will show the current status for that line. (Line assignments are labeled on the system administration overlay and shown in the table on page 15.) To change the option for individual line(s) on that telephone, press the line button(s) and dial a valid digit from the table below. You may press more than one line button to make the change on more than one line.
Telephone Customization ■ OUTSIDE SERVICE Press FEATURE. Dial 6 The indicator light for line 1 will show the current overall OUTSIDE SERVICE for the telephone. To change the overall OUTSIDE SERVICE, dial one of the digits from the following table. DIAL 1 2 3 INDICATOR LIGHT OFF ON Even Flash SETTING Outward Restricted Unrestricted (installed) Toll Restricted ■ COPY TO You can use the three COPY TO features to save time if the customization of two or more telephones is similar or identical.
System SpeedCall - 3 The SpeedCall feature is an important time saver for users. There are two kinds of SpeedCall numbers: Personal and System. Personal SpeedCall numbers are entered by the users of the sets. Each user may store 12 Personal SpeedCall numbers. System SpeedCall numbers are stored in the system memory and are for the use of everyone in the system. The system can store 70 System SpeedCall numbers; of these 70, 50 are unrestricted and 20 are restricted (see below).
Storing System SpeedCall Numbers If you dialed 3 in STEP 5 on page 13, you began customization of the System SpeedCall memory. A. DIAL THE TELEPHONE NUMBER Dial the number to be entered in the System SpeedCall directory. A total of 16 digits, including pauses and one flash, may be stored as one number. NOTE: Press the HOLD/PAUSE button to enter a 1½ second pause in the number (i.e., to wait for a dial tone or access tone).
SMDR Call Report - 4 The Call Report feature provides the information needed to track telephone usage. Using the output, you can observe line and telephone usage that will help your company make the best use of the system. Do you need more or fewer incoming lines? Should the telephones in a particular area be customized as Toll Restricted? These and other questions may be answered after viewing an accurate history of the incoming and outgoing calls on your system.
SMDR Call Report ■ DAY OF WEEK Press FEATURE. Dial 1. Line indicator lights will be OFF. Enter a digit from 1-7 (1 is Sunday, 2 is Monday, etc.). You will hear a confirmation tone if you enter a valid digit and an error tone if the digit you entered is not valid. The information will be used as part of the call record. If the day of the week is not entered, ? will appear on the call record. A System Reset (see page 14) will not affect the day of week setting. ■ TIME OF DAY Press FEATURE. Dial 2.
Printing Customization Information - 5 If your system has optional equipment for Call Report information, you can print the results of your system and telephone customization, your System SpeedCall directory, and the call reporting customization information. NOTE: You can also send this same information about your system to a personal computer. To begin, follow steps 1-4 on page 13. At STEP 5, dial 5. ■ PRINT SYSTEM CUSTOMIZATION Press FEATURE. Dial 1.
Sample SMDR Call Report C C C C †C C C C C DAY APPROX. TIME FRI FRI FRI FRI FRI FRI FRI FRI FRI 11:03 11:02 11:04 11:04 11:30 11:33 11:31 11:34 11:31 CALLED NUMBER 6847 5559876 9P5557654 IN* 5551234 IN IN 5559876#12378945? DURATION LINE STN. 00:00:37 00:02:28 00:26:01 00:26:03 00:01:13 00:00:57 00:03:26 00:00:43 00:02:55 08 04 24 08 05 24 08 20 12 21 10 40 13 22 23 40 † This is an example of a record of a call placed with a device plugged into an LA jack.
Sample Customization Reports SYSTEM CUSTOMIZATION SETTING FEATURE A A A A A A A AUTOMATIC PRIVACY TOLL CALL CHECK HELD CALL REMINDER LINE TYPE PBX ACCESS CODES EXTERNAL ALERT DIAL TYPE 2 1 1 3 3 3 75 3 3 3 1 1 1 3 3 70 1 1 1 1 3 3 3 3 3 3 3 3 3 3 3 3 2 2 2 1 1 1 1 9 3 3 1 3 3 1 4 2 1 1 1 1 1 4 4 2 2 2 2 1 1 1 1 1 1 1 1 1 1 1 1 2 2 1 1 1 1 1 TELEPHONE CUSTOMIZATION STN.
SECTION 2 Additional Information Ringing Options If an attendant answers most of the calls that come into the office, you may want to customize the lines on other telephones to No Ring or Delayed Ring. Some businesses have one attendant and no backup, leaving no one to answer calls if the attendant is absent.
If your system requires a PBX/Centrex line access code, you should customize that code through the system customization process (see page 17). If the line access code is customized, the system will automatically enter a pause to wait for a dial tone after the code is dialed as part of a SpeedCall number. If the code is not customized, the system may consider the code part of the telephone number and not be able to check the digits for toll call restrictions.
Additional Feature Information Outside Calls on INTERCOM Buttons Features and operations that would normally require a line button can use the INTERCOM button instead. The INTERCOM button can act as a line button for a call if no button exists for that line on that telephone. This means not only that you may use the INTERCOM button to access a line for which you have no button, BUT ALSO that incoming calls will ring in on the INTERCOM button and may be answered in the normal way.
originator can then hang up and the other people can continue the call. If none of the telephones except the originator's is an intercom extension, the outside callers are on hold, and will not hear each other. In either case, the originator is still considered one of the four participants on the call, so if someone other than a conference participant sets up the conference, a total of three people can be conferenced. The call will disconnect when all the other parties hang up.
Helpful Hints As you probably already know, when people have troubles with their sets, they will come and discuss them with you. Here are some of the problems you may hear, and suggestions for handling them. set will not ring when it should and the MUTE light is blinking. Do Not Disturb may have accidentally been turned on. Have the person press INTERCOM, SPEAKER, #, 2. The light will go out and the set should be able to ring again.
System SpeedCall Directory Name/Number Unrestricted: Code 30 31 32 33 34 35 36 37 38 39 40 41 42 43 44 45 46 47 48 49 50 51 52 53 54 55 56 57 58 59 60 61 62 63 64 Name/Number Code 65 66 67 68 69 70 71 72 73 74 75 76 77 78 79 Restricted: 80 81 82 83 84 85 86 87 88 89 90 91 92 93 94 95 96 97 98 99 Administration Manual 35
Intercom Extension and Group Directory Number 10 11 12 13 14 15 16 17 18 19 20 21 22 23 24 25 26 27 28 29 30 31 32 33 34 35 36 37 38 39 40 41 42 43 44 45 46 47 48 49 50 51 52 53 54 55 56 57 36 Administration Manual Name or Location Group 61 61 61 61 61 61 61 61 62 62 62 62 62 62 62 62 63 63 63 63 63 63 63 63 64 64 64 64 64 64 64 64 65 65 65 65 65 65 65 65 66 66 66 66 66 66 66 66
2448 Administration Manual Index: A Abbreviated ring, 6, 9, 10, 21 Account codes, 25 Add function, 3 Administration overlay, 3, 10, 13 Answer only, permission, 6, 9, 10, 18, 20 Assign line, 20 Automatic line selection, 6, 9-10, 12, 19, 20, 21 Automatic privacy, 5, 8, 10, 16 C Call forwarding, 33 Centrex line access codes, 5, 8, 10, 17 Conference, 32-33 Controller, 2 Confirmation tones, 12 Copy to function, 3, 10, 11, 22 D Dedicated lines, 31 Delayed ring, 6, 9, 10, 21 Dial, 3; type, 5, 8, 10; pulse, 5 Drop