AT&T ® SPIRIT Communications System Model 308/616 Administration Manual
LIMITED WARRANTY AND LIMITATION OF LIABILITY AT&T Information Systems, Inc. (“AT&T”) warrants to you that your SPIRIT® Communications System (“SPIRIT system”) will be free from defects in material and workmanship when title to your SPIRIT system passes to you.
Introduction The SPIRIT Communications System, Model 308/616, consists of a CONTROLLER that controls the system, TELEPHONE SETS, and some optional equipment. Outside telephone lines from your local telephone company or from a PBX, or switchboard, system are connected to the controller. The controller is connected to all the telephones in the system. Customizing (Section 1) The SPIRIT Communications System can be customized to fit the needs of your company.
Parts Of The System CONTROLLER Mounted near the incoming telephone lines. On top of the controller iS the Administration Switch, which must be turned ON when customizing the system. MUSIC ON HOLD VOLUME CONTROL OPTIONAL EQUIPMENT Optional equipment may include a “music on holds” source (usually a radio). an external alert “buzzer.” and public address speaker. LINE AUX (Line Auxiliary) Dedicated lines for computer modems. answer/ record machines. and for use during power failures.
SECTION 1 Customizing Following is a list and brief description of the features you can change. There are two kinds of features, SYSTEM FEATURES and TELEPHONE FEATURES. When you customize a system feature, you have made a change in the whole system. In this manual, information about system features is always printed with a grey background. When you customize a telephone feature, the change is made for one telephone extension only.
Telephone Features (instructions for customizing begin on page 14) Telephone customization is used to make different telephones in the system work in different ways. ■ LINE USE PERMISSION. You can assign each line of each telephone one of the following permissions. ● No Permission. The telephone may not use that line at all except when a call on that line is transferred to it. ● Full Permission. The user may place and answer calls on that line. (Installed setting). ● Answer Only Permission.
Confirmation and Error Tones Throughout this manual you are told that you will receive a "confirmation" tone after valid key presses and an “error” tone when key presses are not valid. If you would like to hear the confirmation and error tones before you start customizing the system, complete the following exercise: To hear a confirmation tone: ● Press INTERCOM. ● Lift handset (or press SPEAKER). ● Dial #2. To hear an error tone: ● Press INTERCOM. ● Lift handset (or press SPEAKER). ● Dial * 0.
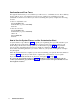
Parts Of The Telephone Sets 6-BUTTON TELEPHONE MESSAGE WAITING INDICATOR Shows that the user has a message waiting. HANDS-FREE ANSWER INDICATOR Shows the status of the Hands-Free Answer on lntercom feature. Turned on and off using the MUTE/HFAI button. LINE BUTTONS (1-6) and INDICATOR LIGHTS Used for placing and receiving outside calls. INTERCOM BUTTONS and INDICATOR LIGHTS Used for placing and receiving intercom calls. RECALL/DROP BUTTON Used to disconnect a call without hanging up.
System Planner Use this page to plan the customization for your system.
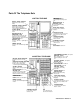
Customization Chart SAMPLE ADMINISTRATION OVERLAY Follow this chart to perform all your customizing duties. A more detailed set of instructions starts on page 10. ■ To get a different line of features, press ENTER ADMIN (at ● ). ■ To customize another feature in the same row, press FEATURE. ■ To leave customization mode, hang up. Replace overlay in pocket. Don’t forget to turn the administration switch OFF when you are finished customizing your system.
How to Customize Getting Started When you have finished your customizing plans you are ready to actually customize the system. You must do all customizing from telephone set 10, which may be either a 6-button or a 24-button set. For some customization procedures, all telephone sets in the system must be idle, so you will want to choose a time when people are not using the telephones. For telephone customization, the telephone being customized must be idle.
STEP 8 CONTINUE CUSTOMIZATION If you wish to continue with another customization type, press the ENTER ADMIN button and repeat steps 6 and 7. For example, if you complete the desired customization under System Customization and want to continue with Telephone Customization, press the ENTER ADMIN button and repeat steps 6 and 7. STEP 9 EXIT CUSTOMIZATION When customization is complete, replace the receiver (or press SPEAKER).
Customizing the System ■ AUTOMATIC PRIVACY Press FEATURE. Dial 1. All the line indicator lights will show the current system-wide privacy status. If the lights are ON, privacy is ON. If the lights are OFF, privacy is OFF. To change the privacy status, enter one of the following: DIAL 1 2 INDICATOR LIGHT OFF ON SETTING Privacy Off Privacy On (installed) ■ TOLL CALL CHECK Press FEATURE. Dial 2. All the line indicator lights will go OFF.
Customizing the System ■ PBX/CENTREX LINE ACCESS CODES Press FEATURE. Dial 5. All of the line indicator lights will go off. To ENTER a system-wide PBX/Centrex dial code. Dial the desired dial code. Press ADD button. You will hear the confirmation tone when the code is added. If there are already four other codes programmed you will hear the error tone. The digit 9 is preset as the PBX/Centrex code, so there is room for three other codes. You may, of course, erase the 9 code if you wish.
Customizing Each Telephone If you dialed 2 in STEP 6 on page 10, you began Telephone Customization (see the chart on page 9). All these features are customized on a set-by-set basis, meaning you must enter the telephone set number before customizing. The changes you make on set 12, for example, will not be made on set 14, or any other, unless you specifically copy a customizing set-up from one telephone set to another.
Customizing Each Telephone ■ LINE USE PERMISSIONS Press FEATURE. Dial 1. Each line indicator light will show the telephone set’s current permission for that line. Choose the line(s) for which you wish to set the same permission by pressing the line button(s). Dial the appropriate digit (see list below). You may press more than one line button to make the change on more than one line. If you enter a digit without first pressing a line button you will hear the error tone.
Customizing Each Telephone ■ LINE RINGING OPTIONS Press FEATURE. Dial 3. Each line indicator light will show the current ringing option for that line. To change the option for individual line(s) on that telephone, press the line button(s) and dial a valid digit from the table below. You may press more than one line button to make the change on more than one line. If you enter a digit without first pressing a line button you will hear the error tone.
Customizing Each Telephone ■ COPY TO To copy the feature choices from this telephone set to another set press COPY TO. The COPY TO indicator light will go on, all of the line indicator lights will go off. While the COPY TO indicator light is on, dial an intercom extension number or, if using a 24-button set, press the auto-dial button for the desired set. The telephone set being copied to must not be busy. If you hear a busy tone, cancel the COPY TO button again.
Company 1 CARPENTER, WATKINS, and SEPULVEDA, Attorneys at Law † Installed Setting
Examples Of Systems Planning the customizing of your communications system requires considering the needs of your company. Since each company is unique, two business profiles are provided to show you how these systems may be customized. The system planners are shown for each business to help give you a better understanding of how to complete your own system planner. COMPANY 1 CARPENTER, WATKINS, and SEPULVEDA, Attorneys at Law Company 1 is a law firm with a receptionist/secretary who answers all calls.
Company 2 LIVELY TRAVEL AGENCY † Installed Setting
COMPANY 2 LIVELY TRAVEL AGENCY. Company 2 is a travel agency with six incoming lines and eleven telephone sets. Eight travel agents share phone answering duties. Whoever is not currently busy picks up an incoming call. Telephone sets 11 through 18 are for the use of the travel agents. Telephone set 10 is used by the company president. Telephone set 19 is in the conference room. Telephone set 20 is in the lobby.
SECTION 2 SpeedCall The SpeedCall feature is an important time saver for users. SpeedCall numbers are dialed by using a two-digit code. There are two kinds of SpeedCall numbers: personal and system. Personal SpeedCall numbers are entered by the users of the sets. These numbers are available only at the telephone where they are stored. Each user may store 16 personal SpeedCall numbers. System SpeedCall numbers are stored in the system memory and are for the use of all the users in the system.
Storing System SpeedCall Numbers STEP 1 SET ADMINISTRATION SWITCH TO “ON” Set the system administration switch on the controller to ON (see the drawing on page 3.) STEP 2 PRESS INTERCOM BUTTON. PRESS SPEAKER Working at telephone set 10, press an INTERCOM button that is not busy. Lift the receiver (or press SPEAKER). INTERCOM times out after five seconds. You must lift the receiver or press SPEAKER within those five seconds or start the procedure over again at STEP 2.
SECTION 3 Additional Information The System Attendant Many businesses have a system attendant or receptionist, a person who answers most calls and transfers them to other people in the company. If your business has an attendant, you’ll probably want to make some customizing changes in your system. Ringing Options If the attendant answers most of the calls that come into the office, you may want to customize the lines on other telephone sets to no ring or delayed ring.
LINE AUX JACKS (Dedicated Lines and Power Failures) Dedicated Lines Two jacks on the 308 controller, and another on the 616 expansion unit, are labeled LINE AUX. The jacks provide standard telephone service separate from SPIRIT system features, and are useful as dedicated lines for computer modem(s) and in power failure situations. When LINE AUX jack 1 on the 308 is actually being used (that is, the device is “off hook” and using the line) incoming line 1 will be unavailable for use by the SPIRIT system.
Conference A maximum of four telephones may be conference; only three of these may be SPIRIT telephones. The total of four must include any telephones bridged onto the conference. NOTE: When two or more outside lines are conference the quality of transmission and audio reception may be reduced. The originator of a conference call is the person who initiates the conference. If the originator hangs up, the call is disconnected. Only the originator can add or drop other people.
AT&T Intercom Extension List Name Intercom Number 10 11 12 13 14 15 16 17 18 19 20 21 22 23 24 25 Administration Manual 27
AT&T System SpeedCall Directory Name/Number Unrestricted: Code 30 31 32 33 34 35 36 37 38 39 40 41 42 43 44 45 46 47 48 49 50 51 52 53 54 55 56 57 58 59 60 61 62 63 64 28 Administration Manual Name/Number Code 65 66 67 68 69 70 71 72 73 74 75 76 77 78 79 Restricted: 80 81 82 83 84 85 86 87 88 89 90 91 92 93 94 95 96 97 98 99
8/616 Administration Manual Index: A Abbreviated ring, 4, 7, 15, 17, 19 Accessories, 24 Administration switch, 2, 8, 9, 10, 22; overlay, 8 - 9 Answer only, 4, 7, 8, 14, 17, 19 Auto-dial buttons, 6 Automatic line selection, 4, 7, 8, 9, 14, 17, 18, 19, 20 Automatic privacy, 3, 7, 8, 11, 17, 18, 19, 20 B Busy lamp field, 24 C Call pickup, 24 Centrex line access codes, 3, 7, 12, 17, 18, 19, 20 Conference, 25; button, 6 Confirmation tones, 5 Controller, 2, 8 - 9 Copy to, 8, 13, 16; all, 8, 16 Customization cha
ENTER ADMlN FEATURE COPY TO STATION DROP ADD Administration Overlay
Document Title Customer Installation Instructions Select Code 950-226 Document Number 999-500-226 Installation Instructions— 616 Expansion Unit 950-227 999-500-227 Administration Manual 950-228 999-500-228 User Manual 950-237 999-500-237 999-500-238 Reference Card (set of 10) 950-238 Set (1 each of the above) 999-902 Customer Convenience Kit (blank and printed telephone set labels, plastic strips, Administration Overlay) 999-240 Administration Overlay Training Tape 999-500-240 999-500-24
999-500-228