User’s manual TL92278/TL92328/TL92378 DECT 6.
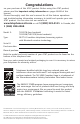
Congratulations on your purchase of this AT&T product. Before using this AT&T product, please read the Important safety information on pages 86-88 of this manual. Please thoroughly read this user’s manual for all the feature operations and troubleshooting information necessary to install and operate your new AT&T product. You can also visit our website at www.telephones.att.com or call 1 (800) 222-3111. In Canada, dial 1 (866) 288-4268.
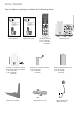
Parts checklist Your telephone package contains the following items. User’s manual Quick start guide TL92278/TL92328/TL92378 DECT 6.0 cordless telephone/answering system with BLUETOOTH® wireless technology TL92278/TL92328/TL92378 DECT 6.
User’s manual TL92278/TL92328/TL92378 DECT 6.0 cordless answering system with Bluetooth® wireless technology Table of contents Getting started Directory Quick reference guide ������� handset............................................. 1 telephone base............................. 3 Handset status icons........................ 4 Installation............................................. 5 Telephone base installation.......... 6 Charger installation...........................
Table of contents Appendix A, Alert tones & lights.........................68 Appendix B, Handset display screen messages.......................................69 Appendix C, Expansion handset...........................72 Adding and registering handsets.........................................73 Replacing a handset.......................74 Appendix D, Troubleshooting................................75 Appendix E, Maintenance.......................................
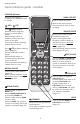
Getting started Quick reference guide - handset CHARGE indicator On when the handset is charging in the telephone base or charger. DIR / MENU/SELECT Press to display the menu. While in the menu, press to select an item or save an entry or setting. CID Press DIR to display directory entries (page 42). Press to scroll up while in menus. While entering names or numbers, press to move the cursor to the right. Press to increase the listening volume when on a call.
Getting started Quick reference guide - handset Feature menu The > symbol highlights a menu item. >DIRECTORY CALL LOG Menu Feature menu Using menus DIRECTORY (page 39) CALL LOG (page 45) INTERCOM (page 35) RINGER VOLUME (page 20) RINGER TONE (page 21) KEY TONE (page 22) LANGUAGE (page 22) CLR VOICEMAIL (page 23) HOME AREA CODE (page 24) Press or to scroll through menu items. Press MENU/SELECT to select or save changes to a highlighted menu item.
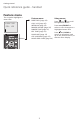
Getting started Quick reference guide - telephone base IN USE indicator On when the handset is in use, when the answering system is answering an incoming call or when you are registering a handset. VOICEMAIL indicator Flashes when you have new voicemail. Voicemail is a service offered by your local telephone company, and is different from answering system messages (page 23). Flashes when another telephone is in use on the same line, or when you are deregistering handset(s) from the telephone base.
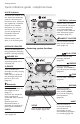
Getting started Handset status icons HANDSET 1 25 MISSED CALLS NEW MUTE 10:21 AM 11/23 HOME line - on steady when the HOME line is in use. CELLULAR line - on steady when the CELLULAR line is in use. BLUETOOTH - on steady when a cellular phone is connected with the telephone base. NEW VOICEMAIL - new voicemail received from the local telephone company. SPEAKERPHONE - the speakerphone is in use. Ringer off - the handset ringer is turned off. Battery status - battery is charging (animated display).
Getting started Installation You must install and charge the handset battery before using the cordless handset. STOP! See pages 8-9 for easy instructions. Install the telephone base close to a telephone jack and a power outlet not controlled by a wall switch. The telephone base can be placed on a flat surface or vertically mounted on the wall (see page 10). For optimum range and better reception, place the telephone base in a central and open location.
Getting started Telephone base installation Install the telephone base as shown below. Make sure that the electrical outlet is not controlled by a wall switch. If you subscribe to high-speed Internet service (digital subscriber line - DSL) through your telephone line(s), you must install a DSL filter between the telephone base and the telephone wall jack. The filter prevents noise and caller ID problems caused by DSL interference.
Getting started Charger installation Plug the power adapter into an electrical outlet not controlled by a wall switch. IMPORTANT INFORMATION 1. Use only the power adapter(s) supplied with this product. To order a replacement power adapter, visit our website at www.telephones.att.com, or call 1 (800) 222-3111. In Canada, dial 1 (866) 288-4268. 2. The power adapters are intended to be correctly oriented in a vertical or floor mount position.
Getting started Battery installation & charging Install the battery as shown on the next page. Once you have installed the battery, the screen indicates the battery status (see table below). If necessary, place the handset in the telephone base or charger to charge the battery. For best performance, keep the handset in the charger when not in use. The battery is fully charged after 16 hours of continuous charging. See the table on page 95 for battery operating times.
Getting started Battery installation & charging Step 1 Press the depression and slide the battery compartment cover downwards (if necessary). Step 2 Plug the battery securely into the connector inside the handset battery compartment, matching the color-coded label. Insert the supplied battery with the label THIS SIDE UP facing up as indicated. Step 3 Align the cover flat against the battery compartment cover, then slide it upwards until it clicks into place.
Getting started Installation options The telephone base is set for desktop use. It is possible to change to wall mounting position by installing the wall mount bracket provided. Wall mounting requires a telephone outlet wall mounting plate with mounting studs that may require professional installation. You can purchase the mounting plate from many hardware or consumer electronics retailers.
Getting started Installation options Desktop to wall mount installation 3. ���������������������������������������������������������������������������� Bundle the telephone line cord and power adapter cord, and secure them with a twist tie before placing them behind the telephone base as shown below. 4. Align the holes on the bracket with the standard wall plate and slide the bracket until the telephone is secured as shown below. Plug the telephone line cord into a telephone wall jack.
Getting started Installation options Desktop to wall mount installation 5. Make sure the telephone is securely positioned as shown below.
Getting started Installation options Wall mount to desktop installation To change the telephone base to the desktop position, make ������������������������� sure that you first unplug the telephone line cord and power adapter cord from the wall outlets before you begin. In addition, to prevent possible damage, remove the handset from the telephone base. 1. Remove the telephone base from the wall and ���������������������������� untie the bundled telephone line cord and power adapter cord. 2.
Getting started Installation options 4. Plug the telephone line cord into a telephone wall jack, and plug the power adapter cord into a power outlet not controlled by a wall switch. Route the cords through the bracket channels. Power outlet not controlled by a wall switch. Power adapter Telephone line cord DSL filter (not included), required if you have DSL high-speed Internet service.
Bluetooth Introducing Bluetooth Your new AT&T TL92278/TL92328/TL92378 �������������������������������������������������������� �������������������������������� telephone system with Bluetooth wireless technology has the following features: •�������������������������������������������������������������� Pair a Bluetooth enabled cell phone with the telephone base. •������������������������������������������ Connect a cell phone to make and receive CELLULAR calls.
Bluetooth Glossary of terms Below are some terms used in this user’s manual to help you become familiar with using your Bluetooth devices and your new AT&T telephone system. Bluetooth cell phone - Refers to a mobile Bluetooth enabled cellular telephone. CELLULAR line - The communications service provided through your Bluetooth enabled cellular telephone. HOME line - ��������������������������������������� Your conventional telephone land line.
Bluetooth Bluetooth setup NOTE: Only one Bluetooth device can be paired with the telephone base at a time. HANDSET 1 To use a Bluetooth-enabled cellular phone with your telephone, you must first pair and connect your Bluetooth cellular phone with the telephone base. Pairing a device Before you begin, make sure that your Bluetoothenabled cellular phone is not connected to any other Bluetooth device. Refer to your cellular phone user's manual to learn how to search for or add new Bluetooth devices.
Bluetooth Bluetooth setup Turning off the auto connection If you do not want the telephone base to reconnect to a paired device automatically after it is disconnected, you can turn off the auto connection feature manually. In order to turn off the auto connection, you will need to initiate a disconnection from the paired cellular phone; this will transmit a signal to the telephone base and disable the auto connection.
Handset settings Handset main menu To enter the main menu: 1.������� Press MENU/SELECT when the handset is in idle mode. 2. Press DIR / CID to select a handset feature menu, then press MENU/SELECT to enter that menu. To return to the idle mode, press and hold CALL LOG allows you to view caller ID history (page 45). >CALL LOG INTERCOM HOME AREA CODE allows you to set your home area code (page 24). >HOME AREA CODE DIRECTORY LANGUAGE allows you to set your handset display language (page 22).
Handset settings Handset settings Using the feature menu, you can customize many of the telephone’s settings. >DIRECTORY CALL LOG 1. Press MENU/SELECT when in idle mode (when the phone is not in use) to enter the feature menu. 2. Use DIR / CID to scroll to the feature to be changed. When scrolling through the menu, the top menu item is always highlighted with a > symbol. 3. Press item.
Handset settings Handset settings Ringer tone >DIRECTORY CALL LOG You can select different ringer tones for the HOME and CELLULAR calls. You may choose one of 10 ringer tones. To choose a ringer tone for the HOME line: >RINGER TONE KEY TONE >HOME 1. Press MENU/SELECT when in idle mode to enter the feature menu. 2. Use DIR / CID to scroll to >RINGER TONE, then press MENU/SELECT. TONE CELLULAR TONE 3. Press MENU/SELECT to select HOME TONE. 4.
Handset settings Handset settings Key tone >DIRECTORY CALL LOG The handset is factory programmed to beep with each key press. If you turn off the KEY TONE, there will be no beeps when you press keys. To turn the KEY TONE on or off: >KEY TONE LANGUAGE KEY TONE ON 1. Press MENU/SELECT when in idle mode to enter the feature menu. 2. Use DIR / CID to scroll to >KEY TONE, then press MENU/SELECT. DIR / 3. Press CID to select ON or OFF. 4.
Handset settings Handset settings Visual message waiting (voicemail) indicator If you subscribe to a voicemail service offered by your local telephone company, the voicemail waiting indicator feature will provide a visual indication when you have new voicemail messages. The VOICEMAIL light on the telephone base will flash, and NEW VOICEMAIL and the icon will appear on the handset screen(s). NOTES: 1. This feature does not indicate new answering system messages recorded on your phone. 2.
Handset settings Handset settings Home area code >DIRECTORY CALL LOG >HOME AREA CODE DIRECTORY If you dial seven digits to make a local call (no area code required), program your area code into the telephone as the home area code. After setting, if you receive a call from within your home area code, the caller ID history will only display the seven digits of the telephone number. 1. Press MENU/SELECT in the idle mode to enter the handset main menu. HOME AREA CODE ___ 2.
Telephone operation Handset operation Elapsed time HOME 0:00:30 Making a HOME call To make a HOME call: • Press HOME/FLASH or the telephone number. SPEAKER, then enter To end a HOME call: • Press OFF/CLEAR or return the handset to the telephone base or charger. The screen displays the elapsed time as you talk (in hours, minutes and seconds). NOTE: Pressing HOME/FLASH to access services from your local telephone service provider will not affect the elapsed time.
Telephone operation Handset operation Temporary ringer silencing DELETE/MUTE Press OFF/CLEAR or DELETE/MUTE while the telephone is ringing to silence the ringer temporarily. This will silence the ringer without disconnecting the call. The next incoming call will ring normally at the preset volume. OFF/CLEAR NOTE: Each handset will ring when there is an incoming call unless the ringer volume is turned off.
Telephone operation Handset operation Making a CELLULAR call Elapsed time CELL 0:00:30 To make a CELLULAR call: • Enter the telephone number (predial mode), then press CELLULAR. Press DELETE/MUTE or OFF/CLEAR to make corrections when entering the phone number. To end a CELLULAR call: • Press OFF/CLEAR or return the handset to the telephone base or charger. The screen displays the elapsed time as you talk (in hours, minutes and seconds). NOTES: 1.
Telephone operation Handset operation Receive a HOME call while on a CELLULAR call While on a CELLULAR call and there is an incoming HOME call, HOME/FLASH will flash on the handset and you will hear a short beep. To answer the incoming HOME call: • Press HOME/FLASH on the handset. The CELLULAR line call will automatically be placed on hold and CELLULAR will start flashing. To end the HOME call: • Press OFF/CLEAR on the handset. The CELLULAR line will still be on hold.
Telephone operation Handset operation Elapsed time HOME 0:00:30 Handset speakerphone During a call, you can press SPEAKER to alternate between hands-free speakerphone and normal handset use. Press OFF/CLEAR to hang up. For better sound quality while using the speakerphone, place the handset on a flat surface with the dial pad facing up. NOTE: The speakerphone uses more power than the normal handset.
Telephone operation Handset operation Handset locator The handset locator feature is useful if you misplace a handset(s). To start the paging tone: • Press HANDSET LOCATOR at the telephone base. This starts the paging tone on the handset(s) for 60 seconds. NOTE: When paging, if you press OFF/CLEAR or DELETE/MUTE on a handset, the ringer of the handset will be silent but the handset locator feature will not be canceled.
Telephone operation Options while on calls Volume control To adjust the listening volume on a handset: Volume control Press DIR / CID ������������������������ to adjust the listening volume when on a call. Each press of the button increases or decreases the volume level by one increment. NOTES: 1. All volume settings (handset and speakerphone) are independent. 2. When the volume reaches the minimum or maximum setting, you will hear two beeps.
Telephone operation Options while on calls Mute DELETE/MUTE The mute function allows you to turn off the microphone. You can hear the caller, but the caller will not be able to hear you. To mute a call: • Press DELETE/MUTE to turn off the microphone. When mute is on, the handset screen will show MUTED for a few seconds and the MUTE icon will be shown until mute is turned off. To un-mute a call: • Press DELETE/MUTE again and resume speaking.
Telephone operation Options while on calls Hold You can place a HOME or CELLULAR call on hold. You will hear an alert tone if you have not taken the call off of hold after 14 minutes. You will hear another alert tone 30 seconds later. At 15 minutes on hold, the call will automatically disconnect. To place a HOME call on hold: HOME LINE HELD CELL LINE HELD • Press the HOLD key on the handset. HOME LINE HELD will appear on the display and HOME/FLASH will flash.
Telephone operation Chain dialing NOTES: 1. You cannot edit a directory entry while you are on a call. For more details about the directory, see page 39. 2. You cannot copy a caller ID entry into the directory while you are on a call. For more details about the caller ID history, see page 45. 3. While on a call, only the most recently called number can be reviewed, and erasing the entry is not allowed. For more details about the redial memory, see page 29. 4.
Telephone operation Intercom Use the intercom feature for conversations between handsets. You can buy additional expansion handsets (model AT&T TL90078) for this telephone base. Up to 12 handsets can be registered to the telephone base. The first nine handsets that you register will be named Handsets 1-9. Use the handset number to intercom and transfer calls.
Telephone operation Intercom 1. 2. 3. 4. NOTES: Before the intercom call is answered, you can cancel the intercom call by pressing OFF/CLEAR on the calling handset. If the called handset is not answered within 100 seconds, or if it is in the directory or caller ID history mode, or on a call, or out of range, the calling handset will show the message UNABLE TO CALL TRY AGAIN. Pressing OFF/CLEAR or DELETE/MUTE will temporarily silence the intercom ringer. A maximum of four handsets can be used at a time.
Telephone operation Call transfer using intercom Use the intercom feature to transfer an outside call to another system handset. Model TL92278 (two-handset system) 1. When on an outside call, press MENU/SELECT to enter the feature menu. 2. Use DIR / CID to scroll to >TRANSFER, then press MENU/SELECT. The outside call is automatically placed on hold. The transferring handset’s screen will show CALLING OTHER HANDSET. The called handset will ring, and its screen will show OTHER HANDSET IS CALLING. NOTES: 1.
Telephone operation Call transfer using intercom Models TL92328/TL92378 (three or more handsets) NOTES: 1. Before the intercom call is answered, press and hold OFF/CLEAR to cancel the transfer and return to the outside call. 2. If the called handset does not answer the intercom call within 100 seconds, is in directory or caller ID history mode, or is out of range, the transferring handset will show UNABLE TO CALL TRY AGAIN on its screen and will automatically return to the outside call. 3.
Directory About the directory Shared directory Robert Brown 888-883-2445 The directory is stored in the telephone base, and is shared by all handsets. Changes made to the directory on any one handset will apply to all. NOTE: Only one handset can review the directory at a time. If another handset attempts to enter the directory, the screen will display NOT AVAILABLE AT THIS TIME.
Directory Creating directory entries To create a new directory entry 1. Press MENU/SELECT when in idle mode to enter the feature menu. >DIRECTORY CALL LOG >REVIEW STORE 2. Press MENU/SELECT again to enter >DIRECTORY menu. 3. Press DIR or 4. Press MENU/SELECT. CID to highlight STORE. 5. Enter the telephone number when prompted. • Use the dial pad to enter up to 30 digits. >STORE REVIEW – Press DIR / CID to move the cursor to the right or left. – Press DELETE/MUTE to erase digits.
Directory Creating directory entries 7. Enter the name when prompted. ENTER NAME Robert Brown_ NOTE: The first letter of every word will be capitalized. The remaining letters in a word begin with lower case letters shown in the chart to the right. Robert Brown 888-883-2445 • Use the dial pad to enter a name (up to 15 characters). Each time a key is pressed, the character on that key will be displayed. Additional key presses will produce other characters on that key. See the chart below.
Directory Directory review To review directory entries DIR 1. Press DIR when in idle mode to display the first entry in the directory. DIRECTORY EMPTY will be displayed if there are no directory entries. -ORYou can also display the first entry in the directory by pressing MENU/SELECT twice, then pressing MENU/SELECT again to choose >REVIEW. 2. Press DIR or CID to browse through the directory. Entries will be displayed alphabetically by the first letter in the name.
Directory Directory search To search by name DIR 1. Press DIR when in idle mode to display the first listing in the directory. DIRECTORY EMPTY will be displayed if there are no directory entries. 2. When a name entry is displayed, press the dial pad keys (2-9) to start a name search. The directory will display the first name beginning with the first letter associated with the dial pad key if there is an entry in the directory that begins with that letter. 3.
Directory To dial, delete or edit entries To dial, delete or edit a directory entry (name and number), the entry must be displayed on the handset. Use the directory review or search (pages 42-43) to display an entry. Display dial To dial a displayed number from the directory, press HOME/FLASH or SPEAKER to dial from the HOME line; or press CELLULAR to dial from the CELLULAR line. To delete an entry When a directory entry is displayed, press DELETE/MUTE to delete the displayed entry from the directory.
Caller ID Caller ID operation CHRISTINE SMITH 888-722-7702 NEW AM 10:01 11/23 This product supports caller ID services provided by most local telephone service companies. Depending on your service subscription, you may see the caller’s number, or the caller’s name and number which are sent by the telephone company after the first or second ring. Caller ID from the HOME line allows you to see the name, number, date and time of the incoming call.
Caller ID Caller ID operation Caller ID history information CHRISTINE SMITH 888-722-7702 10:01 AM NEW 11/23 If you subscribe to caller ID services, provided by your local telephone company and/or cellular service provider, ����������������������������� the caller ID history stores information about the last 50 incoming calls ���� for both the HOME and CELLULAR lines.
Caller ID Caller ID operation Chris 888-722-7702 NEW AM 10:01 11/23 Memory match If the incoming telephone number exactly matches a telephone number in your directory, the name that appears on the screen will match the corresponding name in your directory. For example, if Christine Smith calls, her name will appear as Chris if this is how you entered it into your directory. NOTE: The number shown by your caller ID will be in the format sent by the phone company.
Caller ID Caller ID operation Missed (new) calls indicator HANDSET 1 6 MISSED CALLS Robert Brown 888-883-2445 NEW 10:31 AM 11/23 When a handset is in idle mode and has calls that have not been reviewed, its screen will show XX MISSED CALLS. All entries which have not been reviewed will be counted as missed calls when the phone is idle. Each time an entry in the caller ID history marked NEW is reviewed, the number of missed calls decreases by one.
Caller ID To review the caller ID history To review the caller ID history 1. Press CID to review the caller ID history in reverse chronological order starting with the most recent call. -ORYou can also review the caller ID history by pressing MENU/SELECT, and using DIR or CID to scroll to >CALL LOG, then press MENU/SELECT. HANDSET 1 6 MISSED CALLS CID 2. Press DIR or CID to scroll through the list as shown on the left.
Caller ID To review the caller ID history Other options • Press DELETE/MUTE to delete the displayed entry from the caller ID history. • When an entry from the caller ID history is displayed, press and hold DELETE/MUTE to delete all entries from the caller ID history. When the screen displays DELETE ALL CALLS? press MENU/SELECT to clear the caller ID history of all entries, or press OFF/CLEAR to exit and leave all entries in the caller ID history intact.
Answering system About the answering system Answering system and voicemail Your telephone has both a digital answering system and voicemail indication. Voicemail is offered by your telephone service provider (fees may apply). Your telephone’s answering system and voicemail indication are independent features. Each alerts you to new messages differently. For more information on the voicemail indicators, see page 23.
Answering system About the answering system NOTE: Only messages from the HOME line can be recorded in the system. The answering system can record up to 99 messages, depending on the length of each message. Individual messages can be up to four minutes, and the maximum recording time is 14 minutes. The actual recording time depends on individual message characteristics. Messages will remain available for replay until you delete them.
Answering system Day & time announcement Before playing each message, the answering system announces the day and time the message was received. If you subscribe to caller ID service from your local telephone company, the time will automatically be set with every incoming call. You must set the year so that the day of the week can be calculated from the caller ID information. To check day & time You can press CLOCK when the system is idle to hear the current day and time.
Answering system Day & time announcement 5. Press CLOCK. The system will announce the current day setting, and then announce “To change the day, press SKIP or REPEAT. Press CLOCK when you are done.” 6. Press CLOCK. The system announces the current clock setting.
Answering system Answering system mode Unless you change it, the answering system will be on and ready to record messages. You can turn the answering system off, but if you do so, the answering system will not answer calls and record incoming messages. To turn the answering system on or off: • Press ANSWER ON to turn off your answering system. The system will announce “Calls will not be answered” and then beep to confirm the system is off. The ANSWER ON light will be off.
Answering system Outgoing announcements Outgoing announcements are the messages callers hear when calls are answered by the answering system. The telephone has a prerecorded outgoing announcement, “Hello. Please leave a message after the tone.” You can use this announcement, or replace it with your own recording. To play your current outgoing announcement 1. Press ANNC. and you will hear "Announcement. Press PLAY or press RECORD." 2. Press PLAY/STOP to hear the outgoing announcement.
Answering system Outgoing announcements To delete your outgoing announcement 1. Press ANNC. You will hear “Announcement. Press PLAY or press RECORD." 2. Press PLAY/STOP to begin playback. 3. Press DELETE during playback to delete your announcement. "Announcement deleted." will be announced. Press ANNC. to exit the announcement menu. When your announcement is deleted, calls will be answered with the pre-recorded announcement previously described on page 56.
Answering system Answering system setup You can change the number of rings, telephone base ringer volume, remote access code and message alert tone. NOTE: To adjust the voice prompt volume, press VOLUME . 1. When the phone is idle, press SETUP repeatedly to hear the feature settings. 2. When you hear the feature you want to change, press SKIP or REPEAT to change the setting. • Number of rings - set the number of rings before the answering system answers an incoming call.
Answering system Answering system setup Number of rings You can set the answering system to answer an incoming call after two, four, or six rings. You can also select toll saver, which is explained below. Unless you change it, the answering system answers an incoming call after four rings. To set the number of rings: 1. Press SETUP. The system will announce "Number of rings," followed by the current setting, and then "To change the setting, press SKIP or REPEAT; to continue setup, press SETUP." 2.
Answering system Answering system setup Base ringer You can set the volume to high or low, or turn the base ringer off. Unless you change it, the telephone base ringer volume is set to low. To change the setting: 1. Press SETUP twice. The system will announce “Base ringer,” followed by the current setting, and then “To change the setting, press SKIP or REPEAT; to continue setup, press SETUP.” 2. Press SKIP or REPEAT to choose among off, low or high. 3.
Answering system Answering system setup Message alert tone When the message alert tone is set to On, and there is at least one new message, the telephone base will beep every 10 seconds. Unless you change it, the message alert tone is set to off. To change the setting: NOTE: The message alert tone will beep only if all the conditions below are met: Answering system is on. Message alert tone setting is on. There are new messages. 1. Press SETUP four times.
Answering system Message playback Press PLAY/STOP to listen to the messages. The system announces the number of messages, then begins playback. If you have new messages, you will hear only the new messages (oldest first). If there are no new messages, the system will play back all the messages (oldest first). Before each message, you will hear the day and time it was received. After the last message, you will hear “End of messages.
Answering system Message playback To delete all old messages You can only delete old (reviewed) messages. New messages must be played before you can delete them. Deleted messages cannot be retrieved again. To delete all old messages: 1. Press DELETE when the telephone is in idle mode. The system will announce, "To delete all old messages, press DELETE again." 2. Press DELETE again. The system will announce, "All old messages deleted.
Answering system Recording & playing memos Memos are messages you record yourself. They are saved, played back and deleted exactly like incoming messages. You can record a memo as a reminder to yourself, or leave a message for others who use the answering system. To record a memo: 1 Press RECORD. The system will announce “Record after the tone. Press STOP when you are done.” The message counter will show the elapsed time (in seconds) of the recording. You can record a memo for up to four minutes.
Answering system Message counter displays The message counter usually displays the total number of answering system messages. See the table below for other message counter displays. Message counter displays 0 No messages. 0 (flashing) The clock needs to be set (pages 53-54). 02, 04, 06, Displayed while setting the number of rings (page 59). 1-8 Displayed for two seconds while adjusting the telephone base speaker volume.
Answering system Remote access NOTES: 1. If a valid remote access code is not entered, the call will be ended automatically. 2. If you pause for more than four seconds during remote access, you will hear a help menu listing all features and commands. If there is no command for another 20 seconds, the call will end automatically. 3. If the memory is full, the answering system will answer after 10 rings and announce, "Memory is full. Enter the remote access code.
Answering system Remote access 8 Press to end remote access (the call will be terminated). 4. Hang up to end the call and save all undeleted messages. Cut out the remote access wallet card at the back of this user’s manual for quick reference.
Appendix A Alert tones & lights Alert tones Handset tones Two short beeps VOLUME keys are pressed when the volume is already at its highest or lowest setting. Four short beeps Low battery warning. Two beeps Out of range while the handset is on a call. Three rising tones Command completed successfully. Telephone base tones Beeps every 10 seconds Message alert. Four short beeps VOLUME keys are pressed when the volume is already at its highest or lowest setting.
Appendix B Handset display screen messages Screen display messages ALREADY SAVED The telephone number you have entered is already stored in the directory. BLUETOOTH SYSTEM You are trying to use a handset to make a CELLULAR call when another BUSY handset is already in CELLULAR call predial mode. BOTH LINES HELD Calls on the HOME and CELLULAR lines have been put on hold. CALL LOG EMPTY You are accessing an empty caller ID history.
Appendix B Handset display screen messages Screen display messages INCOMING CALL There is a call coming in. INTERCOM The handset is on an intercom call. INTERCOM ENDED The intercom call has just ended. INTERCOM TO: (For system with three or more handsets) You have started the intercom process, and need to enter the number of the handset you wish to call. LIST FULL The directory is full. No new entries can be saved unless some existing items are deleted.
Appendix B Handset display screen messages Screen display messages PLACE IN CHARGER The battery is very low. The handset should be placed in the telephone base or charger for recharging. RINGER MUTE The ringer is muted temporarily during an incoming call. SAVED The entry in caller ID history is saved to the directory successfully. SEARCHING FOR BASE The handset has lost communication with the telephone base.
Appendix C Expansion handset Your new AT&T ��������������������������������������������� TL92278/TL92328/TL92378 ��������������������� telephone system can accommodate up to 12 handsets. You can add new handsets (AT&T TL90078, purchased separately) to your telephone system, but each device must be registered with the telephone base before use. To register a new handset, see page 73. The handsets provided with the TL92278 come pre-registered as HANDSET 1 and HANDSET 2.
Appendix C Adding and registering handsets (optional) NOT REGISTERED PRESS HNDST LOC 4 SEC ON BASE PLEASE WAIT... HANDSET X REGISTERED Handsets purchased separately (AT&T TL90078) need to be registered to the telephone base before use. When first purchased, all expansion handsets show NOT REGISTERED on the screen. New handsets may need to be charged without interruption for at least 10 minutes before registering to the telephone base. To register a handset to your telephone base 1.
Appendix C Replacing a handset You may need to deregister your handsets if: You have twelve registered handsets and need to replace a unit. -ORYou wish to change the designated handset number of your registered handsets. You must first deregister ALL the handsets, and then re-register each handset you wish to use. Please read carefully through all the instructions on this page before beginning the deregistration process. To deregister all handsets 1.
Appendix D Troubleshooting If you have difficulty with your phone, please try the suggestions below. For Customer Service, visit our website at www.telephones.att.com or call 1 (800) 222-3111. In Canada, dial 1 (866) 288-4268. I cannot pair my cell phone to the telephone base. • Make sure the Bluetooth function of your cellular phone is turned on. See your cell phone user's manual for more information. • Remove the AT&T DECT 6.
Appendix D Troubleshooting I cannot find the AT&T DECT 6.0 on my cell phone. • Make sure that the Bluetooth feature is turned on in the telephone base. Carefully follow the setup instructions on pages 17-18. • Make sure that you manually set your cell phone to find or search for devices. • Remove the AT&T DECT 6.0 from your cell phone's handsfree device history list (see your cell phone user's manual for more information). • Turn off your cell phone, then turn it on again. • Reset the telephone base.
Appendix D Troubleshooting The PIN on the telephone base does not work. • The default PIN is 0000. I cannot hear any sound on my telephone system when on a CELLULAR call. • Reset the telephone base. Unplug the unit’s electrical power. Wait for approximately 15 seconds, then plug it back in. • Turn off your cell phone, then turn it on again. My phone doesn’t work at all. • Make sure the power cord is securely plugged in.
Appendix D Troubleshooting I cannot dial out. • First try all the suggestions above. • Make sure you have a dial tone before dialing. The cordless handset may take a second or two to find the telephone base and produce a dial tone. This is normal. Wait an extra second before dialing. • Eliminate any background noise. Noise from a television, radio or other appliances may cause the phone to not dial out properly.
Appendix D Troubleshooting The handset screen shows PRESS HNDST LOC 4 SEC ON BASE and the handset is out of the telephone base or charger. • Unplug the battery from the handset and plug it back in (page 9). The screen should now show NOT REGISTERED and you can follow the registration instructions on page 73. SEARCHING • Ensure that the telephone base is powered up.
Appendix D Troubleshooting • You may be able to improve the performance of your cordless phone by installing your new telephone base as far as possible from any other existing cordless telephone system that may already be installed. • Other electronic products can cause interference to your cordless phone. Try installing your phone as far away from the following electronic devices as possible: television sets, VCRs, or other cordless telephones.
Appendix D Troubleshooting I hear other calls while using my phone. • Disconnect the telephone base from the telephone jack, and plug in a different telephone. If you still hear other calls, the problem is probably in your wiring or local service. Call your local telephone company. My cordless handset does not ring when I receive a call. • Make sure that the ringer is not turned off. Refer to the section(s) on ringer selection in this user’s manual.
Appendix D Troubleshooting My calls cut in and out while I’m using my cordless handset. • Other electronic products can cause interference with your cordless phone. Try installing your phone as far away from the following electronic devices as possible: television sets, VCRs, or other cordless telephones. • Do not install this phone near a microwave oven or on the same electrical outlet. You may experience decreased performance while the microwave oven is operating.
Appendix D Troubleshooting • If you subscribe to high-speed Internet service (digital subscriber line - DSL) through your telephone lines, you must install a DSL filter between the telephone base and the telephone wall jack (page 6). The filter prevents noise and caller ID problems caused by DSL interference. Please contact your DSL service provider for more information about DSL filters. System does not receive caller ID when on a call.
Appendix D Troubleshooting System does not respond to remote commands. • Make sure to enter your remote access code correctly (page 60). • Make sure you are calling from a touch-tone phone. When you dial a number, you should hear tones. If you hear clicks, the phone is not a touch-tone telephone and cannot activate the answering system. • The answering system may not detect the remote access code while your announcement is playing. Try waiting until the announcement is over before entering the code.
Appendix E Maintenance Taking care of your telephone • Your cordless telephone contains sophisticated electronic parts, so it must be treated with care. • Avoid rough treatment. • Place the handset down gently. • Save the original packing materials to protect your telephone if you ever need to ship it. Avoid water • Your telephone can be damaged if it gets wet. Do not use the handset in the rain, or handle it with wet hands. Do not install the telephone base near a sink, bathtub or shower.
Appendix F Important safety information This symbol is to alert you to important operating or servicing instructions that may appear in this user’s manual. Always follow basic safety precautions when using this product to reduce the risk of injury, fire, or electric shock. Safety information • Read and understand all instructions in the user’s manual. Observe all markings on the product. • Avoid using a telephone during a thunderstorm. There may be a slight chance of electric shock from lightning.
Appendix F Important safety information Especially about cordless telephones • Privacy: The same features that make a cordless telephone convenient create some limitations. Telephone calls are transmitted between the telephone base and the handset by radio waves, so there is a possibility that your cordless telephone conversations could be intercepted by radio receiving equipment within range of the cordless handset.
Appendix F Important safety information Precautions for users of implanted cardiac pacemakers Cardiac pacemakers (applies only to digital cordless telephones): Wireless Technology Research, LLC (WTR), an independent research entity, led a multidisciplinary evaluation of the interference between portable wireless telephones and implanted cardiac pacemakers. Supported by the U.S.
Appendix G FCC part 68 and ACTA This equipment complies with Part 68 of the FCC rules and with technical requirements adopted by the Administrative Council for Terminal Attachments (ACTA). The label on the back or bottom of this equipment contains, among other things, a product identifier in the format US:AAAEQ##TXXXX. This identifier must be provided to your local telephone company upon request.
Appendix G FCC part 68 and ACTA If this product has memory dialing locations, you may choose to store emergency telephone numbers (e.g., police, fire, medical) in these locations. If you do store or test emergency numbers, please: Remain on the line and briefly explain the reason for the call before hanging up. Perform such activities in off-peak hours, such as early morning or late evening.
Appendix H FCC part 15 This equipment has been tested and found to comply with the requirements for a Class B digital device under Part 15 of the Federal Communications Commission (FCC) rules. These requirements are intended to provide reasonable protection against harmful interference in a residential installation. This equipment generates, uses and can radiate radio frequency energy and, if not installed and used in accordance with the instructions, may cause harmful interference to radio communications.
Appendix I Limited warranty The AT&T brand is used under license - any repair, replacement or warranty service, and all questions about this product should be directed to: In the United States of America, visit www.telephones.att.com or call 1 (800) 222-3111. In Canada, call 1 (866) 288-4268. 1.
Appendix I Limited warranty 4.
Appendix I Limited warranty 6. What must you return with the PRODUCT to get warranty service? You must: a. Return the entire original package and contents including the PRODUCT to the service location along with a description of the malfunction or difficulty; and b. Include “valid proof of purchase” (sales receipt) identifying the PRODUCT purchased (PRODUCT model) and the date of purchase or receipt; and c. Provide your name, complete and correct mailing address, and telephone number. 7.
Appendix J Technical specifications RF frequency band 1921.536 MHz — 1928.448 MHz Channels 5 Operating temperature 32°F — 122°F 0°C — 50°C Telephone base voltage (AC voltage, 60Hz) 96 — 129 Vrms Telephone base voltage (AC adapter output) 6VDC @400mA Handset voltage 2.4 — 3.2 VDC Charger voltage (AC adapter output) 6VAC @300mA Replacement battery 2.
Index A Alert tones, 68 Answering calls CELLULAR calls, 27 HOME calls, 25 Answering system, 51-67 Auto connection, 17 Delete redial entries, 29 Dialing, From a record in the caller ID history, 49 Directory dialing, 44 Directory, 39 Dial number, 44 Edit entries, 44 Name search, 43 New entries, 40-41 Display dial, 44 DSL, 6 B Battery, Charging, 8-9 Installation, 9 Base ringer volume, 60 Bluetooth Introduction, 15 Pairing, 17 Replace a paired device, 18 Setup, 17 Bonding, 16 E Elapsed time, 25, 27 Ending
Index I Intercom, 35-36 Incoming caller ID history, 49 Incoming calls, answering, 25, 27 Installation, 5-14 Q Quick reference guide, 1-3 R Receiving calls, 25-28 Redial, 29 Registration, 73 Remote access, 60, 66-67 Resume auto connection, 18 Ring tone options, 21 Ringer silencing, 26 Ringer volume, Base, 60 Handset, 20 K Key tone, 22 L Language, 22 Last number redial, 29 Lights, 68 M Making calls, CELLULAR calls, 27 HOME calls, 25 Maintenance, 85 Manual connection, 17 Memory match, 47 Memos, 64 Message, A
Remote access wallet card Use the wallet card below to help you remember commands to control your answering system from any touch tone telephone. Cut along dotted line. Call your phone number, then enter your two-digit access code (preset to 19). Fold here. Action Remote command Play all messages................... Play new messages................ Delete the message............... Delete all old messages...... Repeat or go back.................. Stop................................................
www.telephones.att.com The Bluetooth® word mark and logos are owned by Bluetooth SIG, Inc. and any use of such marks by Advanced American Telephones and its parent, VTech Holdings Limited, is under license. VTech Holdings Limited is a member of Bluetooth SIG, Inc. Other trademarks and trade names are those of their respective owners. © 2008-2009 Advanced American Telephones. All Rights Reserved.