
User`s manual


Remote
Antenna Coupling Unit
Model 8326
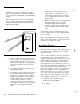
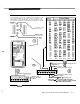
Description: When the CCU-mounted antenna
does not seem to provide optimum reception (or if
the antenna will not fit above the CCU), you may
choose to use this option to reposition the an-
tenna and improve reception. It comes with an 8
foot cable and ferrite bead (required for optimum
antenna performance); you can add another 25
feet of RG-58 cable (BNC connectors) if needed.
See Figure A-3.
Ferrite Bead
Figure A-3 Remote Antenna Coupling Unit
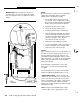
Mount/Install: Mount the Remote Unit enclosure
at the desired location (at least 5 feet from the
CCU). The antenna can point in any direction. To
mount the enclosure, press up on the tab at the
bottom and open the cover. Mount the back using
the two holes, and snap the cover back into
place. Do not use in applications where the
ambient temperature will go below 40°F.
Settings/Connections: You will probably wish to
loosen the nuts holding the Wireless Module, in
order to perform the following steps. If you
planned on using this Remote, some of the
following CCU steps may already be completed.
1.
2.
3.
4.
5.
In the CCU, set the Wireless Module’s
Remote Power jumper to On (up). Re-
move the antenna from the Wireless
Module in the CCU, if it was mounted
there.
If you need additional cable, obtain up to
25 feet of RG-58 cable with BNC connec-
tors (one of each gender). Connect the
extra cable to the Remote Unit’s cable.
Slide the rubber grommet over CCU-end
of the cable. Connect that end of the
cable through the antenna knockout hole
in the CCU enclosure, to the Wireless
Module’s antenna connection. Put the
grommet in the hole to protect the cable.
Remount the Wireless Module in place.
Attach the antenna (provided with the
Wireless Module) to the top of the Cou-
pling Unit enclosure.
NOTE:
Using this Remote Unit means that you do not
have to use the Counterpoise as described on the
previous page.
Data: Use only with Security System 8300. Uses
5VDC and 5
mA.
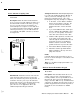
Wireless Remote/Transmitter Keypad
Model 8440
Description: This transmitter allows the user to
select 3 of the 4 Levels of Protection that are
normally available, and accept hardwired sensor
input from its own loop (if used), which it then
relays to the CCU. With no loop, and with wireless
supervision off
(Fn#517)
the unit can be used as a
portable keypad and removed from the premises.
(Program the zone classification as Audible
Panic.)
AT&T Security System 8300 Installer’s Manual
A-
5