
User`s manual


Verification Test
You can only use the Verification Test from the
OFF Level of Protection. The Verification Test is
initiated through either the User Test Menu
(9)
or
Installer Programming
(Fn#014).
Differences
between the User and the Installer tests are listed
later in this section. The keypad used to initiate
the Verification Test becomes “dedicated” to the
test and will serve no other function during the
test. The Verification Test mode is like a Level of
Protection; but in this level, no alarms are ever
generated. The other keypads are not allowed to
perform any programming, but can be used as
telephone or intercom.
Press [SELECT] once after reaching the VERIFY
TEST message; the keypad will display the
message “Nothing In List.” After 10 minutes of
inactivity (no sensors violated and no keypad
operation), the system will leave the Verification
Test mode and return to the OFF level of protec-
tion.
For the test you will violate each and every
sensor. Each violation will cause three things to
happen:
1.
All wired keypads will sound, to indicate
that the violation was noted.
2.
The information will be placed in a special
64-event memory buffer in the CCU.
3.
The keypad displays will show the violated
sensor data.
[The “items” which follow refer to the steps listed
here.]
Item 1:
The sound will be a loud
1/2-second
beep for all
hardwired sensors. Wireless sensors will cause
three beeps under normal circumstances with a
“good” signal strength; if the signal strength is
only “fair” the sound will be only two beeps; this is
not considered acceptable, and the sensor must
be repositioned for better communication.
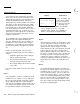
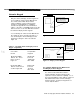
Display
Explanations
(sensor description, put
84 UPSTRS SMOKES
in the sensor number
for your convenience)
3GOOD . . .
<
>>
(*response) (next item)
(back up) (exit)
* The response will be
“1
HWIRE”
for a hardwire
sensor,
“2FAIR”
for wireless sensor with
marginal signal strength, and “3GOOD” for
wireless sensor with good signal strength.
Item 2:
The information is stored in an event buffer so that
you can complete the testing of a group (or all) of
the sensors and then check the information
against your list, from the keypad. The CCU
buffer will hold up to 64 sensor violations, then will
begin to drop the oldest piece of data and re-
place it with the newest. In areas with more than
64 devices, you will need to select a specific area
for testing, and move to another when the first is
completed. In order to empty the event buffer,
leave the programming mode and go to the Users
Status Menu, then return to the Verification Test
mode.
Item 3:
The keypad display will show the descriptor for
the last sensor violated, with the response below it
showing the type of response the sensor gener-
ated. To view the previous sensors in order from
last to first, select the ellipse (...) just as explained
in the User’s Manual programming section. Each
time you select the ellipse, the display will move
back one more sensor, until all violated sensors
have been viewed, then the list will “wrap around”
back to the beginning again.
4-2 AT&T Security System 8300 Installer’s Manual