
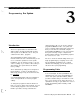
User`s manual
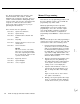

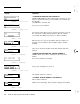
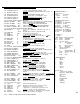

Number
Pad Ke
y
ABC
2
~____
1
____.._
GHI
4
PRS
7
I
*
JKL
5
__--
TUV
a
0
I
s
DEF
3
_~__~_
MN0
6
WXY
9
#
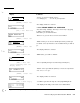
Number Entry Mode:
Press the
appropriate keys to enter number.
NOTE: Star erases an entry, in case of a
mistake.
Character Entry Mode:
(Also used for HEX
numbers) Press a number key, the center
letter shown on that key appears. Use * and
# keys to change letter forward or backward
through alphabet. When done, simply start
next letter by pressing another number key.
NOTES:
1. “0” (zero) makes a space.
2. For a number, press
“1”
first, then the
number.
3.
“1”+“#”
(pound sign) make a backspace.
4.
“1”+“*”
(star sign) make an apostrophe.
Example:
To enter the characters “QC3”
Press
Display Shows
(QB
QC
QC
(Star backs up from
“R”
to “Q”)
(Pound changes from
“B” forward to “C”)
(The
“1”
key says the
next key is a number,
not a character)
(Gives the number)
Figure 3-1 Entering Letters and Numbers
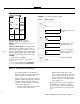
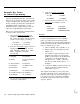
the Function Numbers as making up a
large grid, with boxes that contain specific
pieces of data. Look at Figure 3-2.
5.
Figure 3-2 shows a portion of the Function
Numbers
(Fn#413
through 514) extracted
from the long list (since the entire list
would be too big to illustrate), and visual-
ized as part of the grid.
-
Fn#413
is only one box wide, because
you only need to fill it out once.
-
Fn#511 and the other
Fn#‘s
for the
sensors have more boxes beside them,
since you will need to fill out a box for
each sensor. If the figure were larger,
the last sensor box to the right would
show number 112.
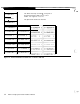
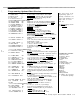
Once you have the concept of the grid in
your mind, refer to Figure 3-3. It shows
how you can press any of 5 keypad keys
to move to the
Fn#
“box” where you wish
to be.
AT&T Security System 8300 Installer’s Manual
3-3