
User`s manual


.
Passive Infrared Transmitter
(PIR)
Model 8561
Description: This supervised infrared detector
and transmitter is a space protector which detects
intruders by observing the infrared energy they
emit as they cross the optical detection zones.
After sending an alarm, the
PIR
waits
2-1/2
minutes before sending another, to preserve its
battery. It can be used in perimeter applications
to protect windows or in interior applications to
protect hallways,
stairways, and
rooms.
Two lenses are included with the PIR, a wide
angle lens and a curtain lens. The wide angle
lens provides broad coverage over a large space,
such as a room. With this lens installed, the PIR’s
detection pattern consists of 24 zones plus three
special look-down zones to protect the area
beneath the transmitter.
The curtain lens provides more restricted cover-
age to protect a longer, narrower area such as a
hallway. This lens gives the PIR 3 zones plus 3
look-down zones.
important Preinstallation Considerations:
Unit
placement controls the detection pattern, and
therefore the unit’s effectiveness. The PIR may be
mounted flat or in a corner. The unit should be
mounted 7’6” from the floor to obtain the optimum
detection range. Allow at least 2” between the
unit and the ceiling to permit servicing. For best
protection, observe these precautions:
1.
Avoid direct sunlight. Don’t place the unit
where strong sunlight will fall on the face.
(Indirect sunlight does not pose a prob-
lem.)
2.
Avoid hot and cold air currents. Mount at
least 3’ from forced air heaters, air condi-
tioners, and drafty doors.
3.
Avoid very warm spots. The
PIR
detects
the temperature
difference
between the
intruder and the background environment.
If the background is 95 to
100
F an
intruder will not stand out against it.
4.
5.
6.
Choose a location at right angles to the
likely intruder’s path. Detection is opti-
mized when the target is moving across
the PIR’s viewing plane.
Avoid large objects in the viewing paths,
Obstructions “blind” the PIR.
Choose the right lens. Use the wide angle
lens for large coverage areas. Use the
curtain lens for a longer narrower cover-
age. Units are shipped with the wide angle
lens in place.
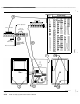
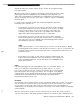
Changing
PIR
Lenses: Use the following proce-
dure to change PIR lenses. The circled numbers
correspond to the step numbers.
1.1.
2.
3.
4.
5.
6.
7.
Remove the transmitter backplate by
pressing down on the release tab and
pivoting the plate off its bottom hinges.
Press out on the tabs inside the housing
and carefully lift the circuit board free of
the cover
(#2
in the following figure).
Press outward on the vertical supports
which hold the lens brackets.
Remove the lens brackets and the current
lens.
Place the desired lens under the top and
bottom tabs.
Replace the lens brackets carefully to
avoid scratching the lens.
While the PIR is open, install batteries (two
9-volt alkalines, such as Duracell MN1604
or Eveready 522). Proceed to Settings/
Connections to set the PIR’s switches.
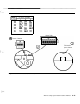
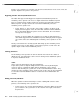
Settings/Connections: Be
sure you have the
proper orientation on the switches and make the
following settings. The circled numbers refer to
the step numbers below.
8.
Set the house code to match the code set
in the Wireless Receiver Module.
9.
Set the sensor number using the chart as
a guide.
10.
Set switch 6 OFF, and 9, 10, and 11 ON;
switches 8 and 12 may be in either
position.
AT&T Security System 8300 Installer’s Manual
A-13