Security System 8300 Owner’s Manual
Sensor List Your dealer should fill in this list for you. It will help you identify all of the sensors in your system. It will also help you know, at a glance, how each sensor will react in each of the four Levels of Protection.
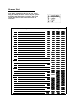
AT&T Security System 8300 Contents Introduction and Safety ............................................................................................................... Introduction ............................................................................................................... Warranty. ................................................................................................................... Checklist ................................................................................
Introduction and Safety Introduction Congratulations on the purchase of your AT&T Security System 8300. Your dealer has demonstrated the correct way to operate your new system. Since each installation is customized to suit the individual needs of the customer, there may be components or features referred to in this manual that are not present in your system. Also, there are different settings available for many of the features. For this reason we have included this checklist.
Introduction and Safety Safety Planning Planning for an Emergency Contact your local police department, fire department, doctor, and alarm dealer for advice on handling household emergencies. Ensure that every member of your household or business knows exactly what to do if an emergency occurs. Plan in advance how each person should respond to an alarm. Discuss the different alarm signals, make sure everyone is familiar with them, and make a plan for each person.
How the System Operates Your AT&T Security System 8300 has been customized to fit your particular needs. Be sure to refer to the checklist on page 1 if you are uncertain whether your system includes a particular component or feature. Communication Control Unit (CCU) The Communication Control Unit is the center of your security system. Using house current, or a backup battery during a power failure, it powers your entire wired system. It monitors all sensors, wired and wireless, and generates all alarms.
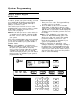
System Programming Display Control Keypad Model 8345 In order to operate your system correctly, you need to be familiar with the Display Control Keypad. Please read this section carefully and keep it handy as a reference source There can be up to four levels of access codes programmed into your system. In order to operate all the features available, you need a Level 1 access code (see page 7). NOTE: Do not write your access code in this book or anywhere that an intruder could find it.
System Programming To Disarm The System: To Generate An Instant Emergency Alarm: 1 Enter your access code. The keypad will beep each time you press a number. 2 Press OFF. The keypad will beep, the Arm/ Alarm light will flash for a short time, and the display will show OFF, beneath the date. OFF is another level of protection for your system. All Fire, Tamper, Environmental, Medical, Emergency, Police, and others that your dealer has programmed as 24-hour alarms, will remain active.
System Programming Moving Through the Displays Display Screen The display on the Display Control Keypad is the key to your AT&T Security System 8300. The display contains two types of items: 1 The names of other menus, and 2 Commands for the system. When you select a name, the display will present the menu you selected. When you select a command, the system will execute that function. The display presents various menus (or lists) that allow you to choose commands or view new menus.
Access Codes Access Codes are the key to programming your system and setting the Level of Protection. When your dealer tells you your Level 1 access code, write it down and store it safely. NOTE: Do not write your access code in this book or anywhere that an intruder could find it. Do not carry it around in a wallet or pocketbook. With this Level 1 access code, a person can gain access to a list of all other access codes in your system.
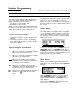
Access Codes 6 The first access code will appear. It will look something like this. To Add Access Codes: NOTE: When giving someone a temporary code, give information about arming and disarming only. Do not give programming or bypass information. For this reason, do not show the user card to people with temporary access codes. The upper left corner will show the user’s name. The access code and level appear on the same line.
Access Codes The following menu will appear. 9 The following menu will appear. c Enter the name of the user (see page 9 for instructions on entering characters) and press SELECT. 10 The screen showing the information you entered will appear. It will look something like this: Enter the code you want to remove and press SELECT. The system will acknowledge that the code has been removed. You may continue to remove codes, select >> to return to the Status Menu or select < to return to the previous menu.
Alarms and Trouble Beeps The System 8300 generates two types of warnings: alarms and trouble beeps. When there is an alarm, the display will show ALARM, the alarm will sound, and the red Arm/Alarm light will light. When there is system trouble, the display will show TROUBLE, the trouble beeps will sound, and the yellow System light will flash. When there is both, the display will show ALRM/TRBL, a distinct alarm/ trouble tone will sound, and both lights will be flashing.
Display Control Keypad Options Phone Operation Phone Options Your Display Control Keypads can be set, by your installer, for use as speakerphones. You do not need an access code to use this feature. Touch Tone Ability: If your system is set for To Answer an Incoming Call: An incoming call is signaled by a ringing sound, and the word PHONE will be flashing in the display. Press SELECT to answer the call. Select pulse dialing, you can still use touch tones for banking or business applications.
Display Control Keypad Options Chime and Tone Date and Time Your dealer can program your system to sound a chime or tone when one of your sensors is activated. Tones and Chimes can be set to sound in any of the Four Levels of Protection. For example, you could have your system chime whenever the front door is opened and your system is set to Day. Tones are louder than chimes and they are set by your dealer. Chimes can be turned on or off with a Level 1 access code. Tones cannot be turned on or off.
Sensor Bypass Your dealer may have set up your system with the capability to bypass certain sensors (other than fire or tamper sensors) when you arm the system. When you bypass a sensor, the system will ignore any alarms from that sensor. An example of when this would be useful would be when you want to leave a door or window open. Manual Bypass Upon Arming Available to Level 1 and Level 2 users only.
Sensor Bypass Group Bypass I\ Press SELECT. 5 If permanent bypasses are allowed in your system, the following screen will appear, with ADD flashing: Group Bypass enables you to bypass an entire pre-programmed group of sensors. Your installer could include this option if there is a section of the building that is used for special occasions. To bypass this group of sensors, bypass group “999” with the permanent bypass described above. Remember to remove the group bypass after the need for it is over.
Optional Components Control Keypad Model 8340 The Control Keypad is similar to the Display Control Keypad. It can arm or disarm the system and generate Police or Emergency Alarms. It cannot, however, be set up as a telephone or intercom. It can not perform any programming capabilities. Most procedures are performed in the same way as they are on the Display Control Keypad.
Optional Components Supervised Smoke Detector Model 8520 The AT&T Supervised Smoke Detector is a photoelectric type, designed to detect a fire in its early stages so that you can escape from your house before smoke reaches a dangerous concentration level. When the detector senses smoke particles, it simultaneously sounds an alarm (using a built-in siren) and sends an alarm to the Communication Control Unit.
Replacing Smoke Detector Batteries Batteries should be replaced annually or when low. See page 22 for the procedure used to test the transmitter battery power and operation. To Replace Batteries: Bedroom Dining Room To avoid generating a false alarm, you must set your system to the Test mode (see page 22). Remove the smoke detector from the mounting bracket by pressing the black tab on the side marked PRESS. Lift the detector away from PRESS and lift up until the top is free from its hook.
Optional Components Wireless System Keypad Model 8440 The Wireless System Keypad provides some of the same features as the other keypads. It does, however, have important differences. Please read this section carefully if your dealer has included this component in your system. To Arm or Disarm Your System: Enter the 3-digit access code. Only one code will work with your system. The keypad will beep once as you enter each number, and will beep three times when the correct code is entered.
Optional Components Universal Transmitter Model 8240 Transmitters may be mounted on walls and connected to sensors or set up as portable units that you can carry with you. The button on the Universal Transmitter can be either a Test or Alarm button. To activate the button, press and hold it for 2 seconds. Replacing Batteries in Universal Transmitters Batteries should be replaced whenever they are low.
Optional Components Passive Infrared Transmitter (PIRT) Model 8561 The PIRT is a space protector which detects intruders by measuring changes in heat patterns. When the PIRT detects an intruder, it transmits a signal to the Communication Control Unit. Most PlRTs are interior sensors and are only armed when your system is set to Away. BAT&T The PIRT is used in areas which would be difficult to protect with other types of sensors or as additional protection against intrusion.
Keyswitch Other Optional Components The optional Keyswitch allows you to turn the system off or on to one Level of Protection (set by the dealer) with the turn of a key. This feature is particularly useful in business applications or when someone, who is physically unable to enter codes, must arm or disarm the system. The Keyswitch has red and green lights that signal the following system conditions. There are other optional components that your dealer may include in your system.
Testing and Maintenance Your AT&T Security System 8300 requires very little maintenance. All you will normally need to do is keep the components clean and replace any batteries that run low. Many dealers offer annual maintenance checks, and they will replace any batteries that are running low. If you need to change a battery yourself, follow the directions below to put your system in the Test mode and then turn to the Optional Components section for that component for further directions.
Testing and Maintenance 6 The following menu will appear, with LIST flashing: 7 Select SEND. Your monitoring service should receive a Test/Restore message, indicating that your system is operating properly. This AT&T security system is suitable for use as a Grade A Household Burglary Warning System (UL1023).
Troubleshooting Error Messages Trouble Messages When you attempt to enter information that is not acceptable, the system will beep and present one of the following messages: ACCESS DENIED: The code you entered is either invalid or not a high enough level to perform the function. ALARM/TROUBLE LIST IN USE: Someone is using the Alarm/Trouble list at another keypad. ALL CODES USED: Only access 15 codes can be used. BYPASS NOT ALLOWED: Your system is not programmed to allow sensor bypass.
Troubleshooting Common Problems If you have trouble with your system, this section may help you answer some of your questions. “I hear a momentary silence interrupt phone calls that are being made by my computer.” Your security system uses the phone line for communication with your monitoring service. When it hears computer signals, it interrupts to detect if they are directed for your security system. This takes less than 1 second and should not interfere with your computer operation.
Index Access Codes, 7 Adding, 8 Entering Characters, 9 Levels, 7 Removing, 9 Reviewing, 7 Alarms, 10 Ambush, 5, 18 Emergency, 5 Fire, 2 Police, 5 Silencing, 10 Maximum, 10 Ambush Alarm, 5 Arming The System, 4 AutoBypass, 13 Bypass, Sensor, 13 Auto, 13 Group, 14 Manual, 13 Permanent, 13 Swinger, 14 Checklist, Options, 1 Chime, 12 Control Keypad, 15 Date, 12 Disarming the System, 5 Display Control Keypad, 4 Display Screen, 6 Moving Through the, 6 Entering Characters on the, 9 Commands, 9 Emergency Alarm, 5 FC