555-520-706 Issue 1, June 1987 AT&T SYSTEM 25 SWITCHED LOOP ATTENDANT CONSOLE USER GUIDE
©1987 AT&T All Rights Reserved Printed in USA TO ORDER COPIES OF THIS DOCUMENT REFER TO DOCUMENT NUMBER 555-520-706. Contact: Your AT&T sales representative or Call: 800-432-6600, Monday to Friday between 7:30 am and 6:00 EST, or Write: AT&T Customer Information Center 2855 North Franklin Road PO.
TABLE OF CONTENTS INTRODUCTION 1 Overview 1 Support Information 4 ATTENDANT 12 FEATURES 12 Answering Calls Attendant Message Waiting 17 Conference Extending 15 20 Calls H o l d 26 Inspect 29 Night 31 Service Paging 32 Park 33 P l a c i n g B u s y 40 A l a r m 47 P o s i t i o n S y s t e m Testing T i m e 36 C a l l s Your Consoles 43 F u n c t i o n s STANDARD MULTILINE 42 FEATURES 44 Account Code Entry 44 Automatic Intercom 45 Call Accountability 46 C
Call Direct Station Hands-Free Incoming Last 49 Pickup Calls Number Manual Placing Selectlon Answer on 50 (DSS) Intercom (HFAI) 54 Group 55 Dialed 57 Signaling Data Calls Programming 52 From Your Console 58 59 Numbers 62 Recal l Repertory 63 Dialing S p e a k e r p h o n e 64 Speed 66 Dialing Transfer 67 G L O S S A R Y 68 i i
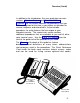
INTRODUCTION Overview As your System 25’s attendant, you are often the first person whom outside callers speak to when they dial your organization. You are well equipped to handle these and any other types of calls. Your Switched Loop Attendant Console (SLAC) provides the same useful features that other voice terminals in the system have.
Overview (Contd) In this guide, fixed features are identified by a preprinted checkmark in the box at the beginning of each procedure. Assignable features that the attendant always has are marked in the same way. The boxes for other assignable features are blank; as a reminder, you may wish to check the boxes of the additional assignable features you have. Discuss the assignable features you need with your System Administrator. A System 25 can have either one or two Attendant Positions.
Overview (Contd) In addition to the Introduction, this user guide has two main sections, Attendant Features and Standard Multiline Features. The first section contains the procedures that you will be using most of the time in your duties as attendant to answer, originate, and extend calls. It also includes procedures for using features that are unique to your attendant console. The second main section contains additional procedures that are available to you and all other voice terminal users.
Support Information Before getting into the specific procedures, you should become familiar with the following console features that have general application. Handset Tones System 25 signals you with several tones heard through the handset. The tones and their descriptions are listed below. • Dial Tone (a continuous steady tone) - You can dial. • Confirmation Tone (three short tones) - Your action has been accepted. Proceed to the next step.
Support Information (Contd) Ringing Tones System 25 signals you with four distinctive rings. The rings and their descriptions are listed below. • Inside Call (one long ring, repeated) - Your call is from a person inside your company. • Outside Call (two short rings, repeated) - Your call is from someone outside your company. • Abbreviated Alert (one short burst of ringing) - Either a new call has entered the queue, or you have received a busy-to-idle reminder, a held call reminder, or a manual signal.
Support Information (Contd) Loop Buttons The voice communications paths between your console and the system switch are called loops. Your Switched Loop Attendant Console gets its name from the system’s ability to hold incoming attendant-bound calls in a queue and switch them to the console by way of these voice loops. Calls are directed to the console in a predetermined, prioritized sequence.
Support Information (Contd) NOTES : 1. Flex DSS buttons are defaults and can be assigned to any allowable features. 2. In a one-console system, Pos Busy button can be assigned to another feature.
Support Information (Contd) Lights A red l-use light and a green status light adjacent to each button provide information about the loop terminated on that button. A steady red light identifies the line you are using or will be using when you lift the handset. Only one red loop light is ever lighted on the console. A steady green light indicates that a loop or feature is in use. A flashing green light at a button indicates an incoming call.
Support Information (Contd) The Selector Console lights can also provide you with other information about activity at system stations: • A call parked at a Call Park DXS button will cause the associated light to turn on steadily. • Any call from an inside station to the console is indicated by a flashing DXS light; however, incoming call information is presented in a much more convenient form by the console display, which is described next.
Support Information (Contd) Pressing the button puts the display into the Inspect mode, in which you can check the information associated with specific buttons. Refer to the Inspect feature for details. The Thumb-wheel Contrast control adjacent to the screen allows you to adjust the visibility of the display under various lighting conditions. The procedures in this guide include typical call information displays.
Support Information (Contd) The following Call Type identifiers appear on the right side of the display (Screen 2). They provide the reason that a call is coming to the console s— A call has gone to coverage because Send All Calls is in effect at the covered station. b— A call is returning to the console because the called station is busy. n— A call is returning to the console because the called station did not answer. d — An incoming call is placed to an Incoming Calls Group, of which you are a member.
ATTENDANT FEATURES Answering Calls Only one call can come into your console at a time; calls are held in a queue at the system switch until you, or the other attendant, can handle them. Your console is available to incoming calls only when you have no other active calls and at least one loop is idle. You answer all incoming calls at one of the five buttons on the upper left face of the console. (The system selects buttons in a rotating sequence for receiving calls.
Answering Calls (Contd) • A call from an inside station is directed to the console. The display shows the extension number and name of the calling party. The “ ! ” symbol indicates that ten or more calls are waiting in the queue. 1463 Pearson,M ! • A call extended earlier is returning (indicated by the “ } ” symbol) to the console; the called party’s PDC and name are shown.
Answering Calls (Contd) ● A call placed to C. Smith by some internal party has redirected to the console for coverage, as indicated by the > symbol. >1197 Smith,C 3 To determine the source of the original call, press to display Screen 2 1013 Black,D s The letter s indicates that the called party, Smith, activated Send All Calls to send the call to coverage.
Attendant Message Waiting You can use a Message light to notify voice terminals of waiting messages. When you call a voice terminal, the status light next to your button will have the same on/off condition as the Message light on the voice terminal you call. Most voice terminals have a button associated with their Message light so that users can turn off their own lights. If a voice terminal does not have this button, you must turn off the Message light from your console.
Attendant Message Waiting (Contd) 2. Continue with the call or hang up Turning Off a Message Waiting Signal Without Ringing the Voice Terminal 1. Lift the handset and listen for dial tone 2. Press < ATTENDANT MESSAGE WAITING > 3. Dial the PDC of the terminal. 4. Listen for confirmation tone and then press < ATTENDANT MESSAGE WAITING > again. 5. Hang up. Display: Using the Attendant Message Waiting feature does not affect the call information display.
Conference You can set up a conference that includes System 25 stations as well as outside callers. The maximum number of conferees is five; however, no more that two may be on outside trunks. The basic technique for setting up a conference is to start with an established call and then contact the new parties one at a time and add them to the original loop. Once a conference has been set up and all the parties can talk to each other, you cannot selectively drop a conferee.
Conference (Contd) • Press or to drop an outside call that is ringing or returning tone. • Press or to drop an inside or outside call that is completed but the party for some reason will not join the conference. 4. Announce the conference call. 5. Press the winking button to connect the new party to the original loop. • The loop where the new conference party was called becomes idle again. 6.
Conference (Contd) Typical Displays for Conference Calls: ● Each time a party is called for a conference setup, the normal information is displayed. Inside party: 3015 Dunn,B 2 Outside party: 95551634 ● 2 As each new party is added to the original loop, the display shows the number of conferees (including you) now connected together, along with the current number of calls waiting in the queue.
Extending Calls Extending a call consists of putting an active call on temporary hold (splitting), placing another call to an inside party or an outside number, and then connecting the two calls together. You can release from the calls or remain connected. You will extend calls for the following reasons: • A party on a trunk call wishes to be connected to a station inside the system. • A party inside your own system wishes to be connected to an outside number via a trunk.
Extending Calls (Contd) 3. Press as soon as the called number starts ringing. Notes: • Trunk calls to inside stations only: If you hear a busy tone instead of ringing, you can activate the Camp-On feature by pressing . — The caller is placed on hold and waits for the called party to become idle (“camps on”). — The busy called party receives a call waiting tone and can answer the call. — The call is separated from the console and the loop becomes idle again.
Extending Calls (Contd) If you are extending an inside party to an outside trunk, press and dial the call from the SLAC. 3. Wait for the called party to answer. Notes: • If the called station rings but does not answer, pressing drops the call and reconnects you to the caller. - • Calls to inside stations only. If the called number is busy, you can press and return to the caller or you can activate Camp-On as previously described.
Extending Calls (Contd) — The light next to the button turns off. • If the called party accepts the call, press . — The caller is connected to the called party. — The call is separated from the console and the loop becomes idle again. — The procedure is complete and you are free to handle other calls. • If a 3-way conference is required among you, the caller and the called party, press instead of .
Extending Calls (Contd) Typical Displays for an Extended Call: You answer an incoming DID trunk call placed by an outside party to your PDC, 1501. The caller asks to be connected to B. Taylor on extension 1728.
Extending Calls (Contd) Screen 2 is unchanged: 1501 DID & After the called party answers, pressing returns the calling party information to the screen: 1501 DID & If you now press , called party information appears on the screen again: &1728 Taylor,B 4 If you press , Screen 1 shows a conference connection: CONFERENCE 3 4 Pressing causes Screen 1 to go blank.
Hold You can hold a call while you attend to other matters, and then pick up the call again. After you put a call on hold, you can hang up the handset without losing the held call. If you do not return to a held call within a preset time interval, the system will remind you with a visible change in the wink rate and, if administered, an audible tone.
Hold (Contd) 2. To place an outgoing call immediately, press an idle button and complete the call. 3. If you do not want to make another call now, hang up; incoming calls can ring at other buttons. Returning to the Held Call While Still Off-Hook 1. Press the button next to the winking green light. 2. Continue your conversation. Returning to the Held Call After Hanging Up 1. If the red l-use light is on at the same button where the green light is winking, simply lift the handset.
Hold (Contd) Typical Displays for Return to Held Call: The same display that was originally associated with the call appears again.
Inspect The Inspect mode allows you to use your console display to get the folIowing information: • The PDC and associated name for a call on hold or ringing at a button. • The number of trunks available in a group of trunks represented by a button. • The number or code stored on a , , , or button. In the Inspect mode, your console is unavailable to incoming calls. Getting Information 1. Enter the Inspect mode by pressing .
Inspect (Contd) 3. To get the number of busy trunks in a pooled facilities group, press the [FACILITY] button. The display has the form “XX of YY BUSY”. Typical Display: 03 of 16 BUSY 4. To display the number stored on a , , , or button, press the button. Typical Display: 912425631324 5. To leave the Inspect mode, press again.
Night Service When you leave for the night, you can set the system so that calls coming in from outside your company either ring a bell or are directed to preassigned voice terminals. Activating Night Service 1. Press . • The light next to this button turns on. Deactivating Night Service 1. Press . • The light next to this button turns off Display: Activating and deactivating Night Service does not affect the current display.
Paging You can page a party in your system if your company has paging equipment. Paging is often used with the Park feature. The paging system can be reached by way of an assigned feature button or an access code. Paging a Party in Your System 1. Lift the handset and listen for dial tone. 2. Press the button (if you have one) or dial the paging access code. 3. If you dialed a code, listen for confirmation tone. 4. Using the handset as a microphone, make your announcement. 5. Hang up.
Park Parked calls are like held calls except that they can be picked up from any voice terminal. Any call, inside or outside, can be parked on the Basic SLAC, but only one call at a time. On the Selector Console, eight outside calls can be parked simultaneously; inside calls cannot be parked on the Selector Console. Parking a Trunk Call on the Selector Console 1. Press the Group Select and DXS buttons of the Call Park code. For example, if the number is 801, press 800 followed by the 01 button. 2.
Park (Contd) 5. If the call is for someone else, dial or page that person. Tell him to pick up the call by dialing *8 followed by your attendant PDC (not 0). 6. Hang up. Note: If the parked call is not picked up within 2 minutes, it will return to the console on the button where it is held. Answer it as you would any incoming call. Picking Up a Parked Call 1. Lift the handset and listen for a dial tone. 2. Dial *8. 3. Dial the PDC or access code on which the call is parked.
Park (Contd) Screen 2 shows the source of the parked call: CO Trunk1 p Typical Displays for Calls Parked on the SLA C: The following example is an incoming trunk call parked on your PDC. The display shows the characters as you dial them to park the call: *5 1 A returning parked call is displayed on both screens.
Placing Calls You can place two general types of calls from the console: • Inside calls - calls to stations inside your system. • Outside calls - calls to parties on the outside; sometimes referred to as trunk calls. Outgoing calls use the loops terminated on the five buttons on the upper left face of the console. Several methods are available for placing calls. Placing an Inside Call From an Idle Console Using Regular Dialing: 1. Lift the handset.
Placing Calls (Contd) You can also make inside calls using the Direct Station Selection and Repertory Dialing features, which are covered later in this guide. Placing an Outside Call from an Idle Console 1. Lift the handset. • The green light next to the selected button turns on. • Dial tone is supplied. 2. Dial the full number of the outside destination, including a facility access code or the ARS access code.
Placing Calls (Contd) • Dial tone is supplied. 3. Continue to place the call in the normal way. Placing an Outside Call for an Inside Party and Calling the Party Back When the Connection is Ready 1. Place the outside trunk call in the normal way. 2. When the called outside party answers, announce the call and then press to split the call (put it on temporary hold). • New dial tone is supplied on the same button. 3. Place a call to the inside party who requested the call. 4.
Placing Calls (Contd) Typical Display for an Outside Call: The display shows the dialed digits and the number of calls in the queue.
Position Busy If your system has two attendant consoles, you can make your position busy to most incoming calls and have them directed to the other console. Only one console can be placed in Position Busy mode at a time. In a one-console configuration, you can activate Position Busy only if some voice terminal has been specifically administered as a backup answering position. Activating Position Busy 1. Press . • The light next to this button turns on.
System Alarm If the green light next to the button flashes, there is a problem with the System 25. Notify your System Administrator at once. If you press the flashing button, it will change to steady, but the trouble still exists. A new trouble situation will cause a steady to start flashing again. Only when the trouble has been cleared will the light turn off. Display: A system alarm does not affect the current display.
Testing Your Consoles You can test the lights and ringer on your SLAC and the lights on your Selector Console. On the SLAC, the Test switch is located on the left side. It has two positions, T and P (the P position is inoperative). On the Selector Console, the Test button is the rightmost button in the bottom row with the Group Select buttons. Notify your System Administrator if any light or ringer does not operate. Testing the SLAC 1.
Time Functions Pressing the button puts the console into the local mode and provides access to clock and timer functions. The buttons at the top of the terminal, adjacent to the display screen, control a clock, a calendar, a 60minute timer, and an alarm. In the local mode, the screen displays the function you select. Refer to the booklet supplied with the console for detailed operating instructions.
STANDARD MULTILINE FEATURES Account Code Entry For bookkeeping purposes, your System Administrator may assign account codes to use with certain calls. Caution: Pressing the Account Code Entry button, , will disconnect you from your call. Do not operate this button until the end of the conversation. Entering an Account Code 1. Before you hang up at the end of a . 2. Dial the account code or speed dialing code, or press the button associated with the account code. 3.
Automatic Intercom This feature provides a dedicated private talking link between your console and another station in your system. Automatic Intercom is assigned to a feature button, preferably one with a status light (the light turns on when the associated station is off-hook). When you press the button to call the other station, a loop is automatically selected for the call. If the other party is busy when you call, you can activate a Busy-to-Idle Reminder.
Call Accountability You can use your PDC at any voice terminal to place toll calls that will be billed to you. Charging a Call to Your PDC from Another Terminal 1. Lift the handset and listen for dial tone. 2. Dial ## followed by your PDC. 3. Listen for dial tone. 4. Dial your call and continue in the usual way. Display: ## PDC is displayed as you dial it. When second dial tone is returned, ## PDC is replaced by the outgoing call number.
Call Coverage The queue that holds calls before they come to the console can be assigned as a receiver of coverage calls. Coverage calls are answered in the same way as any other incoming calls. Typical Displays: A coverage call ringing at the console provides displays called party information (Screen 1) and calling party information (Screen 2).
Call Following If you leave your console temporarily to go to another station, your PDC calls can follow you. You must sign in your PDC at that new station. When you are ready to return to your console, you may either sign out your PDC from that other voice terminal or sign in at your own console. Signing In Your PDC At a Voice Terminal or Your Console 1. Lift the handset and listen for dial tone. 2. Dial ** PDC PDC, using your own PDC. 3. Listen for confirmation tone and then hang up.
Call Pickup This feature enables you to answer calls that are ringing at other stations without leaving the console. System 25 offers two types of call pickup: group (an assigned feature) and directed (a fixed system feature). Picked up calls come to the button where the code was entered. Call Pickup is a one-way feature: Calls ringing at your console cannot be picked up by other stations. Picking Up a Call Within Your Call Pickup Group 1. Lift the handset and listen for dial tone. 2. Dial *70.
Direct Station Selection (DSS) This feature allows you to place a call to a specific inside station by pressing an assigned button. Two types of Direct Station Selection can be administered to the console: • Fixed DSS, which is programmed by the System Administrator (this type is provided for numbers that are called by all or many system users). • Flex (flexible) DSS, which permits you to program any inside numbers you want on buttons assigned for this purpose.
DSS (Contd) Display: When you press a or button, the display shows the stored number and the name associated with the number just as it does for any internal call.
Hands-Free Answer on Intercom (HFAI) The Hands-Free Answer on Intercom (HFAI) feature allows you to answer inside calls without lifting the handset of the console. For this feature to be operational, the System Administrator must assign Auto Answer to a programmable button with a status light. The button and the [HFAI] button must both be pressed in advance and left on. You should turn off the HFAI feature when you leave your office.
HFAI (Contd) The light next to this button will turn on. Ending the Call 1. Press [SPEAKERPHONE]. ● The lights next to [SPEAKERPHONE] and [MICROPHONE] turn off. Turning Off the HFAI Feature 1. Press [HFAI]. • The light next to this button turns off. 2. Press . • The light next to this button turns off. Display: The display for an HFAI call is exactly the same as for any incoming inside call.
Incoming Calls Group You may be in an Incoming Calls Group, also known as a Direct Group Calling (DGC) group. Calls to an Incoming Call Group are distributed among the group members. If you are a member of a group, you can answer calls to the group on your buttons in the same way as other incoming calls. You can leave the group temporarily and return to it by using the following procedures. Leaving the Group Temporarily 1. Lift the handset and listen for dial tone. 2. Dial *4. 3.
Last Number Dialed You can redial the last inside or outside number you dialed (up to 16 digits) by using the button. Numbers are stored in when you use the following buttons or features to place a call: • [CONFERENCE] • • • • Speed Dialing • [TRANSFER] Numbers are not stored in when you use the following buttons or features. • • • Call Accountability • • Redialing a Telephone Number 1.
Last Number Dialed (Contd) 2. Press 3. Continue the call in the normal way. Display: The display shows all the characters that were dialed, including any access codes associated with pooled facilities.
Manual Signaling You can use a button to send an audible signal to another voice terminal. Sending a Manual Signal 1. Do not lift the handset. 2. Press . Display: Manual signaling does not affect the current display.
Placing Data Calls From Your Console If your System Administrator assigned a button to your console, you can use it to place calls for your associated data station. Placing a Data Call 1. Turn on your data terminal. 2. Lift the handset and listen for dial tone. 3. If your data call is an outside call, press . 4. Dial the data endpoint. 5. Listen for high-pitched answer tone. 6. Press within 15 seconds of hearing answer tone. 7. Hang up.
Programming Numbers You can program , , and Personal Speed Dialing codes. While only PDC's can be programmed into buttons, strings of numbers and special characters may be programmed into buttons and Personal Speed Dialing codes (maximum of 28 characters). The first part of this subsection describes, with examples, the use of special characters in numbers to be stored (programmed) in buttons and Personal Speed Dialing codes (#20 through #26).
Programming Numbers (Contd) Using * as an Actual * Character If you wish to program an * as an actual * character, you must place a # before the * For example, you may wish to program the Feature Access Code *7O into : Programmed characters: #*70. Meaning: *70. Using # as an Actual # Character If you wish to use a # as an actual # character, you must place two #’s in the stored number.
Programming Numbers (Contd) For example, you may wish to store in a both a telephone number (555-4444) and an identification code that should be transmitted directly to the far end (12345): Programmed characters: 9*5554444**#312345. Meaning: 9 (1.5 second pause) 5554444 (3 second pause) (start end to end signaling) 12345. Programming Your Buttons and Personal Speed Dialing Codes Use the following procedure to program a new number or a new number over an old number.
Recall If your company uses certain Central Office features, the [RECALL] button may be used to access these features. Check with your System Administrator for a description of available features, access codes, and procedures.
Repertory Dialing You can program telephone numbers, account codes, or feature access codes into buttons and then dial the programmed numbers by pressing the buttons. For instructions on how to store Rep Dial numbers, see the feature section titled Programming Numbers. Placing a Call Using Repertory Dialing 1. Lift the handset and listen for dial tone. 2. Press . Display: The display shows all the characters stored on the button.
Speakerphone The Speakerphone feature allows you to answer and place calls and carry on conversations without lifting the handset. Pressing the [SPEAKERPHONE] button is equivalent to lifting the handset. You can switch from speakerphone operation to handset operation by simply Iifting the handset and continuing the call. The [SPEAKERPHONE] and [MICROPHONE] lights turn off. To return to speakerphone operation, press [SPEAKERPHONE]. Then hang up the handset. Placing a Call Without Lifting the Handset 1.
Speakerphone (Contd) 2. Talk to the caller by speaking toward the console in a normal voice. Note: To temporarily keep the other party from hearing you, press [MICROPHONE]. The light next to this button will turn off. To resume your conversation with the other party, press [MICROPHONE] again. The light next to this button will turn on. Ending a Call 1. Press [SPEAKERPHONE]. • The green lights next to [SPEAKERPHONE] and [MICROPHONE] turn off.
Speed Dialing Speed Dialing allows you to use dialing codes to dial telephone numbers or enter account codes. There are two kinds of speed dialing: System and Personal. System speed dialing codes (#100 through #189) are programmed by the System Administrator and are used for numbers that are frequently called by several people in your company. Personal speed dialing codes (#20 through #26) allow you to program seven personal numbers. Check with your System Administrator to see if you have this feature.
Transfer If you use [TRANSFER] on the SLAC to extend calls, unanswered and busy calls will not be returned to your console and may be lost. Under certain circumstances, you may use [TRANSFER] to connect an incoming trunk call to another trunk. See your System Administrator for more information. Transferring a Call 1. Press [TRANSFER] and listen for dial tone. • The light next to the button of the heId call winks. 2.
GLOSSARY account code entry feature that allows you to assign account codes to calls to charge them to specific customers, clients, or business cases. alarm feature that warns you of system problems. assigned button a button that may be assigned an optional feature; also called a programmable button. attendant message waiting feature that allows you to turn on message waiting lights at other voice terminals.
Glossary (Contd) busy-to-idle reminder feature that allows you to be notified automatically when a person or trunk is available. call accountability feature that allows you to make calls at another voice terminal and have them charged to your PDC. call coverage feature that allows system users to have their calls answered by someone else. call following feature that allows a voice terminal user to direct incoming calls to another voice terminal or to the console.
Glossary (Contd) confirmation tone three short tones that indicate an action was accepted and you can proceed to the next step. data call feature that allows you to place a data call from your console and then transfer the call to your data terminal. DDC (data dial code) extension number assigned to a data terminal. DGC see Incoming Calls Group. DSS (direct station selection) feature like automatic intercom except that the person receiving the call does not need a separate button.
Glossary (Contd) extending procedure followed by Attendant in setting up a connection between an incoming caller and another party inside or outside the system. fast busy tone (reorder tone) repeating on/off tone that indicates the number or access code dialed was busy, misdialed, or restricted. feature access code sequence of characters (digits, “*”, or “#”) that allows you to access System 25 features. fixed button button that has a fixed feature and label (not programmable).
Glossary (Contd) incoming calls group specific group of voice terminals to which incoming calls are directed (also referred to as direct group calling [DGC] group). inside call call between two (or more) System 25 voice terminals (signaled by one long ring) loop voice link that carries all incoming and outgoing calls between the console and the system switch. loop button specific appearance of a loop at the console; used for answering and placing calls.
Glossary (Contd) off-hook voice terminal condition in which either the handset has been removed from its cradle (releasing the switchhook) or the Speakerphone is turned on. on-hook voice terminal condition in which the handset is in its cradle (depressing the switch hook) and the Speakerphone is turned off. outside call call between a System 25 voice terminal and another voice terminal not connected to System 25. Outside calls are made over Central Office or other trunks.
Glossary (Contd) PDC (personal dial code) extension number assigned to an individual and normally associated with the voice terminal at the person’s desk. Floating PDC's are not associated with any particular voice terminal and can be used only when they are signed in at a voice terminal. position busy feature that allows you to have calls that come to your console (position) sent to the other Attendant (if one exists) or to a predetermined backup voice terminal.
Glossary (Contd) queue an ordered sequence of calls waiting at the system switch to be directed to the attendant console for processing. release feature that separates you from a call being extended and frees you to handle another call. repertory dialing feature that allows you to program a telephone number (or account code) into an assignable button and then dial by pressing that button. ringback tone repeating on/off tone that indicates that the number you dialed is ringing.
Glossary (Contd) speed dialing feature that allows you to place a call (or enter an account code) by dialing # and a two- or three-digit code. start feature that initiates the extension of a call to a desired PDC. system administrator person responsible for assigning features and overseeing System 25 operation. (The person to talk to when questions or problems arise.) system switch the central digital electronic unit that provides control, switching, memory, and monitoring functions for System 25.
AT&T System 25 QUICK REFERENCE CARD= Switched Loop Attendant Console User Guide SYSTEM SPEED NUMBERS CODE TELEPHONE NUMBER DIALING CODES CODE DESCRIPTION Your PDC Your Accoutn Code(s) Your DDC Facility Access Code PERSONAL SPEED DIALING NUMBERS CODE #20 TELEPHONE NUMBER Paging Access Code #21 #22 #23 Call Park PDC(s) #24 #25 #26 (See Features list on other side.
AT&T System 25 QUICK REFERENCE CARDSwitched Loop Attendant Console User Guide FEATURE ACCESS CODES CODE *70 *7 PDC *5 *8 PDC *4 *6 #4 **PDC PDC **PDC 0 **0 ##PDC FEATURE ToAnswer a Call Ringing at at Voice Terminal in Your Call Pickup Group To Answer a Call Ringing at Any Other Voice Terminal To Park a Call To Pick Up a Parked Call To Temporarily Leave an Incoming Calls Group To Return to an Incoming Calls Group To Program Personal Speed Dialing Numbers To Sign in Your PDC (for Receiving Calls) To Sign Ou