
Specifications


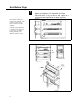
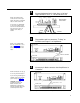
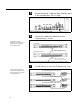
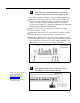
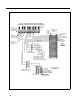
Table Of Contents
- Table of Contents
- General Information
- Before You Start
- Installation Steps
- Connecting Speakers
- Powering Up System
- Self-Powered Controller Connections
- Controller to Generic Amplifier
- Controller to Amplified Speakers
- Controller to PagePac 20
- Controller to AmpliCenter 100
- Controller to D-Series AmpliCenter
- Troubleshooting
- Controller Specifications
- Controls and Indicators, Terminals and Connector
- Connectivity Chart
- Programming the Controller
- General Zone and Zone Group Configurations
- Output Zone/Group Configurations
- Input Zone / Group Options
- Error Tones
- Programming Quick Reference Chart
- Zone Map and Zone Configuration Tables
- Application Notes

Installation Steps
1
Mount the PagePac Plus Controller and Zone
NOTE: When installing the
PagePac Plus Controller, leave
at least four inches space
above and below for proper
ventilation.
Install the paging equipment in
a ventilated room where there
is easy access to speaker
cabling (preferably in the
telephone equipment room).
Expansion Units, if any, to either a wall, cabinet or a
rack (below the AmpliCenter or other amplifier).
SIDE VIEW
AMPLICENTER
4"
CONTROLLER
4"
ZONE EXPANSION
UNIT # 1
3/4"PLYWOOD
Figure 2. Wall Mounted Hardware
FRONT DETAIL
4.0"
TYPICAL
COMBINATION
PAN HEAD
19"
PILOT POINT
# 12 - 24 (TYPICAL)
REAR DETAIL
ZONE
WIRING
POWER STRIP
Figure 3. Rack Mounted Hardware
4