
Specifications


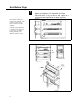
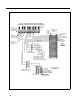
Table Of Contents
- Table of Contents
- General Information
- Before You Start
- Installation Steps
- Connecting Speakers
- Powering Up System
- Self-Powered Controller Connections
- Controller to Generic Amplifier
- Controller to Amplified Speakers
- Controller to PagePac 20
- Controller to AmpliCenter 100
- Controller to D-Series AmpliCenter
- Troubleshooting
- Controller Specifications
- Controls and Indicators, Terminals and Connector
- Connectivity Chart
- Programming the Controller
- General Zone and Zone Group Configurations
- Output Zone/Group Configurations
- Input Zone / Group Options
- Error Tones
- Programming Quick Reference Chart
- Zone Map and Zone Configuration Tables
- Application Notes
Before You Start
1
2
■
■
■
■
NOTE 1: This cable is only
supplied with the standard
(non-powered) Controller.
NOTE 2: These items are only
supplied with the Controller
with power supply.
Before installing your system, read and understand the safety instructions
that follow. Be sure you have all the necessary parts, tools, and test
equipment, listed below.
Read Important Safety Information on Page 2
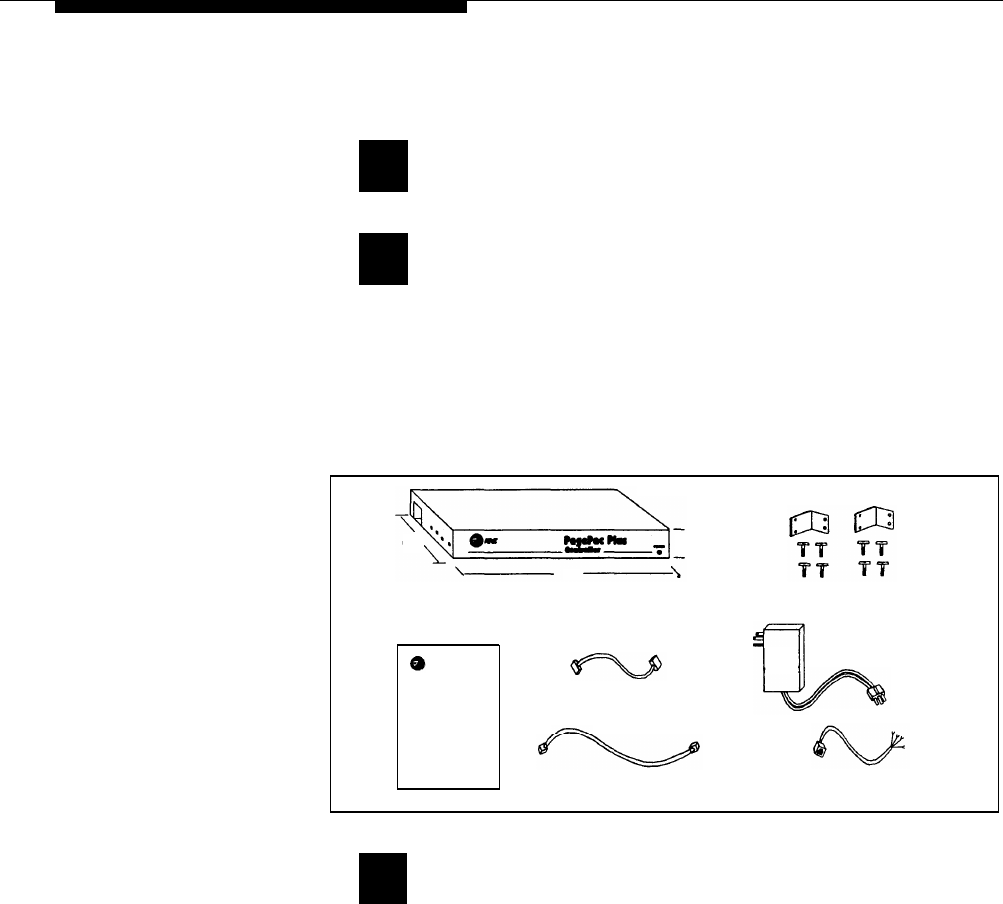
Check Shipping Container Contents
Controller Unit, including plastic snap on cover
Mounting hardware (screws and brackets)
Cables, a non-standard modular to modular cord (do not
substitute), and 8-pin Molex (See note 1)
This Installation and Configuration guide
INSTALLATION GUIDE
8-PIN MOLEX CABLE
(SEE NOTE 1)
AT&T
PagePac Plus System
Installation and Configuration
NON-STANDARD CORD
CONTROLLER
MOUNTING BRACKETS
6
7
/
8
" 1
3
/
4
"
16"
16.5 VAC WALL PLUG-IN
TRANSFORMER
(SEE NOTE 2)
16.5 VAC
POWER
MODULE
MODULAR TO SPADE
LUG CABLE
(SEE NOTE 2)
Figure 1. Controller Components
3
Have Required Tools
The following tools are required for the installation of the system
hardware and cabling.
■
■
■
■
■
■
■
■
Phillips screwdriver (small and large)
Standard blade screwdriver (small and large)
Wire strippers (24 AWG -12 AWG)
Telephone test set (optional, for troubleshooting)
Tone out circuit tester (optional, for troubleshooting)
Portable 70V speaker (use cabling pulled for ceiling speakers)
(optional, for troubleshooting)
Volt-Ohm Meter (optional, for troubleshooting)
4 wood screws, if mounting on wall
3