
Specifications
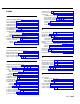


CHANGING FACTORY SETTINGS
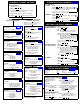
SYSTEM SPEED DIAL NUMBERS
(p. 5-39)
AT EXTENSION 10:
AT EXTENSION 10:
1. PRESS [
Feature
] [
0
] [
0
].
2. PRESS left [
Intercom
] twice.
3. Follow the boxed instructions below for the option
(or options) you want to change.
Repeat boxed instructions to correct a mistake.
4. PRESS [
Feature
] [
0
] [
0
] again when you are done.
OPTIONS THAT
AFFECT ALL EXTENSIONS
OPTIONS THAT AFFECT AN
INDIVIDUAL EXTENSION
NOTE: If you are changing more than one
setting for an extension, you must set
Automatic Line Selection first.
ONE-TOUCH AUTO DIAL NUMBERS (p. 5-4)
SYSTEM DATE
(p. 5-37)
DIAL #101
DIAL the date in MMDDYY form
SYSTEM TIME
(p. 5-41)
DIAL #103
DIAL the time in HHMM 24-hour
military format
RECALL TIMER DURATION
DIAL
#107
(p. 5-35)
DIAL two digits to set the length of a
switchook flash (01-80
(where 01 = 25 msec.)
18 = 450 msec. ✔
NOTE: If behind PBX, set to 18.
If behind Centrex, set to 32.
UNIQUE LINE RINGING (p. 5-44)
DIAL #118
DIAL
1 = Active
(red steady)
2 = Not Active ✔
(red flashing)
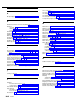
DIAL MODE (p. 5-12)
DIAL
#201
DIAL
1 = Touch-Tone ✔
(red steady)
2 = Rotary (red flashing)
HOLD DISCONNECT TIME (p. 5-19)
DIAL
#203
DIAL
1 = Long–450 msec. ✔
(red steady)
2
= Short–50 msec.
(red flashing)
STORING SPECIAL FUNCTIONS IN A SPEED
DIAL OR AUTO DIAL NUMBER
(p. 5-36)
To insert a:
Pause
Recall
Press:
[
Hold
]
[
Spkr
]
To insert a:
Stop
Touch-Tone Enable
Press:
[
Mic
]
[
Transfer
]
OUTGOING CALL PREFIX (p. 5-29)
DIAL
#402
DIAL
1 = 0/1 plus Area Code and
Number ✔ (red steady)
2 = Area Code and Number
only (red flashing)
MUSIC/TONES ON HOLD (p. 5-27)
DIAL #602
DIAL
1 = Tones On Hold
(red steady)
2 = Not Active ✔
(red flashing)
3 = Music On Hold
(red wink)
AUTOMATIC LINE SELECTION
PRESS right [
Intercom
]
(p. 5-7)
DIAL the extension number (10-21)
PRESS [
★
] [
★
]
PRESS the line/intercom buttons in
the desired order
PRESS [
★
] [
★
]
Repeat above steps to change
another extension
LINE RINGING
(p. 5-22)
PRESS right [
Intercom
]
DIAL the extension number (10-21)
PRESS each line button until the
desired setting displays:
● Ring ✔ (green steady)
● No ring (green flutter)
Repeat above steps to change
another extension
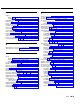
AUTOMATIC EXTENSION PRIVACY
DIAL
#304
(p. 5-6)
DIAL the extension number (10-21)
DIAL
1 = Assigned (red steady)
2 = Not Assigned ✔
(red flashing)
ABBREVIATED RINGING (p. 5-2)
DIAL
#305
DIAL the extension number (10-21)
DIAL
1 = On–1 ring ✔
(red steady)
2 = Off–repeated ringing
(red flashing)
Repeat above steps to change
another extension
OUTGOING CALL RESTRICTION
DIAL
#401
(p. 5-30)
DIAL the extension number (10-21)
DIAL
1 = No Restriction ✔
(red steady)
2 = Inside (intercom) Only
(red flashing)
3 = Local (intercom and
local) Only (red winking)
Repeat above steps to change
another extension
✔
= Factory Setting
TO STORE
TO REMOVE
PRESS [
Feature
] [
0
] [
0
]
PRESS [
Feature
] followed by a 2-digit code (20-79)
DIAL telephone number up to 20 digits including
special functions (see box below)
(To store another number, repeat last two steps)
PRESS [
Feature
] [
0
] [
0
] when you are done
PRESS [
Feature
] [
0
] [
0
]
PRESS [
Feature
] followed by the 2-digit code (20-79)
PRESS [
Mic
]
(To remove another number, repeat last two steps)
PRESS [
Feature
] [
0
] [
0
] when you are done
TO STORE REMOTELY
FROM EXTENSION 10
TO STORE DIRECTLY
AT A USER’S PHONE
TO REMOVE
PRESS [
Feature
] [
0
] [
0
]
PRESS left [
Intercom
] twice
PRESS right [
Intercom
]
DIAL the extension number for which the
Auto Dial number is to be stored
PRESS an Auto Dial button
DIAL an extension number, or an outside
phone number up to 20 digits including
special functions (see box below). (To
set up an Auto Dial button for group
paging, press [
Intercom
] [
★
] [
7
].)
(To store another number, repeat last two steps)
PRESS [
Feature
] [
0
] [
0
] when you are done
PRESS [
Feature
] [
0
] [
0
]
PRESS the Auto Dial button
PRESS [
Mic
]
(To remove another number, repeat last two steps)
PRESS [
Feature
] [
0
] [
0
] when you are done
DOORPHONE / INTERNAL HOTLINE PHONE /
EXTERNAL HOTLINE PHONE (#604)
(p. 5-14)
To assign doorphone,
internal hotline phone or
external hotline phone
extension:
PRESS right [
Intercom
]
DIAL the 2-digit extension number
assigned to the doorphone,
internal hotline phone, or
DIAL
#604
external hotline phone
DIAL the extension number
PRESS the leftmost Auto Dial button on
DIAL
1 = Assigned
the upper row of Auto Dial buttons
2
= Not Assigned
✔
PRESS left [
Intercom
] and dial 2-digit
PRESS [
Feature
] [
0
] [
0
]
extension number to alert that
extension or [
7
] to alert all
extensions
To store alert extension or
OR
outside phone number:
DIAL the outside phone number
up to 20 digits includings special
PRESS [
Feature
] [
0
] [
0
]
functions—see box above)
PRESS left [
Intercom
] twice
PRESS [
Feature
] [
0
] [
0
]