999-507-144 AT&T ® MERLIN PIus COMMUNICATIONS SYSTEM System Manual
Welcome... ...to the magic of MERLIN. Your MERLIN® Plus Communications System is ready when you are. Once it's installed, you can begin using it immediately. You can use the MERLIN Plus system voice terminals the same way you use ordinary telephones. But sooner or later you'll want to take advantage of the system's advanced technology and customize it to meet your business needs.
TO ORDER COPIES OF THIS MANUAL CALL: Cincinnati Contract Service Organization Document Distribution Center on 800-252-4076. FAX: 513-352-7031 ATTMAIL: Free form to !docdist Please include your name and telephone number with your order information While reasonable efforts were made to ensure that the information in this document was complete and accurate at the time of printing, AT&T can assume no responsibility for any errors.
Contents Section 1: Introduction What's in This Manual 1-1 How to Use This Manual 1-3 The MERLIN Plus Communications System 1-5 Section 2: Planning the System Introduction 2-1 System Configuration Form 2-3 Line Assignments Form 2-7 Call Restrictions and Allowed Lists Directory 2-13 System Speed Dial Directory 2-17 FORMS: System Configuration Form 2-21 Line Assignments Form 2-23 Call Restrictions and Allowed Lists Directory 2-25 System Speed Dial Directory 2-27 Section 3: Administering the System Introduct
Section 1: Introduction
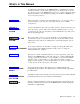
What's in This Manual You'll find the information in this MERLIN ® Plus Communications System manual convenient y divided into eight sections, as described below. You'll also find ten copies of the MERLIN Plus System User's Card in the back of this binder. In addition to the manual, this package also includes a MERLIN Plus System Training Manual. SECTION 1. INTRODUCTION This section tells you what's in the manual and how to use it.
USER'S CARD This card is a handy reference for anyone who uses a MERLIN Plus system voice terminal (telephone) on the job. Give one to everyone in your business who uses a voice terminal. MERLIN PLUS SYSTEM TRAINING MANUAL This guide offers self-paced instructions on using the MERLIN Plus system features. Make the guide available to everyone in your business who uses a voice terminal, and encourage them to use it.
How to Use This Manual How you should use this manual at any particular time depends on what you want to do, as the following information suggests. ADMINISTERING A NEW SYSTEM? Use the information in Section 2, "Planning the System," to decide which options and features you want for your system. Then follow the instructions in Section 3, "Administering the System, " and in Section 5, "Reference," to set up the system with the options and features you've selected.
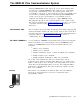
The MERLIN Plus Communications System The basic MERLIN Plus system supports up to four outside telephone lines and eight voice terminals (MERLIN system telephones). To accommodate your growing communications needs, the system expands easily and economically to support up to eight outside lines and 20 voice terminals.
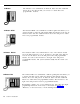
-Button The 10-button voice terminal has an Intercom button and nine additional buttons above the dial pad that you can use for outside lines and programmable features. 10-Button HFAI The 10-button HFAI voice terminal has a built-in speaker that allows you to answer and talk on intercom calls without liking the handset. It also has an Intercom button and nine additional buttons above the dial pad for outside lines and programmable features.
Section 2: Planning the System
Introduction You can begin making and receiving calls as soon as your MERLIN ® Plus Communications System is installed. But to take full advantage of the system's power, you should customize it to fit your business needs. Customizing the system is called administering the system throughout this manual. Administering the system involves entering information into the system's memory about how you want the system to operate.
System Configuration Form Use the System Configuration Form to record information about the following: ● Dial Signals ● Long Distance Dialing ● Voice Terminals ● Outside Telephone Lines The following information should help you make the appropriate entries for your system on the System Configuration Form. DIAL SIGNALS Touch-Tone signals. But If you don't rotary-only, telephone lines can carry both Touch-Tone and rotary (pulse) dial rotary-only telephone lines cannot carry Touch-Tone dial signals.
Intercom 10 By design, the intercom 10 position is the primary call-handling position in the system, and it is also the system administration point. You must, therefore, assign intercom number 10 to the voice terminal at the system attendant's location. For easy system administration, the voice terminal assigned intercom 10 should be a 34-button deluxe model, but a 10-button model will also work. Under "Voice Terminals" . . .
The system also assigns intercoms 10 through 19 to Paging Group 1 and intercoms 20 through 29 to Paging Group 2. You can keep these groups as they are, or you can change the makeup of Paging Groups 1 and 2 during system administration to fit the needs of your business. You can assign as few or as many voice terminals as you want to Groups 1 and 2. You can also assign the same voice terminal to both groups. Under "Paging Groups" . . .
Line Assignments Form OUTSIDE TELEPHONE LINES The information in the lower area of the Line Assignments Form, under the heading "Outside Telephone Lines," is almost identical to the information under the same heading on the System Configuration Form you've already completed. The only difference is that the leftmost column is headed "Control Unit Jacks" on the System Configuration Form and "Lines" on the Line Assignments From.
FIGURE 2-1 Original Line Assignments MERLIN Plus system line administration offers you these options: ● Customize the line assignments on some or all of your voice terminals. ● Keep the original line assignments on some or all of your voice terminals. The following paragraphs offer guidelines for choosing a line assignment option for each voice terminal and recording your choices on the form. 2-8 Section 2: Planning the System .
Customized Line Assignments As you decide whether to customize the line assignments to one or more voice terminals, review your business calling patterns and each person's telephoning responsibilities. You may find that customizing line assignments can help you control costs and increase the efficiency of your communications system. Let's say, for example, that you are the MERLIN Plus system administrator for a branch office of a large company.
Figure 2-2 shows how you might customize the line assignments to the buyer's, the manager's, and the clerk's voice terminals to best meet their individual needs and responsibilities.
Review the responsibilities of the people in your business and the special characteristics of your outside lines. Then decide which, if any, should have customized line assignments. (Your System Configuration Form shows the telephone number and line type for each of your outside telephone lines.) In the "Intercom No." column . . . Find the intercom numbers for the people for whom you want customized line assignments.
In the "Intercom No. " column . . . Find the intercom numbers for the voice terminals you want to program with special line selection sequences. Write the line selection sequences in the appropriate spaces in the "Automatic Line Selection Sequence" column. (For example, if you want the voice terminal with intercom number 14 to have the automatic line selection sequence D, C, A, B, write DCAB in the space for intercom number 14 in the "Automatic Line Selection Sequence" column.
Call Restrictions and Allowed Lists Directory You can use call restrictions to prevent some or all voice terminals from making outside calls (both local and long distance) or from making long distance calls. Then you can use allowed lists of numbers and/or special speed dial codes to permit restricted voice terminals to call specified telephone numbers, local exchanges, or area codes.
Under "Call Restrictions" . . . Put a check mark in the "Toll Restricted" column next to the intercom numbers for those voice terminals you want to place toll restrictions on when you administer the system. ALLOWED LISTS If you plan to administer the system with a 10-button voice terminal, you cannot assign allowed lists to restricted voice terminals. Go on to "System Speed Dial Directory.
Allowed Lists Created Under "Allowed Lists" . . . Write area codes, local exchange codes, etc., on the lines next to the "Item" numbers to create your allowed lists. Allowed Lists Assigned Now that you've created some allowed lists, you should decide how you want to assign them to restricted voice terminals when you administer the system. Under "Call Restrictions," in the "Allowed Lists Assigned" column . . . Write the allowed list number(s) (01, 02, 03, etc.
System Speed Dial Directory You can assign system speed dial codes to frequently called telephone numbers. Then people in your business can call any of these telephone numbers by dialing its 3-character code. You can also assign these codes to account numbers that you want to print out on call reports if your system has the Call Report (often referred to as Station Message Detail Recording [SMDR]) feature.
CALL REPORT With the Call Report feature, your system prints out a report on every call that meets the criteria you set during system administration. Figure 2-3 shows a printout that contains several typical call reports. Each line beginning with "C" represents an individual call report.
In the "Account Number" column . . . Write the account numbers next to 3-character dial codes that do not already have telephone numbers next to them. In the "Name" column . . . Write the name of the person or organization to identify each account number. You should now have a complete set of planning forms. Keep them together in a safe place until you are ready to install and administer your system.
System Configuration Form Dial Signals ❑ Touch-Tone ❑ Rotary (pulse) Long Distance Dialing ❑ Toll Prefix ❑ Area Code Only Voice Terminals Intercom Number 10 11 12 13 14 15 16 17 18 19 20 21 22 23 24 25 26 27 28 29 Name Location Paging Groups Group 1 Group 2 (Attendant) (Call Report) Outside Telephone Lines Control Unit Jack Telephone Number Line Type A B C D E F G H System Configuration Form 2-21
Line Assignments Form Name Icom No.
Call Restrictions and Allowed Lists Directory Call Restrictions Intercom Number Unrestricted Toll Restricted Outward Restricted Allowed Lists Assigned 10 11 12 13 14 15 16 17 18 19 20 21 22 23 24 25 26 27 28 29 Allowed Lists List 02 List 01 Item 01 02 03 04 05 06 07 08 09 10 Number Item Number 01 02 03 04 05 06 07 08 09 10 Call Restrictions and Allowed Lists Directory 2-25
List 03 Item List 04 Number Number 01 02 03 04 05 06 07 08 09 10 01 02 03 04 05 06 07 08 09 10 List 05 Item List 06 Number Item Number 01 02 03 04 05 06 07 08 09 10 01 02 03 04 05 06 07 08 09 10 List 08 List 07 Item Number Item 01 02 03 04 05 06 07 08 09 10 01 02 03 04 05 06 07 08 09 10 2-26 Item Section 2: Planning the System.
System Speed Dial Directory Dial Code Telephone Number Account Number Name Restriction Override #60 #61 #62 #63 #64 #65 #66 #67 #68 #69 #70 #71 #72 #73 #74 #75 #76 #77 #78 #79 #80 #81 #82 #83 #84 #85 #86 #87 #88 #89 #90 #91 #92 #93 #94 #95 #96 #97 #98 #99 System Speed Dial Directory 2-27
Section 3: Administering the System
Introduction You can begin using your MERLIN ® Plus Communications System right now. Just make sure the system is set to generate the right dial signals for your outside telephone lines and to recognize the long distance dialing procedure for your area. To make these simple checks, see "Dial Signals" and "Long Distance Dialing" under "Basic Administration" later in this section.
Administration Preview PLANNING FORMS The information about your system recorded on the planning forms listed below is important to both initial and ongoing system administration. ● System Configuration Form ● Line Assignments Form ● Call Restrictions and Allowed Lists Directory ● System Speed Dial Directory If you haven't filled out any planning forms yet, you should do so now. It won't take long, and it will save you time later.
Administrator/Attendant Console A 34-button deluxe voice terminal (Figure 3-2), which has a button with lights every outside line and voice terminal, is the ideal administrator/attendant console. The Line Buttons (above the dial pad) and the Auto Intercom Buttons (to the right of the dial pad) give you one-touch access to each line and voice terminal. The lights allow you to keep track of administration procedures as well as changes in the status of the voice terminals is and the outside lines.
FIGURE 3-2 34-Button Administrator/Attendant Console Line Buttons Auto Intercom Buttons T T/P Switch P Hi Volume Control Lo Dial Pad Administration Preview 3-5
FIGURE 3-3 10-Button Administrator/Attendant Console Line Buttons T T/P Switch P Volume Control H i Lo Dial Pad 3-6 Section 3: Administering the System
ADMINISTRATION MODE Button Labels As you just learned, you administer the system from the administrator/attendant position with the console in administration mode.
Entering Administration Mode To enter administration mode: 1 Slide the T/P switch on the left side of the console to P (down). The green lights next to the line buttons begin flashing. The console rings every five seconds to remind you that it's in programming mode. 2 Touch Administer, or dial #01. The green lights go off. The red lights go on steady next to Administer and Restrict. NOTE: A 10-button voice terminal doesn't have a button labeled Administer.
Centralized Programming To program voice terminals from the administrator/attendant console. do the following: COPY 1 Enter administration mode. 2 Touch the Auto Intercom button or dial the intercom number for the first voice terminal you want to program. 3 Touch Conference. 4 Program the voice terminal according to the instructions in the Training Manual or in Section 5, "Reference." 5 Leave administration mode, or select another voice terminal for programming as follows: a Touch Conference.
Copy To copy line assignments, call restrictions, and most programmable features from one voice terminal ( the source ) to another voice terminal ( the target ), do the following: 1 Enter administration mode. 2 Touch the Auto Intercom button or dial the intercom number of the target voice terminal. 3 Touch Copy. 4 Touch the Auto Intercom number or dial the intercom number of the source voice terminal. 5 Continue to administer the system, or leave administration mode.
Basic Administration Basic administration should take no more than a few minutes. All the information you need should be on your System Configuration Form. DIAL SIGNALS Locate the column headed "Dial Signals" on the System Configuration Form. Is the box next to "Touch-Tone" checked? If so, you don't have to do anything here. Your system is factory set to generate Touch-Tones when you dial an outside call on any of your outside telephone lines.
To set the systemwide line assignments, do the following: 1 Enter administration mode. The red lights go on next Administer and Restrict. 2 Dial *4. 3 Dial the number of outside telephone lines in your system. 4 Touch Administer. The console beeps twice. 5 PAGING GROUPS Continue to administer the system, or leave administration mode.
Customized Line Assignments As you filled out the Line Assignments Form, you learned that customizing line assignments to voice terminals can help control costs and increase the efficiency of your communications system. All the information you need to customize line assignments should be on the Line Assignments Form.
CUSTOMIZE LINE ASSIGNMENTS The check marks to the right of the intercom numbers on the Line Assignments Form should show how you plan to customize the line assignments to voice terminals. Customizing a voice terminal's line assignments is simply a matter of removing and adding lines. But keep the following points in mind: ● On every voice terminal, the button directly above Conference is always the Intercom button. You can't assign a line or feature to it.
3 Remove all the lines from the voice terminal. To do this, touch each line button that has a green light on next to it. The green lights go off as you touch the the corresponding line buttons. 4 Assign lines to the voice terminal in the order in which you want the lines to appear on the voice terminal's line buttons.
Systemwide Options This . concluding phase of initial system administration includes instructions for administering the following systemwide options: ASSIGN CALL RESTRICTIONS TO VOICE TERMINALS ● Call Restrictions ● Allowed Lists ● Call Reports (often referred to as SMDR) ● System Feature Reports ● System Speed Dial The Call Restrictions and Allowed Lists Directory should show whether you plan to restrict any of your voice terminals.
You cannot administer this feature with a 10-button voice terminal. You must have a 34-button administrator/attendant console to assign allowed lists to voice terminals. NOTE: Set Up Allowed Lists In order to assign an allowed list to a restricted voice terminal, you first have to set up the allowed list in the system's memory. To set up an allowed list, do the following: 1 Enter administration mode. The red lights go on next to Administer and Restrict. 2 Dial the code for the list you want to set up.
Assign or Remove Allowed Lists Use this procedure to assign an allowed list to a voice terminal or to remove an allowed list from a voice terminal. Your Call Restrictions and Allowed Lists Directory should show which lists to assign to each voice terminal. To assign or remove an allowed list, do the following: 1 Enter administration mode. The red lights go on next to Administer and Restrict. 2 Dial the code for the list you want to assign. (The codes for Lists 01 through 08 are *01 through *08.
7 Dial *81. 8 Dial two digits for the hour (00 through 23). 9 Dial two digits for the minute (00 through 59). 10 Touch Administer. The console beeps twice. 11 Control Unit Jack Go on to assign Call Report to a control unit jack, or leave administration mode. The system automatically assigns station jack number 19 on the control unit to the data collector and printer for the Call Report option. If you want to keep jack number 19 for the Call Report equipment, you don't have to do anything here.
Type of Calls Reported You can set the system to report either outgoing calls only, or both outgoing and incoming talk. To set the type of calls reported, do as follows: 1 If you haven't already done so, enter administration mode. 2 Dial *84. 3 Dial the the one-digit code for the calls reported option you want: 1 = outgoing calls only 2 = outgoing and incoming calls 4 Touch Administer. The console beeps twice. 5 Continue to administer the system, or leave administration mode.
The telephone number can have up to 16 characters, including these special characters: – For a p (pause), touch H o l d . – For an s (stop), touch D r o p . – For an r (switchhook flash), touch Recall and then touch H o l d . NOTE: This special character for the switchhook flash works only as the first character in a sequence of characters stored under a system speed dial code.
Assign Codes to Account Numbers An account number on a call report allows you to identify the person or organization to whom the call should be charged. As you learned when you planned your system, you can store account numbers in the system under system speed dial codes. Your System Speed Dial Directory should show the codes you plan to assign to your account numbers. NOTE: The 3-character codes available for account numbers are the same as those available for telephone numbers #60 through #99.
Section 4: Using The Attendant Console
Overview As your company's system attendant, you will probably answer most calls that come into the business and transfer many of those calls to other people in the office. This section includes descriptions, instructions, and suggestions that will help you transfer calls and use Auto Intercom buttons, the Loudspeaker Page and Group Page features, the Send Message feature, and the headset.
FIGURE 4-1 The 34-button deluxe voice terminal Line Buttons T T/P Switch P Hi Volume Control Lo Dial Pad 4-2 Section 4: Using The Attendant Console Auto Intercom Buttons
FIGURE 4-2 The 10-button HFAI voice terminal Line Buttons T T/P Switch P Volume Control Hi Lo Dial Pad Overview 4-3
Handling Calls As the system attendant, you will be answering most of the incoming calls.
● Screening Calls When you screen a call, you first discuss the call with the person to whom it is to be transferred. There are many reasons for consulting about the call. For example, a person may want to obtain a file before taking the call, may be busy and not want to answer the call at the moment, or may want the attendant to answer the call and take a message. To screen a call: 1 Touch Hold. 2 Touch Intercom and dial the intercom number of the person to whom the call may be transferred.
To call someone in your MERLIN Plus system with one touch: 1 USING THE LOUDSPEAKER PAGE AND GROUP PAGE FEATURES Touch the Auto Intercom button for the person you want to call. The Loudspeaker Page or the Group Page feature makes it easy for you to announce calls to people who are not always at the same location. When a call comes in, you can put the call on hold and page the person for whom the call is intended.
To use a programmed button to make an announcement through a group of voice terminal speakers: 1 Touch the Group Page button for the group you want to page. 2 When you hear a beep, lift your handset and make the announcement. To page a group using a dial code: 1 Dial a code for the group you want to page. 70 = Page-All (all voice terminals in the system) 71 = group 1 72 = group 2 2 USING THE SEND MESSAGE FEATURE When you hear a beep, speak into your handset.
To use a 10-button voice terminal to turn on the Message light at another voice terminal: a Dial #01. b Touch an Auto Intercom button, if you have one for the person. or Dial the 3-character Send Message button code opposite the person's intercom number as found on the chart.
USING NIGHT SERVICE USING THE HEADSET During the night or on weekends when you are off duty, you can still make it convenient for someone else, such as a guard, to answer calls. You do so with the Night Service feature. There are two ways to provide Night Service for your office: ● You may want to provide the person with a 34-button voice terminal that has all the lines, or the person may prefer to monitor the attendant console and answer calls there.
Section 5: Reference
Overview This section of the MERLIN ® Plus System Manual provides the information you need to program, administer, and use the many MERLIN Plus system features. It also tells you how to use the accessory equipment that you can add to your system.
MERLIN Plus System Features Your MERLIN Plus system offers features that provide effective telephone service both on a business-wide and personal basis. In order to meet company priorities and needs, the system administrator can assign lines and add features that will benefit the whole system. The voice terminals (telephones) in the MERLIN Plus system come ready to use with many preassigned features, such as Transfer and Hold.
Abbreviated Ringing When another line rings while you are busy on a call, your voice terminal rings only once. In this way you are aware that you have another call, but it does not interrupt the call in progress. After the ringing cycle stops, the green light continues to flash to remind you of the other call. CONSIDERATIONS None ADMINISTRATION None PROGRAMMING None HOW TO USE If you want to pickup the new call, you can place the call in progress on hold and touch the line button of the new call.
Most businesses will be satisfied with the quick method of entering account numbers on a call report. The general method is recommended for businesses that have many accounts, or in which there is no central accounting organization and users must invent their own codes. CONSIDERATIONS This feature can be used only with outside calls; it cannot be used with intercom calls.
PROGRAMMING TO program a general Account Number Enter button (program this feature on a button with lights): 1 2 Label the button Account Number Enter. Slide the T/P switch to P. The voice terminal rings every 5 seconds to remind you that you are programming and that you cannot place or receive calls. 3 Touch the button you want to program. 4 Dial *82. 5 Slide the T/P switch to the center position.
If you enter the account code incorrectly, keep the call in progress and repeat the above procedure. To use a button for a specific account number: 1 While you have a call in progress, touch the Account Number button for the particular account number to be recorded. Allowed Lists DESCRIPTION When the system is installed, people can use their voice terminals to place intercom, local, and toll calls. However, the system administrator can restrict any voice terminal to intercom or local calls.
ADMINISTRATION If your responsibilities do not include system administration, skip this information. Before you administer allowed lists for your system, refer to the Allowed List Directory that you have filled out. To set up an allowed list: 1 Enter administration mode by sliding the T/P switch to P and touching Administer. 2 Dial a * and a 2-digit code (01 through 08) that corresponds to the number of the list. For example, to add an entry to List 5, dail *05.
To clear all the entries from an allowed list: 1 Enter administration mode by sliding the T/P switch to P and touching Administer. 2 Dial a * and a 2-digit code (01 through 08) that corresponds to the number of the list you want to clear. For example, to clear all entries from List 6, dial '06. 3 4 Touch Drop. Touch Administer. The console beeps twice. 5 Leave administration mode by sliding the T/P switch to the center position.
PROGRAMMING None HOW TO USE Ask your system administrator what call restrictions, if any, he or she has assigned to your voice terminal. Auto Answer-All NOTE: This feature requires a General Purpose Adapter and can be used with a modem, an answering machine, a facsimile machine, or a cordless telephone.
HOW TO USE To have a modem, answering machine, or facsimile machine answer calls automatically: 1 Touch Auto Answer-All. The green light next to the button goes on. This feature remains active until you: 1 Touch Auto Answer-All again. The green light next to the button goes off. Auto Answer-Intercom NOTE: This feature is used with a hands-free unit.
HOW TO USE To have your hands-free unit turn on automatically when you receive intercom calls with voice announcement: 1 Touch Auto Answer-Intercom. The green light next to the button goes on. To return to answering calls yourself: 1 Touch Auto Answer-Intercom again. The green light next to the button goes off. Auto Intercom DESCRIPTION You can use an Auto Intercom button for one-touch dialing of intercom numbers.
ADMINISTRATION None PROGRAMMING A button with lights is recommended but not required for the Auto Intercom feature. To program an Auto Intercom button for your voice terminal: 1 Label the button with a name and intercom number. 2 Slide the T/P switch to P. The voice terminal rings every 5 seconds to remind you that you are programming and that you cannot place or receive calls. HOW TO USE 3 Touch the button you want to program. 4 Dial *91 plus an intercom number.
CONSIDERATIONS If you plan to program other features when you program Automatic Line Selection, you must program Automatic Line Selection first. If you are already in the middle of a programming session, slide the T/P switch to the center position and then back to P before programming this feature. The Automatic Line Selection order is for only outside lines; the line selection does not include intercom lines.
CONSIDERATIONS ● Basic Telephones — During an electrical power outage, your MERLIN Plus system will not function. However, you can plug a basic telephone (not a MERLIN Plus system voice terminal) into the AUX jack, and use it to place and receive calls .on Line A or Line E. ● Facsimile Machines — You can also plug a facsimile machine into the AUX jack. When calls come in on Line A or Line E, the FAX machine will respond to them as it would if plugged into any other outside telephone line.
Use the basic telephone, facsimile machine, or modem and computer connected to the auxiliary jack as you normally would. Plug in the auxiliary telephone whenever you want to bridge or monitor Line A or Line E. Bridging DESCRIPTION If you share a line with another person, you can join (or "bridge" onto) a call in progress on that line. In this way you can easily join a conference call by just touching a line button and lifting your handset. (See "Conference.
Button-Free Line Operation DESCRIPTION Button-Free Line Operation allows people with 5-button or 10-button voice terminals to access lines, even though the lines do not appear on the voice terminal buttons. Therefore, those voice terminals have additional free buttons for needed programmed features. This feature is ideal for people who need several lines, but who rarely handle more than one call at a time.
2 Dial the intercom number or touch the Auto Intercom button for the voice terminal you are administering. A green light goes on next to the Auto Intercom button. Green lights go on next to the buttons of any lines already assigned to the voice terminal.
Call Pickup DESCRIPTION If you want to pick up a call that is ringing at another voice terminal, use the Call Pickup feature. You can use this feature in three different ways: CONSIDERATIONS ● Option A — You can use a dial code and dial the intercom number of the ringing voice terminal. ● Option B — You can program a Call Pickup button and dial the intercom number of the ringing voice terminal.
To program Option C: 1 2 Label the button Call Pickup plus an intercom number. Slide the T/P switch to P. The voice terminal rings every 5 seconds to remind you that you are programming and that you cannot place or receive calls. HOW TO USE 3 Touch the button you want to program. 4 Dial *85 plus an intercom number. 5 Slide the T/P switch to the center position. You can use a programmed button or a dial code to pick up a call at any other voice terminal in the system.
Call Report NOTE: This feature is used with a MERLIN Plus system data collector and an AT&T 475 printer or its equivalent. DESCRIPTION The Call Report feature, often called Station Message Detail Recording (SMDR), enables a business to keep records of incoming and outgoing calls.
ADMINISTRATION If your responsibilities do not include system administration, skip this information. Before you administer the Call Reports options for your system, refer to the System Conjuration Form that you have filled out. To administer the various Call Reports options for your system: The Date and the Time. To set today's date: 1 Enter administration mode by sliding the T/P switch to P and touching. Administer. 2 Dial *80. 3 Dial two digits for the month (01 through 12).
Control Unit Jack Assignment for the Call Report Feature. To specify the voice terminal jack to which the data collector and the printer will be connected (the system is factory-set for jack 19; if you are using a 10-button voice terminal for administration, you cannot change this assignment): 1 Enter administration mode by sliding the T/P switch to P and touching Administer. 2 Dial *82.
Type of Documented Calls. To specify the type of calls that will be documented (the system is set to have no calls reported): 1 Enter administration mode by sliding the T/P switch to P and touching Administer. 2 Dial *84. 3 Dial a number code 0 through 2 to specify the kind of calls to be reported (the system is factory-set so that no calls are reported): – If you do not want any calls reported, dial 0. – If you want only outgoing calls reported, dial 1.
If the administrator decides to store a System Speed Dial code with Restriction Override, all voice terminals in the system can use the code as a type of password that allows the person to access the outside number, regardless of toll or outward call restrictions previously placed on the voice terminal. (See "System Speed Dial.
Centralized Programming DESCRIPTION The Centralized Programming feature allows the system administrator the convenience of programming-features onto individual voice terminals directly from the administrator/attendant console. In this way there is no need to go to each voice terminal to do the programming. This feature is useful when the administrator is assigning Ringing Options for incoming calls.
Conference DESCRIPTION When you want people outside the MERLIN Plus system to join a call in progress, you can use the Conference feature. You can set up a conference call that includes up to two outside people and yourself. In addition, up to two people in your MERLIN Plus system can bridge onto the call. (See "Bridging.") CONSIDERATIONS You must use the Drop feature when you want to disconnect one outside line at a time from a conference call (See "Drop.") If you press the switchhook, you end the call.
To remove yourself from a conference without ending the call: Touch Hold. To rejoin the call: 1 Touch a line button associated with the call. To disconnect one outside line at a time from the call: 1 Touch Drop. 2 Touch the button of the line you want to disconnect.
If your responsibilities do not include system administration, skip this information. To copy line and feature assignments from one voice terminal to another: Enter administration mode by sliding the T/P switch to P and touching Administer. 2 Dial the intercom number or touch the Auto Intercom button of the voice terminal to which you want to copy line assignments.
If two or more voice terminals in the system will have the same line assignments, the administrator can use the Copy feature to copy the line assignments from one voice terminal to another. (See "Copy.") A line jack with nothing plugged into it is called a nonequipped line appearance, or "ghost line." To eliminate ghost lines, the administrator must specify for the system how many lines the system contains.
Do Not Disturb DESCRIPTION When you are busy and do not want to receive calls, you can touch the Do Not Disturb button, if you have programmed one onto your voice terminal. When you receive outside calls, the green light next to the line button flashes, but your voice terminal does not ring. Calls transferred to you return to the sender, and intercom calls get a busy signal.
Drop DESCRIPTION If you get a busy signal or no answer as you set up a conference call, or if you want to disconnect one outside line at a time from a conference call, use the Drop feature. For more information about using this feature, see "Conference." CONSIDERATIONS If you press the switchhook, you cut off everyone on the conference call. ADMINISTRATION None PROGRAMMING None HOW TO USE To disconnect one outside line at a time from a conference call: 1 Touch Drop.
Group Page DESCRIPTION The system administrator can set up Group Page groups so anyone in the system can use the Group Page feature to page up to 20 people at a time directly through the voice terminal speakers. You can have up to three paging groups. The Page-All group consists of all voice terminals in the system; groups 1 and 2 can have up to 20 voice terminals in each group.
3 Touch Auto Intercom buttons until they show the paging group assignment you prefer. Green light on = voice terminal is assigned to the group Green light off = voice terminal is not assigned to the group 4 Touch Administer. The console beeps twice. 5 Follow the last three steps for each paging group you want to administer. 6 Leave administration mode by sliding the T/P switch to the center position.
HOW TO USE You can use a programmed button or a dial code to access this feature. To use a Group Page button to make an announcement through a group of voice terminal speakers: 1 Touch the Group Page button for the group you want to page. 2 When you hear a beep, lift your handset and make the announcement. To page a group using a dial code: 1 Touch Intercom. 2 Lift your handset.
HOW TO USE If you have a 10-button HFAI voice terminal and you want your intercom calls answered automatically: 1 Touch HFAI/Mic. If you have a 34-button BIS voice terminal and you want your intercom calls answered automatically: 1 Touch HFAI. Hold DESCRIPTION When you need to put someone on hold, use the Hold feature. CONSIDERATIONS When you leave a call on hold for more than a minute, your voice terminal rings at one minute intends to remind you the call is still on hold.
Hold Retrieve DESCRIPTION If you have a 5-button voice terminal and do not have a line button for a call that you have received or that has been transferred to you, you can still put it on hold using the Hold button. To retrieve the call, you can use a dial code or program a Retieve Call button. CONSIDERATIONS To use this feature, you can either program a button or use a dial code.
You can use a programmed button or a dial code for the Hold Retrieve feature. To use a Retrieve Call button to retrieve a held call: 1 Touch Retrieve Call. To use a dial code to retrieve a held call: 2 Dial #*. Intercom DESCRIPTION Each voice terminal connected to the MERLIN Plus system has a unique 2-digit intercom number. You can dial intercom numbers to place calls to people connected to the system. CONSIDERATIONS In the MERLIN Plus system, you place an intercom call with a voice announcement.
PROGRAMMING None HOW TO USE To place an intercom call iwth a voice announcement. 1 Touch Intercom. 2 Lift your handset. 3 Dial the 2-digit intercom number for the voice terminal you want to call. 4 When you hear a beep, speak into your handset. or If you hear ringing, wait for the person to answer. Intercom Preference DESCRIPTION If you want a voice terminal in the system to have only an intercom line, withdraw all outside lines from that voice terminal.
Last Number Redial DESCRIPTION With a Last Number Redial button, you can redial with one touch the number you dialed most recently. You do not need to do anything to save this number. CONSIDERATIONS If you want to save the programmable buttons on your voice terminal for other features, you may prefer to use a dial code to use Last Number Redial instead of programming a button.
Lights DESCRIPTION The lights next to the line buttons on your MERLIN Plus system voice terminal allow you to know immediately the status of any of your lines. There is also a light next to the Message button, and, on most voice terminals, there is a light next to the Speaker button. Lights Line Status Red light steady This is either the line you are now using or the line you will get when you lift your handset. Green light steady This line is busy.
CONSIDERATIONS None ADMINISTRATION None PROGRAMMING None HOW TO USE None Line Request DESCRIPTION If all the lines that appear on your voice terminal are busy, you can still request the use of one of these lines. When the line becomes available, the system alerts you. CONSIDERATIONS None ADMINISTRATION None PROGRAMMING None HOW TO USE To request a line that is presently busy: 1 Touch the line button of the line you want to use.
Line Select DESCRIPTION You may need to make an outside call at a time when you also need to leave your primary line open for incoming calls. If your voice terminal has more than one outside line, you can select a line other than your primary line for an outside call. CONSIDERATIONS None ADMINISTRATION None PROGRAMMING None HOW TO USE To select a specific outside line: 1 Touch the button for the specific outside line you want to use. The Ted light goes on beside the line you select.
PROGRAMMING Buttons with lights are recommended for the Loudspeaker Page feature. To program a Loudspeaker Page button for your voice terminal: 1 Label the button Loudspeaker Page. 2 Slide the T/P switch to P. The voice terminal rings every 5 seconds to remind you that you are programming and that you cannot place or receive calls. HOW TO USE 3 Touch the button you want to program. 4 Dial *91. 5 Dial 6. 6 Slide the T/P switch to the center position.
Manual Signaling DESCRIPTION You can use a Manual Signaling button to generate a beep at a coworker's voice terminal. Most often, this feature is used by a boss who wants to buzz his or her secretary. Assign a Manual Signaling button to each person you want to signal. CONSIDERATIONS You can signal someone with a Manual Signaling button while you have an outside call in progress. The beep sounds at your coworker's voice terminal even if it is busy.
To place an intercom call using a Manual Signaling button: 1 Touch Intercom. 2 Touch Speaker. 3 Touch the Manual Signaling button for the person you want to call. 4 When you haer a beep, lift your handset. Message DESCRIPTION When the light next to the Message button is on, your MERLIN Plus system attendant has a message for you. CONSIDERATIONS Your Message light can only be turned on from the administrator/attendant console. Note that 5-button voice terminals do not have a Message button.
Monitor-on-Hold DESCRIPTION When someone puts your call on hold, you can turn on your voice terminal's built-in speaker, hang up, and continue working while you wait for the person to return to the call. CONSIDERATIONS None ADMINISTRATION None PROGRAMMING None HOW TO USE To turn on your speaker until you are taken off hold: 1 When you have been put on hold, touch Speaker. 2 Hang up. 3 When you hear the person return to the call, lift your handset and continue the call.
● The backup person can also answer calls that come in after hours by programming a Call Pickup button so that he or she can pick up calls at the administrator/attendant console. Since the attendant console has all the lines of your MERLIN Plus system, the person answering calls after hours can pick up calls by touching the Call Pickup button when the attendant console rings. (See "Call Pickup.
CONSIDERATIONS In order to use any one of these five one-touch dialing features, you must program it onto an available button on your voice terminal. ADMINISTRATION None PROGRAMMING If you want to use any of the five One-Touch Dialing features, you must program them onto your voice terminal. For programming procedures for each of the features, see their separate entries in this section. HOW TO USE When you want to use one of the five one-touch dialing features, merely touch the button.
If the line is busy, or if you get no answer: 1 Touch Speaker to cancel the call. Outside Auto Dial DESCRIPTION You can use Outside Auto Dial to dial frequently used numbers and codes with one touch. These numbers and codes can include telephone numbers, and PBX, Centrex, or Custom Calling feature codes. You can include up to 16 numbers and special characters in an Outside Auto Dial sequence.
HOW TO USE To dial an outside number with one touch: 1 Without lifting your handset, touch the Outside Auto Dial button for the number you want to dial. Your voice terminal speaker goes on, and you hear dialing. 2 When you hear the other person answer, lift your handset. If the line is busy or if no one answers: 1 Touch Speaker to cancel the call.
If another voice terminal in your system has that line, you must remove it from that voice terminal by dialing the intercom number for that voice terminal and touching the line button that corresponds with that line so the green light next to it goes off. NOTE: 4 Touch Administer. The console beeps twice 5 Leave administration mode by sliding the T/P switch to the center position. PROGRAMMING None HOW TO USE When a call comes in on your personal line: 1 Lift your handset.
CONSIDERATIONS Personal Speed Dial uses a dialing code. You do not place these codes on a voice terminal button. The attendant or administrator at Intercom 10 cannot use code #01. You may need to program a pause, stop, or switchhook flash into a Personal Speed Dial sequence, or you may need to switch from rotary to Touch-Tone signals in the middle of a programmed dialing sequence. To do so, you must enter one or more of the following special characters when you program the sequence.
Personalized Ringing DESCRIPTION To make it easy for the right person to pick up calls in a group office, people in this type of office may want to program their voice terminals with a ringing pattern that is easier for each person to identify. There are eight different ringing patterns available. CONSIDERATIONS Once you have programmed your Personalized Ringing selection, calls that ring at your voice terminal have this ringing pattern.
ADMINISTRATION None PROGRAMMING The Privacy feature requires a button with lights. To program a Privacy button for your voice terminal: 1 Label the button Privacy. 2 Slide the T/P switch to P. The voice terminal rings every 5 seconds to remind you that you are programming and that you cannot place or receive calls. HOW TO USE 3 Touch the button you want to program. 4 Dial *72. 5 Slide the T/P switch to the center position.
ADMINISTRATION If your responsibilities do not include system administration, skip this information. 1 2 Enter administration mode by sliding the T/P switch to P and touching Administer. Dial *57. The green light goes on next to those lines that cannot be bridged or monitored.
ADMINISTRATION The system administrator can program features onto individual voice terminals by using the Centralized Programming feature. (See "Centralized Programming.") PROGRAMMING Individual feature programming codes are provided in programming instructions in the reference description for each programmable feature and in Section 6, "Quick Reference Guides.
If you have PBX, Centrex, or Custom Calling features, you must touch Recall any time instructions call for a switchhook flash. By touching the Recall button, you automatically place a specially timed pause onto the line. If you press the switchhook instead, you disconnect your call. ADMINISTRATION None PROGRAMMING None HOW TO USE To use Recall as a switchhook flash: 1 Touch Recall.
HOW TO USE To have all your calls ring immediately at your voice terminal: 1 Touch Ring Option Override. If you have programmed this feature on a button with lights, the green light goes on. To return to your programmed line ringing: 1 Touch Ring Option Override again. The green light goes off. Ringing Line Preference DESCRIPTION When you receive an outside call, the MERLIN Plus system automatically connects you to the ringing line.
Ringing Options DESCRIPTION You can designate incoming calls to ring immediately at your voice terminal, ring at a second voice terminal if they are not answered at the first one after three rings (delayed ring), or not ring at all. When your system is installed, the lines at each voice terminal ring immediately when a call comes in on them.
HOW TO USE 4 Repeat steps 2 and 3 for each line button you want to program. 5 When you are finished programming, slide the T/P switch to the center position. Even if you program the lines on your voice terminal not to ring, you can tell if a call comes in for you because the green light next to the line button still flashes. To answer the call: 1 Touch the line button next to the flashing green light. 2 Lift your handset.
PROGRAMMING To program a Saved Number Redial button for your voice terminal: 1 Label the button Saved Number. 2 Slide the T/P switch to P. The voice terminal rings every 5 seconds to remind you that you are programming and that you cannot place or receive calls. HOW TO USE 3 Touch the button you want to program. 4 Dial *74 (you do not need to dial an outside number). 5 Slide the T/P switch to the center position. You can use a programmed button or a dial code to access this feature.
Send Message DESCRIPTION The system attendant can turn on the Message light at the voice terminals of people in the MERLIN Plus system in order to alert them that they have a message. (See "Message.") CONSIDERATIONS The Message light at voice terminals in the system can only be turned on at the attendant/administrator voice terminal. If your company is using a 10-button voice terminal as the attendant console, the attendant can still use the Send Message feature by using the directions below.
If the person's intercom number is: Dial this Send Message button code: If the person's intercom number is: Dial this Send Message button code: Intercom 10 #22 Intercom 20 #03 Intercom 11 #21 Intercom 21 #04 Intercom 12 #20 Intercom 22 #05 Intercom 13 #19 Intercom 23 #06 Intercom 14 #18 Intercom 24 #07 Intercom 15 #17 Intercom 25 #08 Intercom 16 #16 Intercom 26 #09 Intercom 17 #15 Intercom 27 #10 Intercom 18 #14 Intercom 28 #11 Intercom 19 #13 Intercom 29 #12 For
There are three main ways to use your speaker: CONSIDERATIONS ● On-Hook Dialing— Without lifting your handset, turn on the voice terminal speaker and dial an outside or intercom number. (You can also use the one-touch dialing features for this purpose. See "One Touch Dialing.") ● Monitor-on-Hold— If someone puts you on hold, you can turn on your voice terminal speaker, hang up, and continue working until the person returns to the call.
To use Monitor-on-Hold: 1 When you have been put on hold, touch Speaker. 2 Hangup. 3 When you hear the other person return to the call, lift your handset and continue the call. To use Group Listening: 1 Without hanging up, touch Speaker, and continue your conversation.
Stop Switchhook Flash Touch-Tone Enable Program a stop into a dialing sequence to wait for a second dial tone. For example, you may need to program a stop between a local telephone number and an alternate long distance authorization code. 1 Dial the local telephone number (seven digits). 2 Touch Drop (Stop). 3 Dial the authorization code (five or six digits). Program a switchhook flash at-the beginning of a dialing sequence.
The system features that can be printed on the System Feature Report are: ● Group Page groups ● Call restrictions for each voice terminal ● Allowed list assignments for each voice terminal ● Transfer Return Interval ● Call Report settings, such as the minimum call duration of a call for which the Call Report feature will print information ● System Speed Dial numbers The voice terminal features that can be printed on the System Feature Report are: CONSIDERATIONS ● The intercom number of the vo
3 Dial two digits for the month (01 through 12). 4 Dial two digits for the day (01 through 31). 5 Dial two digits for the year (00 through 99). For example, if the date is May 16, 1986, dial *80 05 16 86. 6 Touch Administer. The console beeps twice. 7 Leave administration mode by sliding the T/P switch to the center position. To set the current time: 2 Enter administration mode by sliding the T/P switch to P and touching Administer. Dial *81. 3 Dial two digits for the hour (00 through 23).
5 Leave administration mode by sliding the T/P switch to the center position. Complete System Report. To print out a system administration report and a report for every voice terminal in your system: 1 Enter administration mode by sliding the T/P switch to P and touching Administer. 2 Dial *60. The printer prints the reports as it receives data from the system. 3 Touch Administer. The console beeps twice. 4 Leave administration mode by sliding the T/P switch to the center position.
3 Touch the Auto Intercom button(s) or dial the intercom number(s) of the voice terminal(s) for which you want a report. The printer prints the report as it receives data from the system. 4 Touch Administer. The console beeps twice. 5 Leave administration mode by sliding the T/P switch to the center position. Printout Cancellation. To cancel a printout in progress and to delete all waiting report requests: 1 2 Enter administration mode by sliding the T/P switch to P and touching Administer.
CONSIDERATIONS When the administrator resets the system, all programming done for any voice terminal in the MERLIN Plus system is erased. If the administrator has administered customized line assignments for any voice terminal, these are erased also, and the line configuration is returned to square operation. ADMINISTRATION System Reset requires readministering your system and reprogramming all voice terminals.
CONSIDERATIONS You can program a System Speed Dial code for an area code and an exchange. Then when you want to dial a telephone number that begins with this area code and exchange, you can dial the speed dial code or touch the button programmed for the speed dial code, and then dial the remainder of the telephone number. The MERLIN Plus system can hold a maximum of 40 System Speed Dial codes of up to 16 digits each.
To assign System Speed Dial codes to frequently dialed telephone numbers: 1 Enter administration mode by sliding the T/P switch to P and touching Administer. 2 Dial the code (#60 to #99) that you are assigning to the telephone number. 3 Dial one of the following codes: – Dial *90 to assign the Speed Dial code.
HOW TO USE In order to use the System Speed Dial feature, you can use a speed dial code or program a button. To place a call by dialing a System Speed Dial code: 1 Lift your handset. 2 Dial a System Speed Dial code (#60 through #99). To place a call using a button programmed for a specific System Speed Dial code: 1 Lift your handset. 2 Touch the System Speed Dial button for the particular code.
If your voice terminal does not respond when you slide the Test/Program switch to T, check Section 7, "Troubleshooting," for possible causes and recommended action. Toll Prefix Setting DESCRIPTION In most telephone systems people must dial a toll prefix (a 1 or a 0) before they dial an-area code and telephone number. When the MERLIN Plus system is installed, it is set for dialing a toll prefix.
PROGRAMMING None HOW TO USE Ask your administrator whether you need to dial a toll prefix ( a 1 or a 0) before you dial an area code and a telephone number. Tones DESCRIPTION Your MERLIN Plus system or your voice terminal provides the following tones to inform you of the progress of a call you are placing or are about to place. There are also tones that let you know you are in administration or programming mode and a tone to tell you that your voice terminal is working satisfactorily.
The MERLIN Plus system also provides you with the following ringing sounds or voice announcements so that you know immediately what kind of all you are receiving.
CONSIDERATIONS None ADMINISTRATION If your responsibilities do not include system administration, skip this information. To set your system for rotary dialing: 1 Enter administration mode by sliding the T/P switch to P and touching Administer. 2 Dial *39. 3 Touch Administer. The console beeps twice. 4 Leave administration mode by sliding the T/P switch to the center position.
Touch-Tone Enable NOTE: This feature is for rotary lines only. DESCRIPTION If you have telephone lines that carry rotary signals, use the Touch-Tone Enable feature to switch to Touch-Tone signals midway through a dialing sequence. This lets you take advantage of bank-by-phone, credit card authorization, computer access, and alternate long distance services.
Transfer DESCRIPTION You can use your voice terminal Transfer button to transfer outside calls to someone else in your MERLIN Plus system. There are three ways to transfer calls: CONSIDERATIONS ● Option A—Simple Transfer You can ask the person to whom you are transferring the call if he or she wants to accept the call. ● Option B—One-Touch Transfer If you have an Auto Intercom button for the person to whom you want to transfer a call, you can transfer a call with one touch.
3 Announce the call and ask if it will be accepted. No? a Touch the held call's line button. b Advise the caller. c Hang up. Yes? a Hang up. To transfer a call using Option B, One-Touch Transfer: 1 With the call in progress, touch the Auto Intercom button of the person to whom you want to transfer the call. 2 When you hear a beep, you can announce the call, if appropriate. 3 Hang Up. To transfer a call using Option C, Direct Transfer: 1 Touch Transfer.
Transfer Return Interval DESCRIPTION When someone in the MERLIN Plus system transfers a call and it is not answered, the call returns to the sender. When the system is first installed, it is set to return calls after three rings. The system administrator can change that setting so that calls ring as many as nine times before they return to the person who has transferred it. The administrator may also choose to set the system not to return transferred calls at all.
CONSIDERATIONS If someone in the MERLIN Plus system has the Voice Announcement Disable feature programmed for his or her voice terminal, he or she cannot hear a Group Page announcement. If you use the Voice Announcement Disable feature on a 10-Button HandsFree Answer on Intercom (HFAI) Voice Terminal, you deactivate the HandsFree feature.
Accessory Equipment Once you have set up your MERLIN Plus system, you may decide to purchase additional hardware such as a headset that the system attendant can use for easier call-handling or a basic telephone that is connected to the MERLIN Plus system but which you can use off-premises. The information included in "Accessory Equipment" will help you decide what optional equipment you want to add to your system and how to use these accessories.
FIGURE 5-1 A basic telephone connected to an OPTI CONSIDERATIONS 5-66 Section 5: Reference You can also use accessories with your MERLIN Plus system that work similarly to basic telephones. These accessories include auto-dial modems, facsimile machines, credit phones, answering telephones, manual dial modems, auto dialers, and answering machines. The following devices support these accessories. ● Off-Premises Telephone Interface (OPTI)— The OPTI is intended for Off-Premises Extensions (OPX).
Once you have assigned lines to a basic telephone, be sure to provide the person using the telephone with a list of the codes for the lines he or she has access to. Basic telephones are able to receive ringing intercom calls, but not intercom calls with voice announcement. Therefore, you must program the Voice Announcement Disable feature for the telephone.
5 6 If you want to change the order in which the system selects available lines for this telephone, assign an Automatic Line Selection sequence. a While in programming mode, dial **. b Touch the line buttons in the order you want them to be selected. c When you are finished programming the basic telephone, slide the T/P switch to the center position. If you want the basic telephone not to ring on specified lines, use the Ringing Options feature.
Basic Telephone and Modem Interface DESCRIPTION The Basic Telephone and Modem Interface (BTMI) allows you to connect most types of telephone and data devices to your MERLIN Plus system, including auto-dial modems, facsimile machines, credit phones, and answering telephones. FIGURE 5-3 The Basic Telephone and Modem Interface FIGURE 5-4 A basic telephone connected to a BTMI CONSIDERATIONS The BTMI works with Touch-Tone and rotary telephones.
ADMINISTRATION If your responsibilities do not include system administration, skip this information. If you do not want the basic telephone to ring on every line, you can specify which lines ring when a call comes in using Ringing Options and programming the lines for immediate or no ring. You can also specify the order of lines for the phone by programming an Automatic Line Selection sequence. Be sure to program Automatic Line Selection only for those lines to be used by the basic telephone.
Data Collector and Printer DESCRIPTION The MERLIN Plus system Data Collector uses information from the Call Report and System Feature Report features and transmits the material from the MERLIN Plus system to a printer. You can connect the data collector to an available voice terminal jack on the control unit.
ADMINISTRATION None HOW TO USE None General Purpose Adapter DESCRIPTION With the General Purpose Adapter (GPA) you can connect to your voice terminal Touch-Tone ( not rotary ) equipment such as manual dial modems, auto dialers, answering machines, and telephone extensions (including cordless telephones). FIGURE 5-6 A basic telephone and a voice terminal connected to a GPA (back view) CONSIDERATIONS If you set the GPA to the automatic setting, you must program an Auto Answer-All.
Originating a Call Using an Automatic Answering Device ● Use the Basic Operation switch position if you only originate calls with your telephone or data device. You may also answer incoming calls using your telephone or data device. However, incoming calls ring only at your voice terminal, not at the telephone or data device. ● Use the Automatic Operation switch position for using automatic answering devices.
ADMINISTRATION None HOW TO USE To place a call using your headset: 1 Touch On/Quiet on the headset adapter. The green light next to the button goes on. 2 Dial the outside number. To answer a call: 1 Touch On/Quiet on the headset adapter. To mute the microphone: 1 Hold down On/Quiet on the headset adapter. To hang up: 1 Touch Off on the headset adapter. The green light next to On/Quiet goes off.
FIGURE 5-8 The Paging Jack on the MERLIN Plus system Control Unit CONSIDERATIONS To control the loudness of the loudspeaker paging system, including the background music throughout the building, or to turn off the background music, the system administrator can dial a code at the administrator/attendant console for the preferred volume. Background music volume can also be controlled at the music source. The MERLIN Plus system also works with talk-back paging systems. Single contact closure is included.
2 Dial one of the following codes to set the volume you prefer: – Dial *16 to turn off the background music. – Dial *17 to set the volume to low. – Dial *18 tO set the volume to medium. – Dial *19 to set the volume to high. 3 Touch Administer. The console beeps twice. 4 HOW TO USE Leave administration mode by sliding the T/P switch to the center position. You can use a programmed button or a dial code to access the Loudspeaker Page feature. To use a Loudspeaker Page button: 1 Touch Loudspeaker Page.
FIGURE 5-9 The Music-on-Hold Jack (MOH) on the MERLIN Plus system control unit CONSIDERATIONS In order to control the loudness of the Music-on-Hold and the background music for the building, the system administrator can dial a code at the administrator/attendant voice terminal for the preferred volume. The administrator can also turn off the Music-on-Hold and background music by entering a code at the administrator/attendant console. The system is factory-set for medium music volume.
3 Touch Administer. The console beeps twice. 4 Leave administration mode by sliding the T/P switch to the center position. If you want to set the volume on the background music for the building or turn the music off, dial one of the following codes: 1 Enter administration mode by sliding the T/P switch to P and touching Administer. 2 Dial one of the following codes to set the volume you prefer: – Dial *16 to turn off the background music. – Dial *17 to set the volume to low.
FlGURE 5-10 The Off-Premises Telephone Interface CONSIDERATIONS For more information about basic telephones, see "Basic Telephones." ADMINISTRATION If your responsibilities do not include system administration, skip this information. If you do not want the off-premises telephone to ring on every line, you can specify which lines ring when a call comes in using the Ringing Options feature and programming the lines for immediate or no ring.
Supplemental Alert Adapter DESCRIPTION You can connect Extra Alert Devices, such as a horn, bell, strobe, or chime, to your system so that people working in noisy or remote areas of a building can be alerted when a call rings. When you activate the Supplemental Alert Adapter (SAA) and a voice terminal rings, the adapter automatically activates the connected extra alert device, which gives a visual or audible signal that a call has come in.
ADMINISTRATION None HOW TO USE To set up your SAA: 1 Unplug the appropriate voice terminal from its modular wall jack, and plug it into the jack labeled V.T. on your SAA. 2 Plug one end of the modular cord into the jack labeled C.U. on the SAA and the other end into the voice terminal's modular wall jack. 3 Plug the modular cord from the extra alert device into the jack labeled Alerter on the SAA.
Section 6: Quick Reference Guides
Quick Reference Guide to System Administration The following table is a quick guide to administration procedures for the MERLIN ® Plus Communications System. If you need more information on a procedure than the table gives you, look up the procedure in Section 5, "Reference." Before you perform the steps given for any procedure, you first have to enter administration mode as follows: 1 Slide the T/P switch on the left side of the console to P. The red lights next to the line buttons go on steady.
Administration Procedure Make Line A and/or Line E private. Customize line assignments to a telephone. Assign Button-Free Line Operation to a telephone. Do This 1 Enter administration mode. 2 Dial *57. The green lights next to the buttons for Line A and Line E indicate their status: Green light on = privacy active Green light off = privacy inactive 3 Touch the line button until the green light indicates the privacy status you want. 4 Touch Administer. The console beeps twice.
Administration Procedure Add an entry to an allowed list. Remove an entry from an allowed list. Assign an allowed list to a telephone. Copy line assignments, call restirctions, and programmed freatures from one telephone (the source) to another (the target). D O This 1 Enter administration mode. 2 Dial the code for the right list; for lists 1 through 8 dial *01 through *08. 3 Dial the item number (01 through 10). 4 Dial the entry (up to six digits). The console beeps twice on the sixth digit.
Do This Administration Procedure Assign System Speed Dial codes to telephone numbers and account numbers. 1 Enter administration mode. 2 Dial the 3-character code (#60 through #99) you are assigning to the number. 3 Dial either: *90 to assign the code without Restriction Override *92 to assign the code with Restriction Override *88 to assign the code to an account number. 4 Dial the telephone number or account number.
Administration Procedure Set the background music volume. Set the date for call reports. Set the time for call reports. Designate a telephone jack on the control unit For call reports. Set the calls reported option for call reports. Do This 1 Enter administration mode. 2 Dial the code for the volume you want: *16 to turn off the background music. *17 to set the volume to low. *18 to set the volume to medium. *19 to set the volume to high. Or use the music source volume control instead.
Administration Procedure Set the minimum call duration for call report records. Do This 1 Enter administration mode. 2 Dial *83. 3 Dial one digit (0 through 9) for the minimum number of minutes. NOTE: Print out a System Feature Report. Program a telephone using Centralized Programming. Reset the system. 6-6 Section 6: Quick Reference Guides The system adds 10 seconds to the number of minutes you select. 4 Touch Administer. The code beeps twice. 5 Leave administration mode.
Quick Reference Guide to Administration Codes Other Numbers Administration Code *01 through *08 Feature 00 Add (or remove) an allowed list (1 through 8) to a voice terminal 01 through 10 plus telephone number digits Add telephone numbers to an allowed list (1 through 8) *12 Turn off Music-on-Hold *13 Set Music-on-Hold to low volume *14 Set Music-on-Hold to medium volume (the default setting) *15 Set Music-on-Hold to high volume *16 Turn off Background Music *17 Set Background Music to low
Administration Code Other Numbers *71 Assign voice terminals to Group Page group 1 *72 Assign voice terminals to Group Page group 2 *80 a 2-digit month, a 2-digit day of the month, and a 2-digit year Set the date for the Call Report feature *81 a 2-digit hour, a 2-digit minute of the hour Set the time for the Call Report feature *82 an intercom number of the voice terminal Set the control unit jack for the Call Report feature *83 0 through 9 (minutes) Set the minimum call duration for the C
Quick Reference Guide to Voice Terminal Features The table below acquaints you with the preassigned features that come with the MERLIN Plus system voice terminal and the features that you can program onto your voice terminal. Some features can also be accessed by using a dial code; those features are identified with a "+." For your convenience, the features in tis table are listed by function, and a brief description of each feature is provided.
Feature Name Description Preassigned or Programmable Programming Code CALL-HANDLING REPORTS Account Number Entry Programmable Dial *82 Enter an account number on a Call Report Programmable Dial *88 - an account number (up to 16 digits) or Dial *95 + a System Speed Dial code (60 through 99) Dial an intercom number with one touch Programmable Dial *91 + an intercom number Enter an account number on a Call Report (SMDR) by dialing the number or a System Speed Dial code Requires a button with light
Feature Name Description Preassigned or Programmable Programming Code PRIVACY Do Not Disturb Prevent tails from ringing while you are busy Programmable Dial *71 Programmable Dial *72 Choose the order of the lines you will get when you pick up the handset Programmable No programming code necessary; for programming information, see Section 5, "Reference" Have a line ring immediately even though it is programmed to ring after a delay or not at all Programmable Dial *78 Requires a button with li
Quick Reference Guide to Programming Codes Programming Codes *6 Other Numbers an intercom number Manual Signaling *71 Do Not Disturb *72 Last Number Redial *73 Privacy *74 Saved Number Redial *75 Auto Answer-All *76 Touch-Tone Enable *78 Ring Option override *82 Account Number Entry *85 Call Pickup an intercom number Call Pickup with One Touch *88 an account number Account Number Entry with One Touch *90 a telephone number Outside Auto Dial *91 an intercom number Auto Intercom
Section 7: Troubleshooting the System
Troubleshooting Procedures As with any piece of equipment, there are times when some of your MERLIN ® Plus Communication System parts may not be working properly. Rather than call someone immediately, you can often determine the cause of the problem yourself. Simply follow the step-by-step procedures outlined in this section. Then, with the problem identified, you can either correct the problem yourself or know from the chart who can help you correct it.
SYMPTOM: You can't place outside calls (continued). Possible Cause 3: Call Restriction feature activated on malfunctioning voice terminal. Do This Refer to Section 5, "Reference," tO learn how to administer the Call Restriction feature. Then If The feature is activated on the malfunctioning voice terminals Deactivate the feature following the instructions in Secrion 5, "Reference." Feature is not activated Go to Possible Cause 4.
SYMPTOM: You can't place outside calls (continued). Possible Cause 6: Faulty telephone company wiring. Do This If At the control unit location, find the network interface associated with the outside line from which you cannot make a call. Unplug the line cord from the network interface and, in its place, plug in a basic Touch-Tone or rotary telephone. (Do not use a MERLIN system voice terminal.) Try to place an outside call from the telephone.
SYMPTOM: A voice terminal doesn't ring. Possible Cause 1: Volume Control Switch. Do This Slide the volume control to a high setting. Then If Go to Possible Cause 2. The voice terminal still doesn't ring Possible Cause 2: Voice terminal is programmed not to ring. Do This Refer to Section 3, "Administering the system," to learn how to program ringing Then If The voice terminal is programmed not to ring Change the ringing option by following the instructions in Section 3, "Administering the System.
SYMPTOM: Trouble with voice terminal lights, speaker, and ringing. Possible Cause 1: Control Unit. Do This Slide the T/P switch on the side of the voice terminal to the T position and hold it there. If Then All the red and green lights flash alternately and a tone sounds continually The voice terminal is working properly. Go to Possible Cause 3.
SYMPTOM: Trouble with voice terminal lights, speaker, and ringing (continued). Possible Cause 3: Cable connections. Do This If Then Step 1. Go to the control unit and locate the intercom jack for the malfunctioning voice terminal and an intercom jack for a working voice terminal. Unplug both from the control unit and replug each into the other's jack See if the trouble occurs on the working voice terminal.
SYMPTOM: A voice terminal rings constantly. Possible Cause 1: Voice terminal T/P switch isn't in the center position. D O This Check T/P switch position. If Then It is set at either T or P Slide it to the center position The T/P switch is in the center position Your voice terminal is faulty. Unplug it from the modular jack and contact your equipment supplier for assistance. SYMPTOM: All voice terminal lights are out; none has a dial tone. Possible Cause 1: Control unit is not receiving power.
SYMPTOM: All voice terminal fights are out; none has a dial tone (continued). Possible Cause 3: Faulty power outlet. Do This Test the outlet by plugging in an appliance such as a lamp or a radio. If Then The appliance doesn't work The outlet is faulty. The appliance works Go to Possible Cause 4. Possible Cause 4: A module is loose. Do This Set the control unit power switch to Off. NOTE: You will damage the modules if you don't turn the power off.
SYMPTOM: Programmed voice terminal feature doesn't work. Possible Cause 1: Feature is programmed or being used incorrectly. Do This If Review the programming instructions in Section 5, "Reference," to make sure the feature is programmed correctly, and the user instructions for the feature in the MERLIN Plus System Training Manual to make sure it is being used correctly. The feature is programmed correctly and the feature still doesn't work Then Go to Possible Cause 2.
General Test If you are experiencing a problem other than those described in the previous tests, try the following procedure before calling your equipment supplier. SYMPTOM: System not working; trouble not described in above procedures. Possible Cause 1: The control unit may need to be reset. Do This Set the control unit power switch to Off and then back to On. If The trouble remains Then Go to Possible Cause 2. Possible Cause 2: A module may be loose. Do This Set the control unit power switch to Off.
Section 8: Installation
MERLIN Plus System Installation INTRODUCTION This section contains technical reference material for a MERLIN® Plus Communications System installer. For more detailed information on wiring, installing, adding accessories to, and upgrading your MERLIN Plus system, order the MERLIN ® Plus System Installation Manual from your equipment supplier. Figure 8-1 illustrates system connectivity.
FIGURE 8-2 Typical MERLIN Plus System Grounding Plan The control unit, the CO line protector, and the ac power service panel should be as close to each other as possible in order to provide a protected and grounded system. If equipment is spread throughout a building, the National Electric Code requires that the ground point for the CO line protector must be bonded to the ac power ground.
Mounting the Control Unit The control unit is designed to be wall mounted 6 inches above the jack field that is centered beneath it in two columns. The slots at the bottom of the control unit provide for simple, neat cord management.
CONNECTING THE CONTROL UNIT Before connecting the control unit to the system, you must be sure of the following: ● The building wiring is completely installed. ● The jack field labels correspond with the distant end location. ● The distant end labels correspond with the jack field labels (optional). ● The network interface labels have the correct telephone numbers. FIGURE 8-4 Connecting the Control Unit Make sure the control unit power is off before connecting system wires.
CO Line Wiring 1 Label each line cord running from the network interface to the control unit (A through H). 2 Plug the unlabeled end of each line cord into the corresponding control unit line jack. 3 Plug the labeled end of each line cord into the appropriately labeled jack at the network interface. I For future reference, you may want to make a copy of all the assignments that are labeled at the jack field.
Table 3-1 Wiring Parts Cross Reference Apparatus Code Description PPEC 61400 2750-D14 2750-D08 2750-D07 Net Intf Adptr Net Brdg Adptr 61407 NI/CU Mod Cord CU Jumper Cord Cbl Strp Tool 1000 ft 4-Pr Cable 61208 32910 2122C Apparatus Box 2A Adapter Mounting Z601A Adapter Z610A Adapter 267C Adapter 267A2 Adapter 103A Corm Block 102A Corm Block 65B Faceplate D2R-29 Cord 7 ft D8W-87 Cord 2.
Table 6-3 CO Line Wiring, 6-Position Jack, Single-Pair RJ11 NI Specification Signal Pin T 4 R 3 Color D2R Cord CU Line Jack Plug Plug Pin Signal GREEN 4 3 3 T RED 3 4 4 R Table 6-4 CO Line Wiring, 6-Position Jack, Two-Pair RJ14 NI Specification Signal Pin Color 267A2 Adapter 267C Adapter Plug Jack 1 Jack 2 Plug Jack Pin T1 R1 4 3 GREEN RED 4 3 4 3 4 3 4 3 1 4 3 T2 R2 2 5 BLACK YELLOW 2 5 2 5 2 5 2 5 2 4 3 Table 8-5 CO Line Wiring, 6-Position Jack, Multipair
TYPICAL MERLIN PLUS SYSTEM WIRING The figure below shows a typical wiring installation for a MERLIN Plus System. Local telephone lines connect with system wiring at a network interface. Voice terminal wiring connects to the control-unit through building wiring and a jack field. Table 8-6 lists the material needed for the sample configuration shown in Figure 8-5.
Table 8-6. Material List for 8 Telephones and 3 Lines Voice Terminal Wiring Item Qty 3 3 5 1 2 8 8 102A Connecting Block (1 shown) 65B Faceplate (1 shown) 103A Connecting Block (1 shown) 1000 ft Cable Spool, DIW Z122C Apparatus Box Z601A Adapters D8W Cords, 2.
FCC REGISTRATION AND REPAIR INFORMATION This equipment is registered with the FCC in accordance with Part 68 of its rules. In compliance with the rules, you are to be advised of the following: 1 Means of Connection: Connection of this equipment to the telephone network must be through several standard network interface jacks: USOC RJ11C or RJ14C, or a multiline network interface cable and connector USOC RJ21. You can order these from your local phone company.
Index A Abbreviated Ringing, 5-4 using, 5-4 Accessory equipment, 5-85 – 5-101 Account Number Entry, 5-4 – 5-7, 6-10, 6-12 administering, 5-5 assign System Speed Dial codes to account numbers for, 6-8 with Call Report, 5-21 with One Touch, 6-12 with System Speed Dial, 5-72 maximum number of characters available, 5-5 programming, 5-4 using, 5-6 – 5-7 Account Number Entry button, 5-4 programming, 5-6 using, 5-6 Account numbers, assigning system speed dial codes to, 2-17, 6-4 on call reports, 2-18 Administer, d
C Call Pickup, 5-17, 5-19 – 5-21, 5-29, 5-48, 6-12, 6-9 with One Touch, 6-12 programming, 5-19 – 5-20 using, 5-20 using a Call Pickup button, 5-19 using a dial code, 5-19 using a One-Touch Call Pickup button, 5-19 Call Pickup button, 4-10, 5-48 Call Report, 2-4, 2-17, 2-18 – 2-19, 5-21 – 5-24, 5-68, 5-69, 5-73, 5-74, 5-91, 6-10 Account Number Entry, 5-21 administering, 5-22 – 5-24 control unit jack assignment, 5-23, 6-5 general method of entering an account number, 5-4 maximum number of characters available
H Handling Calls, 4-5, 4-10 Hands-Free Answer on Intercom, 5-35 – 5-36 using, 5-36 Hands-Free Unit, 5-11 with Auto Answer-Intercom, 5-11 Headset, 4-1, 4-5, 5-93 – 5-94 using, 4-10, 5-94 Headset Adapter, 4-10, 5-93 – 5-94 HFAI button, 5-41 HFAI/Mic button, 5-41 Hold, 5-18 Hold Retrieve, 5-18, 5-37 – 5-38, 6-9, 6-12 programming, 5-37 using, 5-37 – 5-38 Hold, 1-5, 5-17, 5-36, 5-38, 5-41, 5-66, 5-81 in Personal Speed Dial, 5-53 with Outside Auto Dial, 5-50 with System Speed Dial, 5-73 using, 5-36 How to Use Thi
N Night Service, 4-5, 4-10, 5-47 – 5-48 administering, 5-48 programming, 5-48 using, 5-48 No Ring, 5-51, 5-60 .
Ringing Options, 4-5, 4-9 – 4-10, 5-15, 5-17, 5-51, 5-58, 5-60 – 5-61, 5-87, 5-88, 5-90, 6-11 with copy, 5-28 Delayed Ring, 4-9 – 4-10, 5-60 Immediate Ring, 4-9 – 4-10, 5-60 No Ring, 4-9 – 4-10, 5-60 with Off-Premises Telephone interface, 5-99 programming, 5-60 – 5-61 using, 5-61 Ringing tone, 5-77 Rotary dial signals, 2-3, 5-66, 5-73 Rotary dialing, 6-1 setting the system for, 6-7 Rotary lines, 5-77 Rotary service, 7-1 Rotary telephones, 5-89 S Saved Number Redial, 5-40, 5-48, 5-61 – 5-62, 6-10, 6-12, 7-2
Toll prefix, 2-3 dialing. 6-1 setting the system for, 6-7 Toll Prefix Setting, 5-76 – 5-77 administering, 5-76 using, 5-77 Tones, 5-77 – 5-78 using, 5-78 Touch-Tone dialing, 6-1 resetting the system for, 5-79 setting the system for, 6-7 Touch-Tone Enable, 5-79, 5-80, 6-9, 6-12 with Outside Auto Dial, 5-50 in Personal Speed Dial, 5-53 programming, 5-80 with System Speed Dial.
Warranty AT&T warrants that this product will be free from defects in material and workmanship on the dare of your purchase, and that it will repair or replace, at its option, without charge for parts or labor, the product if it fails to work, provided that the defect is reported to AT&T within one year of your purchase. If AT&T determines that any defective product cannot be replaced, it may refund your purchase price.
999-507-144