
Specifications


Overview
THE ATTENDANT
CONSOLE
As your company’s system attendant, you will probably answer most calls
that come into the business and transfer many of those calls to other people
in the office. This section includes descriptions, instructions, and suggestions
that will help you transfer calls and use Auto Intercom buttons and Group
Page features, the Send Message feature, and the headset. For more
information about any of the MERLIN@ Plus Communications System
features discussed here, refer to Section 5, “Reference.
It
The main attendant console, plugged into jack 10 on the control unit, also
serves as the administration console. All of the company’s lines appear on
separate buttons on this console.
It is important, especially if you answer
most of the incoming calls, that as the attendant, you have an Auto Intercom
button with lights for each voice terminal in the system. Therefore, most
attendants use a BIS-34 or BIS-34D model voice terminal that has enough
buttons for lines and Auto Intercom buttons. When you plug in your BIS-34
or BIS-34D model voice terminal into intercom jack 10 on the control unit,
your console automatically has a button for every line and an Auto Intercom
button for every voice terminal in the system.
If you are using a BIS-22 or
BISZD
voice terminal as an
administrator/attendant console,
all
the lines to which your system has access
will appear on separate buttons on your voice terminal, but you may not have
an Auto Intercom button for each person’s voice terminal in your system.
Therefore, when you want to place an intercom call or transfer a call, you
may need to dial the person’s intercom number rather than use an Auto
Intercom button.
NOTE:
Since the BIS-10 voice terminal does not have separate buttons for
outside and Auto Intercom lines, its use as an attendant console is
severely limited and so not recommended for that use.
Since the BIS-22 or BIS-22D voice terminal may not have Auto Intercom
buttons for every voice terminal in your MERLIN Plus system, you may need
to use the special procedure described in “Using the Send Message Feature”
in this section to turn on the Message light at the voice terminal of the person
who has a message waiting.
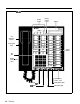
Figures 4-1 and 4-2 on the following pages are illustrations of the BIS-34D and
BIS-22 voice terminals respectively.
Look at the picture of the type of voice
terminal that you are using and check the location of the buttons and the dial
pad.
If you need to check the initial button assignments for any voice terminal with
34 buttons to be used as an administrator/attendant console in regular
call-
handling mode, see Section 3, “Administering the System.
”