
Specifications


4
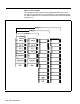
To make the line Button Free, dial one of these two codes:
D
Dial
*31
if you want the voice terminal to ring.
The green light next to the Auto Intercom button flashes rapidly.
D
Dial
*32
if you do not want the voice terminal to ring.
The green light next to the Auto Intercom button
flashes slowly.
5
Touch Administer.
The console beeps twice.
6
Continue with administration, or leave administration mode.
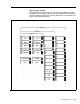
LINE ASSIGNMENTS FOR
The four Automatic System Access
(ASA)
features require the assignment of
ASA FEATURES
incoming lines and one requires the additional assignment of outgoing lines.
Call Forwarding (CF)
If there is an “I” and an
“0”
entered under two lines in this row, perform the
following procedure to administer the incoming and outgoing call forwarding
lines:
1
Enter administration mode.
The red lights go
on
next to
Administer
and
Restrict.
2
Dial the code for the type of line group you want to administer:
w
Dial
*51
for a Call Forwarding incoming line group.
w
Dial *52 for a Call Forwarding outgoing line group.
3
Touch the line buttons until the green lights show the assignments you
want to each line group.
Green light on
=
line is assigned to the group
Green light
off
=
line is not assigned to the group
4
Touch Administer.
The console beeps twice.
5
Continue to administer the system, or leave administration mode.
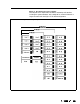
If you entered a number other than 2 in the “Ring Interval” column for call
forwarding, follow the procedure below to change the ring interval for
incoming CF calls:
1
Enter administration mode.
The red lights go
on
next to
Administer
and
Restrict.
2
Dial
*762
plus the number of rings (0 through 9).
NOTE:
If 0 is selected, the voice terminal will not ring, and calls will be
forwarded immediately.
3
Touch Administer.
The console beeps twice.
4
Continue to administer the system, or leave administration mode.
If you put a telephone number in the column headed “Modify Message” for
Call Forwarding, follow the procedure below: